Masking: the portrait photographer’s best friend

Ever take several photos of a group, but none of the shots show everybody looking at the camera, eyes open, with a smile on their face? The more people you add to the shot, the more likely this is to occur. Recently I shot a wedding, and although most of the shots came out well, one of the critical portraits (the wedding couple with the bride’s parents) did not turn out. There wasn’t a single frame with everybody looking their best.

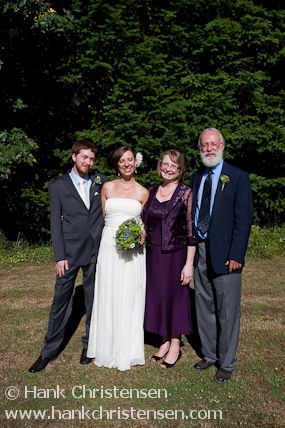
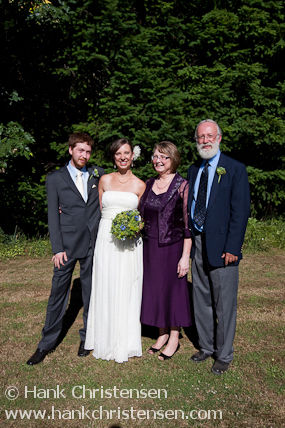
The photo on the left was the best shot, but the mother of the bride was looking away from the camera. Because I knew I liked the picture except for this one problem, I hunted through the rest of the similar shots and found the photo on the right. Ordinarily, it would be a throw-away, particularly because the bride is blinking. But the mother of the bride’s expression is perfect.
Good shot, but mother of the bride is looking away from the camera
Mother of the bride is smiling at the camera, but bride's eyes are closed

So now that I have both pictures that I want to combine, how do I do it? First, I open both images in Photoshop (for this example, I will be referring to CS4, but the same technique can be used in CS3). Using the Move tool, I drag one image on top of the other image. This will create a second layer, giving the second image two layers, one with each original image.

Or, if you are using Lightroom, all of the above can be skipped by selecting both photos, and clicking the menu item Photo->Edit In->Open as Layers in Photoshop…

Now that both images are stacked as separate layers, I select both layers in Photoshop and click the menu item Edit->Auto-Align Layers. This is a crucial step in making sure everything blends nicely between both layers when I merge them later. Next, I make sure that the image I want to keep (the left image above) is the top layer, and I add a layer mask (by clicking on the rectangle with the small circle icon at the bottom of the Layers palette). I make sure that black is selected as the foreground color.

With the top layer selected, I use the paint brush tool to paint the photo in the places that I want the bottom layer to show through. In this case, I painted in the mother-of-the-bride’s head. The head from the bottom layer appeared in the top layer, creating the fixed photo below:

Fixed portrait with everyone looking great

If the two photos you are merging have only small differences, the above method can be a great and more natural looking alternative the more traditional approach of selecting from one image and pasting into another.

Pre-visualizing the shot

You’ll often hear professional photographers talking about “pre-visualizing” the photos that you want to take. Abstractly, this makes sense – instead of going out for the day and just snapping what you see (many people can now do this with their phone cameras that they have with them all the time), you think about specific photos that you want to capture, and then go about creating them. Sounds great, but how does it actually work?

With landscape photography, if you don’t pre-visualize a photo that you want to create, you’ll end up driving around all day looking out the window of your car until you happen to get lucky – being in the right place at the right time. This can work well for you, especially if you have unlimited money for gas and many years to spend driving around! Let’s put this into practice. Let’s say I want to capture a shot of the sun reflecting across the ocean. I live in California, so that means sunset. Looking at a calendar will give me the exact time to be there. Now I have my time, but what about place? Do I want cliffs dropping into the ocean with the sun lighting them? Do I want a wide beach with waves? Do I want the smooth water of a bay or inlet? Do I want strong foreground elements like smooth boulders or footprints in sand, or jagged rocks jutting out of the sea? First I answer these questions, and then do some research. Obviously the internet is a great tool for finding reference shots of specific places, but topographical maps or applications like Google Earth can help immensely.

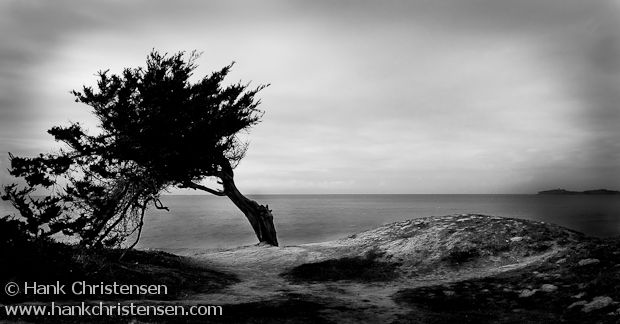
Here is a shot in which pre-visualizing the photograph that I wanted played an essential role in the success of the photo. It was a dark, overcast, winter day and the wind had picked up. Definitely the kind of day that you cozy up by the fire with a good book. I wanted to create a photograph to capture how I was feeling – something moody, black and white, and dramatic. Kerry and I decided to head to the coast and enjoy the cold and solitude. Half way into our walk I saw a subject that perfectly communicated what I was feeling – a bent over lonely tree on a sea cliff, struggling against the wind.

Tree and sea cliff silhouette, Half Moon Bay, California

I knew when I took the picture that I was only part of the way to my imagined image. The rest would come in post-processing by converting to black and white, adjusting the levels to really silhouette the tree, and burning the edges of the photo to accentuate the drama of the incoming storm. The result conveyed everything I thought about before I left home. Sometimes it is great fun to head out with a camera and no expectations of what I will find – often times I am happily surprised. But for anyone intent on improving their photographic skill and taking a large number of successful photos, pre-visualization is an important component.

To HDR or not to HDR

Sometimes capturing a scene that has very bright and very dark areas with a camera can be impossible, because both film and the digital sensor can resolve fewer stops of light than the human eye. Traditionally, this limitation was overcome by using a graduated neutral density filter, which darkened the bright portions of the scene to allow the film to expose the entire scene correctly. With the advent of digital technology, there has been a trend to move instead to post processing and digital manipulation to achieve similar results.

HDR (or High Dynamic Range for the uninitiated) has been sweeping the digital photography world for the past couple of years, mostly thanks to some new software that makes creating these images easy. The goal is simple: use several shots of the same scene at varying exposures to create a single image with a greater dynamic range (the range between pure white and pure black) than your camera can capture. Unfortunately, this goal is usually not achieved with results that look correct to the human eye. The final images appear flat and with low contrast, and the colors tend look almost cartoonish. This can be overcome to some degree by increasing the black level and overall contrast – however correcting the color issue is difficult.

The solution is to go back to digital basics. Instead of letting software automatically combine 3 or more shots at different exposures, combine 2 or more images yourself in an application such as Adobe Photoshop using stacked layers and various blending techniques. Photographer Glenn Randall covers some of these techniques and the principals behind them in his recent article for Outdoor Photographer magazine. The images below demonstrate using image blending verses an HDR software approach.

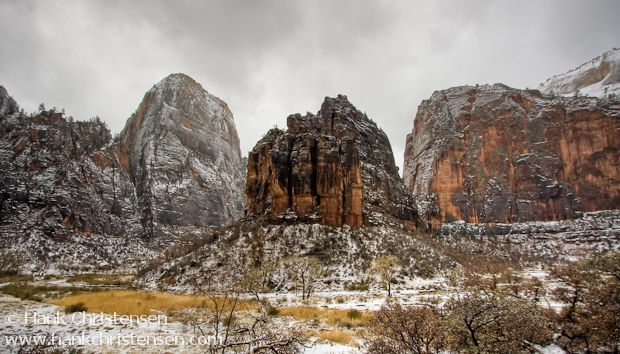
High Dynamic Range photo of Zion National Park
High Dynamic Range photo of Zion National Park, combining three images shot at different exposures

The above image was created by blending three photographs of different exposures together using software. Once this was done, the contrast was increased significantly. However, as you can see, the colors still look unnatural, with too much yellow in the rock. In addition the two rock faces in the background are washed out.

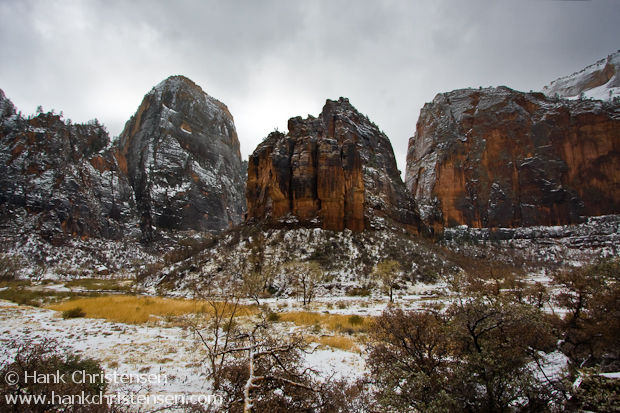
The image below combines two the the images used to create the previous image. The foreground and mountain were exposed with no evaluative metering compensation. The sky was exposed in a second shot at -1 stop, and blended into the foreground using a graduated mask. The result is more natural looking.

Dramatic cliffs rise above a snowy riverbed with foreground trees, Zion National Park
Two images of Zion National Park blended together using a gradient mask

Some people like the aesthetic of HDR images, and that is great. It brings a new artistic flair to the world of digital photography. But since I am usually trying to create a final photograph that accurately portrays what I see in nature, using the blended approach often works better for me.

Copyright 2017 Hank Christensen