Going Macro With A Big Lens

Don’t get me wrong – I love my big lens. My primary lens for bird photography is the Canon 800mm, which serves as a real workhorse. However, there are times while using that lens that I get frustrated. One of the lens’ limiting factors is its minimum focus distance. I can’t bring any subject closer than 16 feet into focus, which means that very small things (for example, hummingbirds) still appear fairly small in frame. What to do about this limitation? Enter the extension tube!

An anna's hummingbird pauses from its rapid flight to warm itself in the sun
An anna’s hummingbird pauses from its rapid flight to warm itself in the sun

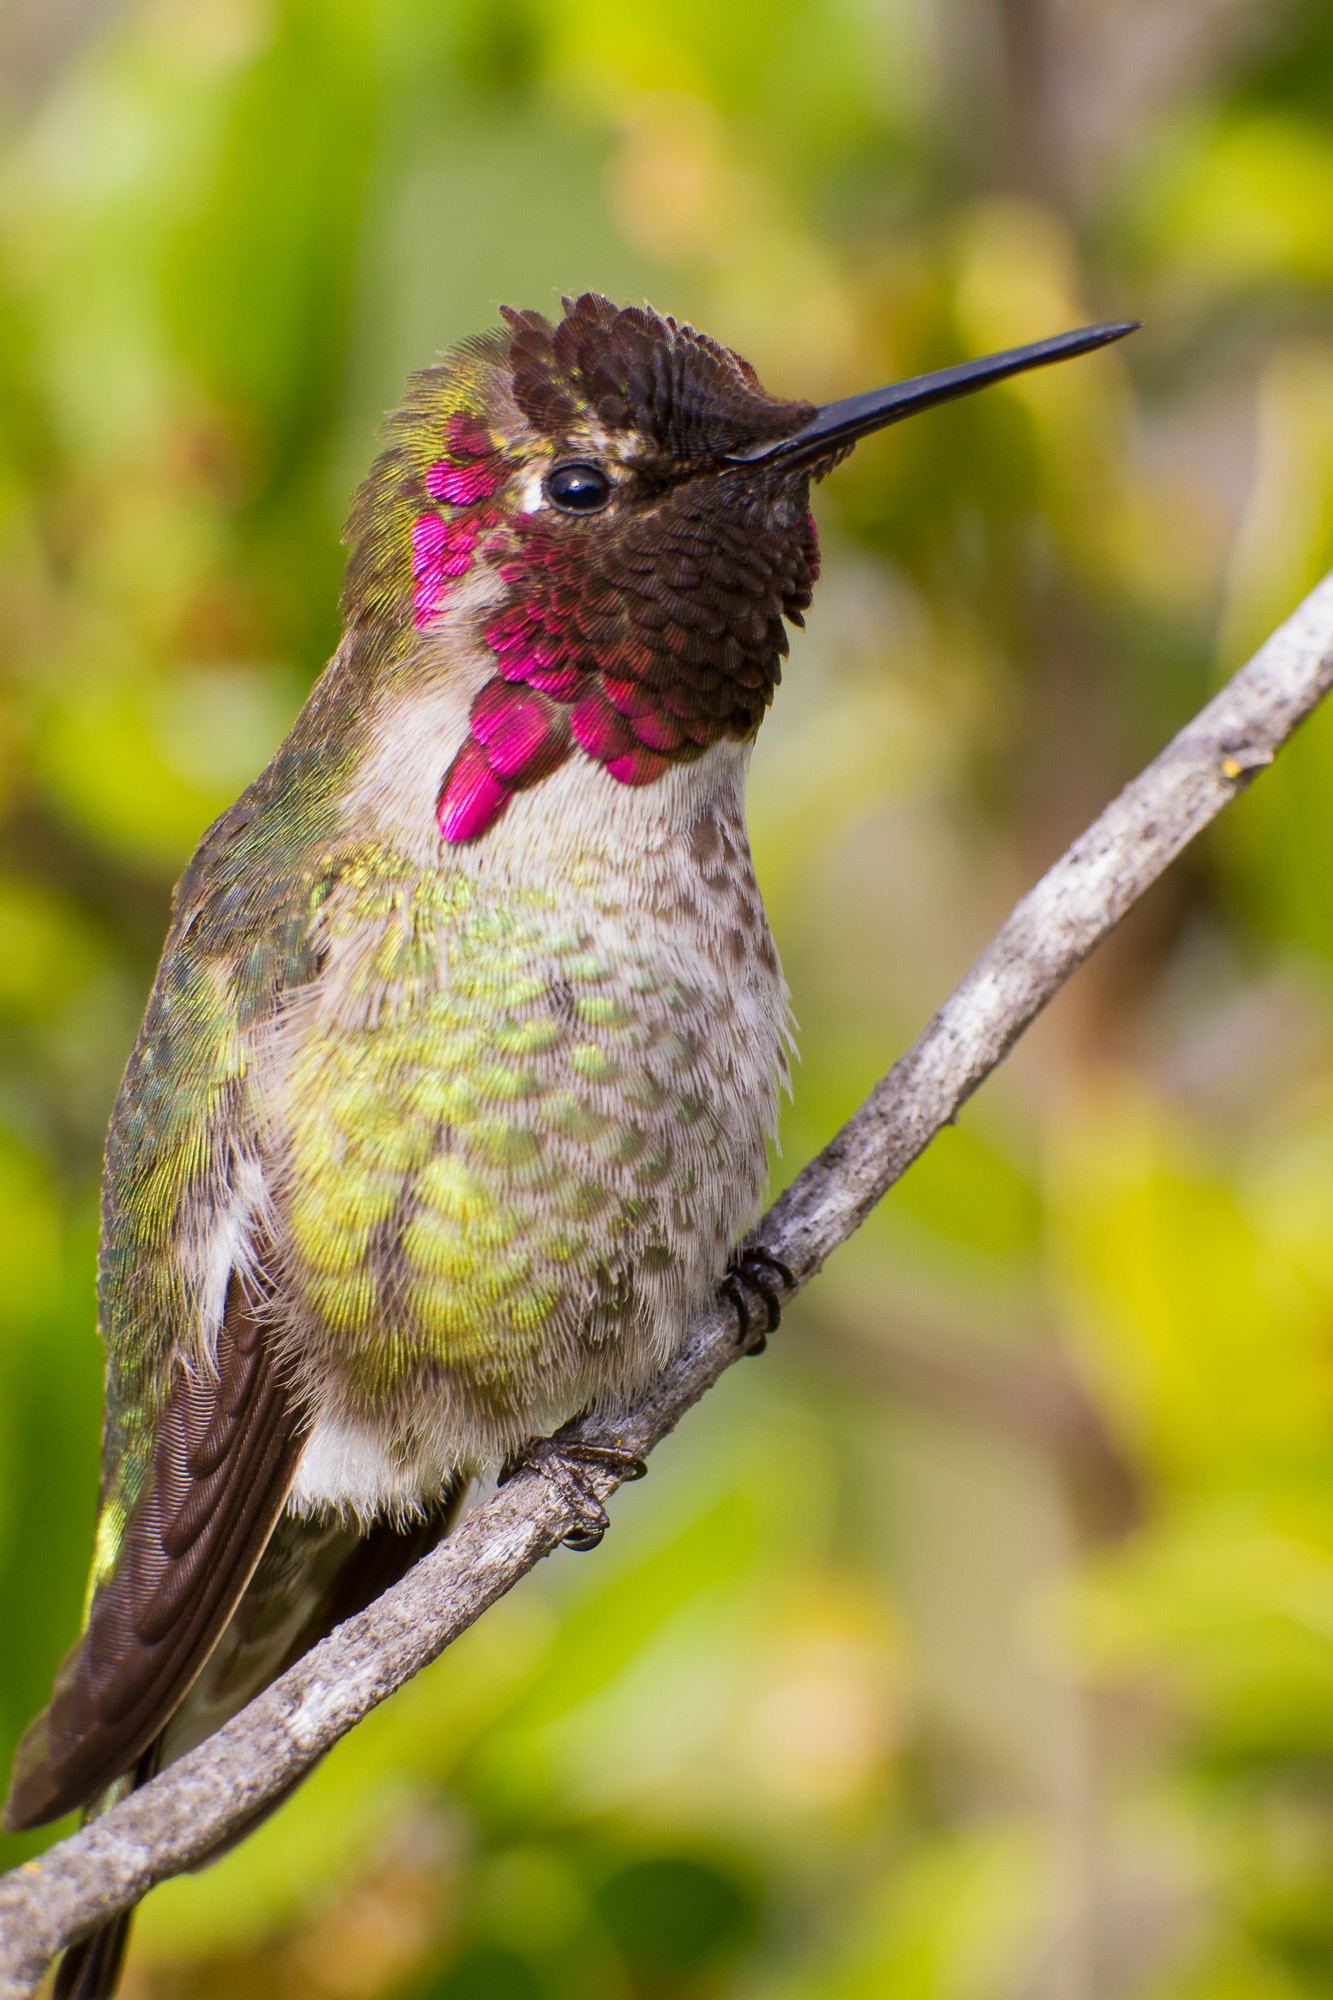
Recently I took an out of town colleague to some of my favorite local bird sites. We found an area rife with anna’s hummingbirds, zipping this way and that, and generally causing a ruckus as they battled each other over territory. I took some shots, but couldn’t get close enough to these little creatures to fill the frame. I resolved to come back the following day, this time armed with my full array of extension tubes.

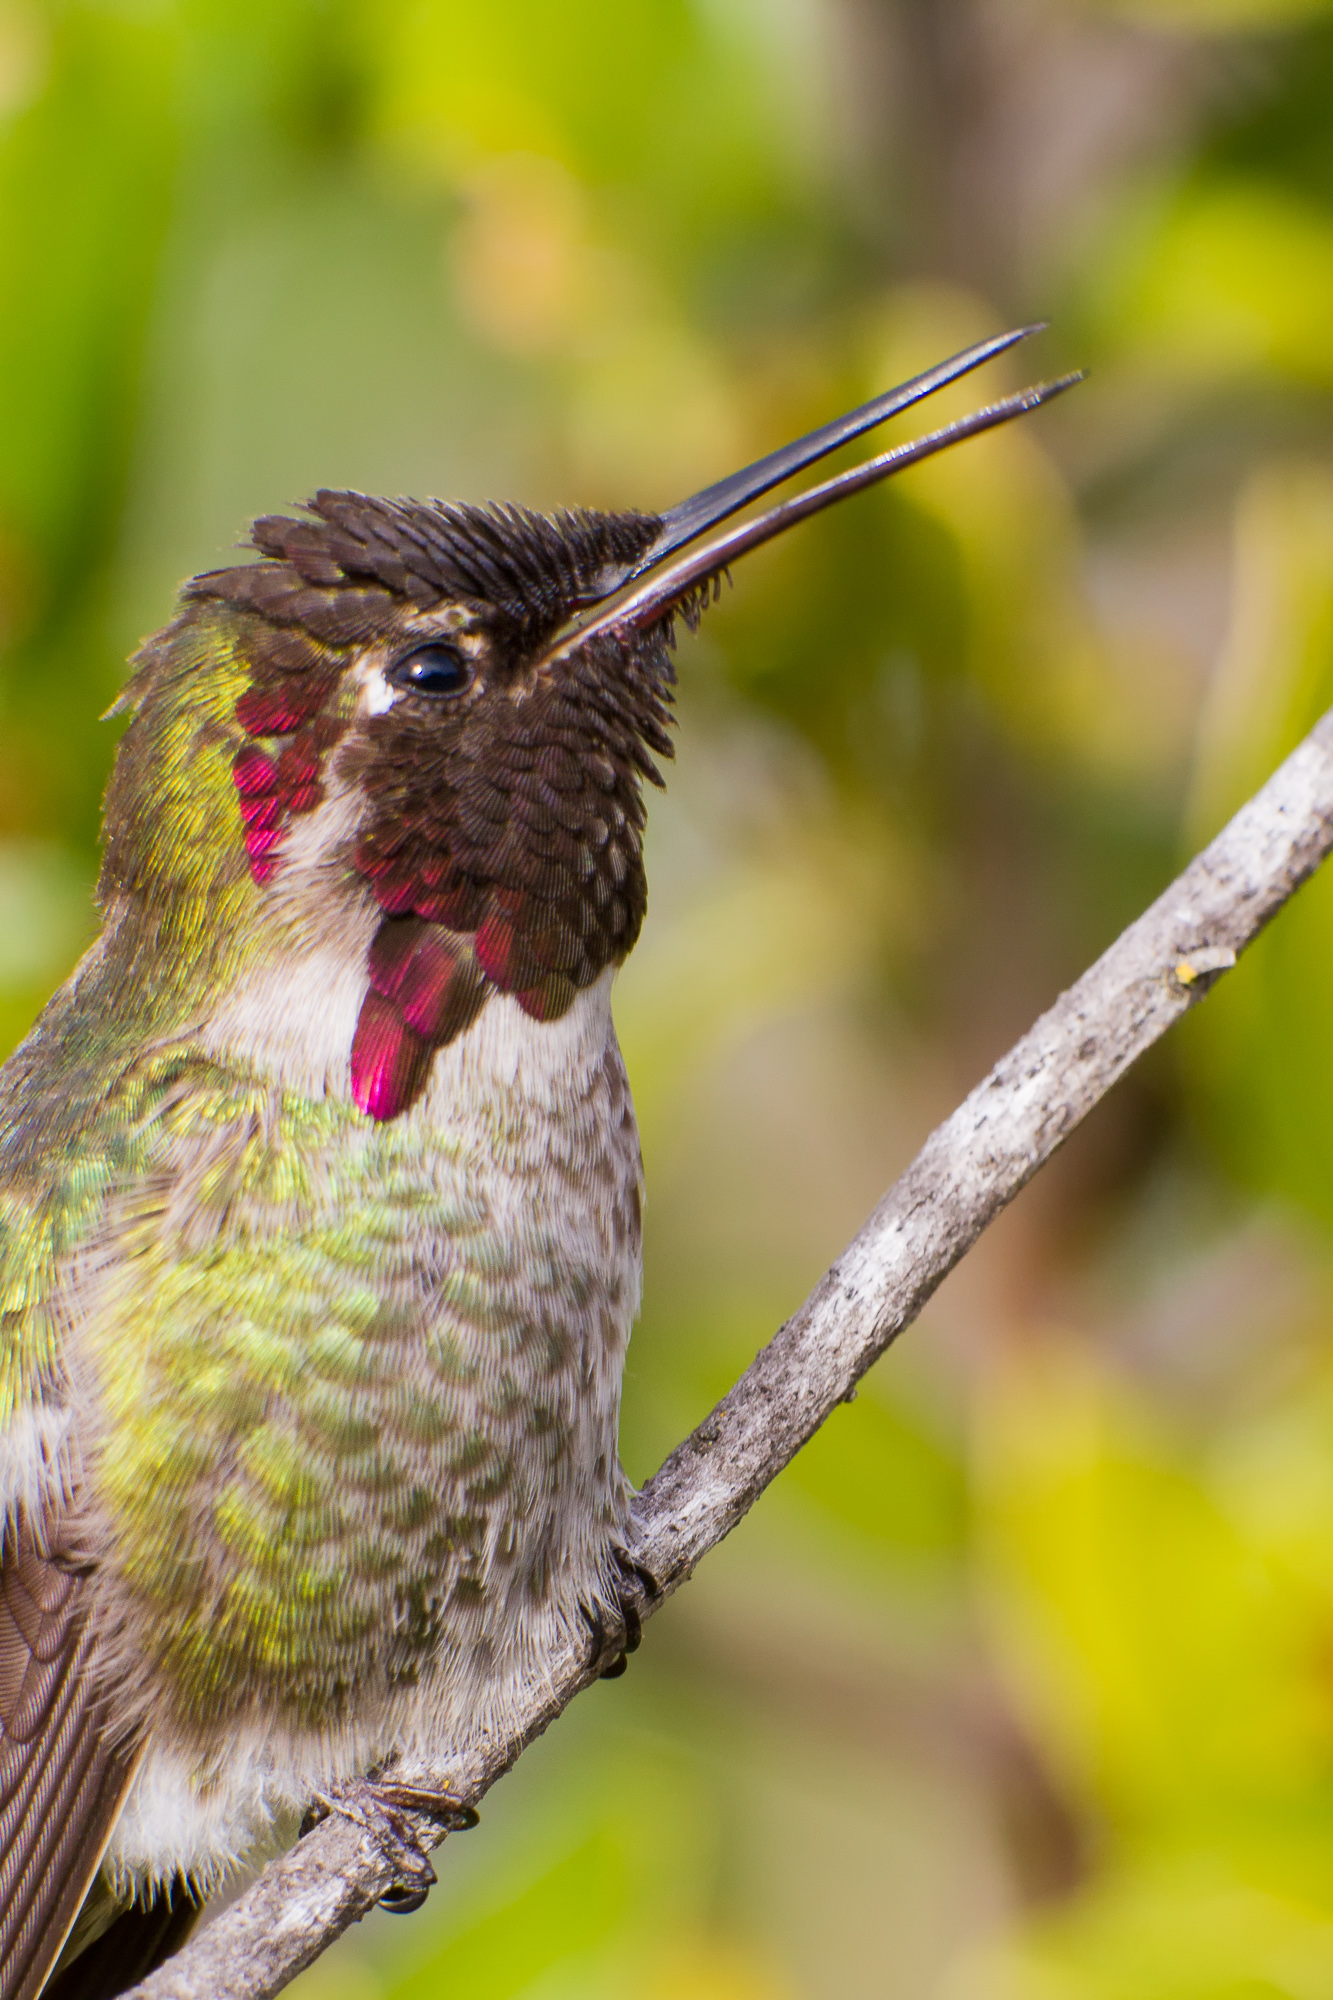
Luckily the hummingbirds were still there, sparring and resting, and this time in beautiful light. I wanted to get as close as possible, so I stacked three tubes together and placed them in between my camera body and lens. This allowed me to get as close as about 10-12 feet away from the birds, finally filling my frame. Creeping closer yet, I wanted to push my extension tubes to their limit, and was able to get the image below.

An anna's hummingbird perches on a small branch and opens its beak
An anna’s hummingbird perches on a small branch and opens its beak

Extension tubes have no optics in them, and can even be in the form of cardboard – no electronics required! My tubes happen to have small contacts that still allow me to use my lens’ autofocus system, albeit much slower than normal.

The principal of an extension tube is to move the rear focusing element of the lens further away from the focal point, which in today’s world means the camera’s digital sensor. The effect is that the lens’ minimum focus distance is reduced, allowing the entire rig to move closer to the subject while keeping it in focus. The downside is that with extension tubes attached, the lens will no longer be able to focus to infinity.

In comparison to most photography gear, extension tubes are relatively cheap. I have a set of Kenko tubes that stack together. If you ever want to dabble in macro photography, I recommend first getting a (cheap) set to tubes before spending bigger bucks on dedicated macro lens. Yes, the macro lens will give you better quality, but a set of extension tubes will allow you to bring your entire collection of lenses into the macro world.

Eye Of Stone

Petrified sandstone forms in layers of design along the walls of Mosaic Canyon, Death Valley National Park

This week’s photos are late-comers to the blog from my recent Death Valley trip. They are sandstone detail shots taken near the mouth of Mosaic Canyon, shot mid-day under a partially cloudy sky. The patterns of the canyon were really wild – these are just a sampling of the swirling colors and carved shapes.

In order to get the colors of the sandstone to really show, I needed full shade – here direct sunlight was not my friend. I would have preferred a cloudier day, but one must work with what they are given. As it was, I was forced to shoot only the side of the canyon that was in shade, and that shade was disappearing by the minute as the sun moved directly over the canyon opening. As the sun crept up the wall that I was shooting, I began to wish for a large shade (and an assistant to hold it too!)

Petrified Sandstone ripples in layers along the wall of Mosaic Canyon, Death Valley National Park

Use What Ya Got

A yellow garden spider waits patiently on its web for prey to get caught

Throughout the year, we see these yellow garden spiders spinning their webs around our front garden. I came across this nice specimen and wanted to capture him on my camera. However, lacking any real macro gear, I had to figure out how to make do with what I did have on hand. If I had my choice of any equipment I wanted for this shot, I would have used:

1. A small tripod with a swing arm (to get close to the web which was inconveniently placed between some hard-to-reach plants)
2. A Canon 180mm macro lens (so I could keep my distance from the creepy spider)
3. A focusing rail (to achieve that manual pin point focus on the beast)

However, I had none of that. What I did have was a 100-400mm zoom lens (non-macro). None of my tripods work work well in this area because of the spacing of the plants, so I was stuck hand-holding. In order to increase the magnification, I was able to reduce the lens’ minimum focusing distance using 3 stacked extension tubes. This allowed me to move the lens closer to the subject, filling the frame with only the spider.

Because I was not using a tripod, I had to keep the shutter speed relatively fast. That meant a larger aperture, and a smaller depth of field than I would have otherwise used (f/8 in this case). In order to compensate, I decided to try the digital technique of focus stacking to achieve the look of a larger depth of field. This image is actually a composite of two shots – one focusing on the spider’s abdomen, and the other focusing on the legs. The sharpest part of each image was blended together.

So, after all applying all these work-arounds, what is the moral of the story? Get some decent macro equipment! 🙂

Creativity tip #2 – Go small

Dew stands out on the petals of a princess flower (Tibouchina)

Tip number two in the creativity series is to enter the world of macro photography. If you ever feel that your photography is getting stale, or would just like to try something new, think about taking photos of life’s smaller members. You need the following to get started:

1. Your camera. Whatever you normally use – point and shoot, SLR, whatever.
2. At least 1 hour of uninterrupted time. This should give you some time away from your normal day to think and let the creative juices flow.
3. A confined space (a backyard works well). You should limit the area you cover so that you are really forced to see this space in a different way.

In abstract, macros of flowers can create unusual patterns

Your goal is see your designated area with an eye toward the details. Get down on the ground to get eye-level with a rock. Move in close on that flower petal. Capture the veins of a leaf. Many point-and-shoot cameras have a macro mode (look for the icon of the flower) that will allow you to focus closer than normal. For SLR users, if you don’t have a dedicated macro lens, you can employ the use of an extension tube in between your lens and your camera body (I use a set of Kenko tubes). This moves the focal point of the lens further away from the film plane or sensor, essentially allowing you to focus your lens closer to your subject than its normal minimum focal distance.

Sunlight shines through the backs of blades of grass

Don’t be discouraged if you get bored after the first half hour or so. It is after this point that you will really start to reap the benefits of this forced creativity. At this point, think about new angles on old subjects. Shoot your house as an ant might see it by peaking your lens between blades of grass. Capture some detail of an ice cube melting in the sun. Whatever you do, think outside the box. Your hour will be up before you know it, and you should walk away with some pretty intriguing photographs.

Rain drop remain on the broad leaf of a calla lily after a passing storm

Copyright 2017 Hank Christensen