


May you and your loved ones have a joyous and rejuvenating Easter. Here are a few spring chicks to help welcome the coming of spring.


May you and your loved ones have a joyous and rejuvenating Easter. Here are a few spring chicks to help welcome the coming of spring.
Adobe just released a photo and text composition app called Slate. Its purpose is to allow quick and easy creation of stories composed of photos and text. I decided to give it a try, and created a post about the color diversity of Death Valley National Park. Click here to give it a try. It is optimized for mobile, so be sure to try it on your phone or tablet. Let me know what you think in the comments below. Want to see more posts in this format, or is a simple blog post more accessible?
As a photography blogger, I oftentimes get more caught up with the latest gear that was used to create a photo rather than the substance of the photograph itself. But when the focus shifts to meaningful subject matter and creativity, all pixel count, ISO performance, and frame rate melt into the background. Meaningful photographs can be created with almost any gear. In order to succeed here, the emphasis should be on photographer intent and how well the photographer conveys that intent.

Recently I welcomed the arrival of my nephew Jake with a quick photo session when he was four days old. Due in part to the latest technology of my gear, I was able to capture high quality photographs without much disruption to little Jake or his parents. I was able to use natural light, a quiet shutter, and a fast frame rate to capture those fleeting expressions of a newborn.

When I first started photographing regularly, I thought of myself as an explorer, both of the technology I was using and of the world around me. Seeing through a variety of lenses provides many different perspectives of the world, and being able to record those perspectives provides avenues of endless creativity and communication. I first had to master my tools before I could really concentrate on the art. As I improve (I like to always think of myself as improving!) I find myself thinking more about the meaning behind the pictures I am creating, and what I am trying to communicate to the viewer.

Don’t get me wrong, when taking these photos of baby Jake I was using many techniques I’ve learned over the years. But much more important than how I achieved the photos are the photos themselves. These photos will serve both as a keepsake for family members, and as a lasting record of Jake as he appeared as a newborn. I’m sure there will be tens of thousands of photos taken of Jake in his lifetime. Most will become a visual record of his life, but it is those most meaningful photos that will have lasting impact to those who love him.

The next time you are out shooting, whether you are capturing a beautiful sunset, a wild creature, or a portrait of a loved one, think about the message you are trying to convey in your image. If your answer is “I am creating a beautiful scenic”, that is a great answer. But over time, you might find a deeper message creeping into your work. I know I keep striving to find my meaning and connect with the viewers of my photographs.
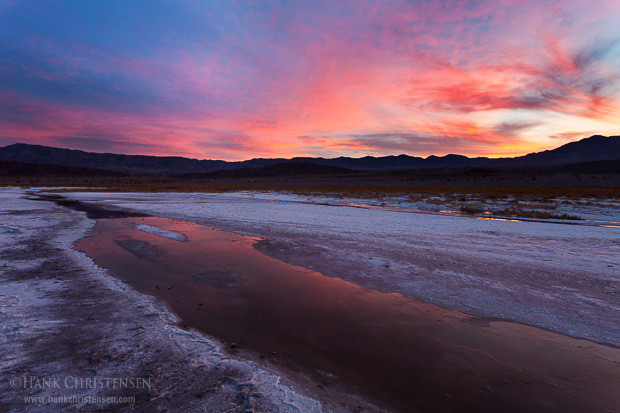
When I shoot landscape panoramas, in addition to tripod use and careful alignment, I always follow one basic technique – set my camera in manual exposure mode. To determine the optimum exposure for a panorama, I set my aperture (typically between 11 and 16 for landscapes), and meter different parts of the scene. I select the brightest portion of the scene and over-expose the meter to a point that no highlights are blown out. Then I set the camera to manual exposure, dial in the appropriate shutter speed, and I’m ready to capture all the frames of the panorama, knowing that they will blend together nicely in post production.
However, when I am photographing birds or wildlife panoramas, I am often forced to use quick and dirty techniques. These panorama situations usually arise when I am close enough to an animal that their face can fill an entire frame, but I still want to capture their entire body. Instead of backing away, I usually resort to taking multiple overlapping images, knowing I can stitch them together later. This often happens with large water birds such as this great blue heron, that are docile enough to allow me to get close.
Because I know that the animal can move at any time, I need to be quick with my overlapping photos, taking them in rapid succession. This means I don’t have time to carefully meter the scene and dial in the optimum exposure. Usually I will leave my camera in aperture priority (for overlapping photos to stitch together, aperture MUST be the same throughout all images) and let the camera decide the exposure. Usually no photo is more than 1 stop from any other photo.
Now that I’ve taken my photos and have imported them into Lightroom, I need a quick way to align the same exposure across all photos. Enter the “hidden” Match Total Exposures feature.
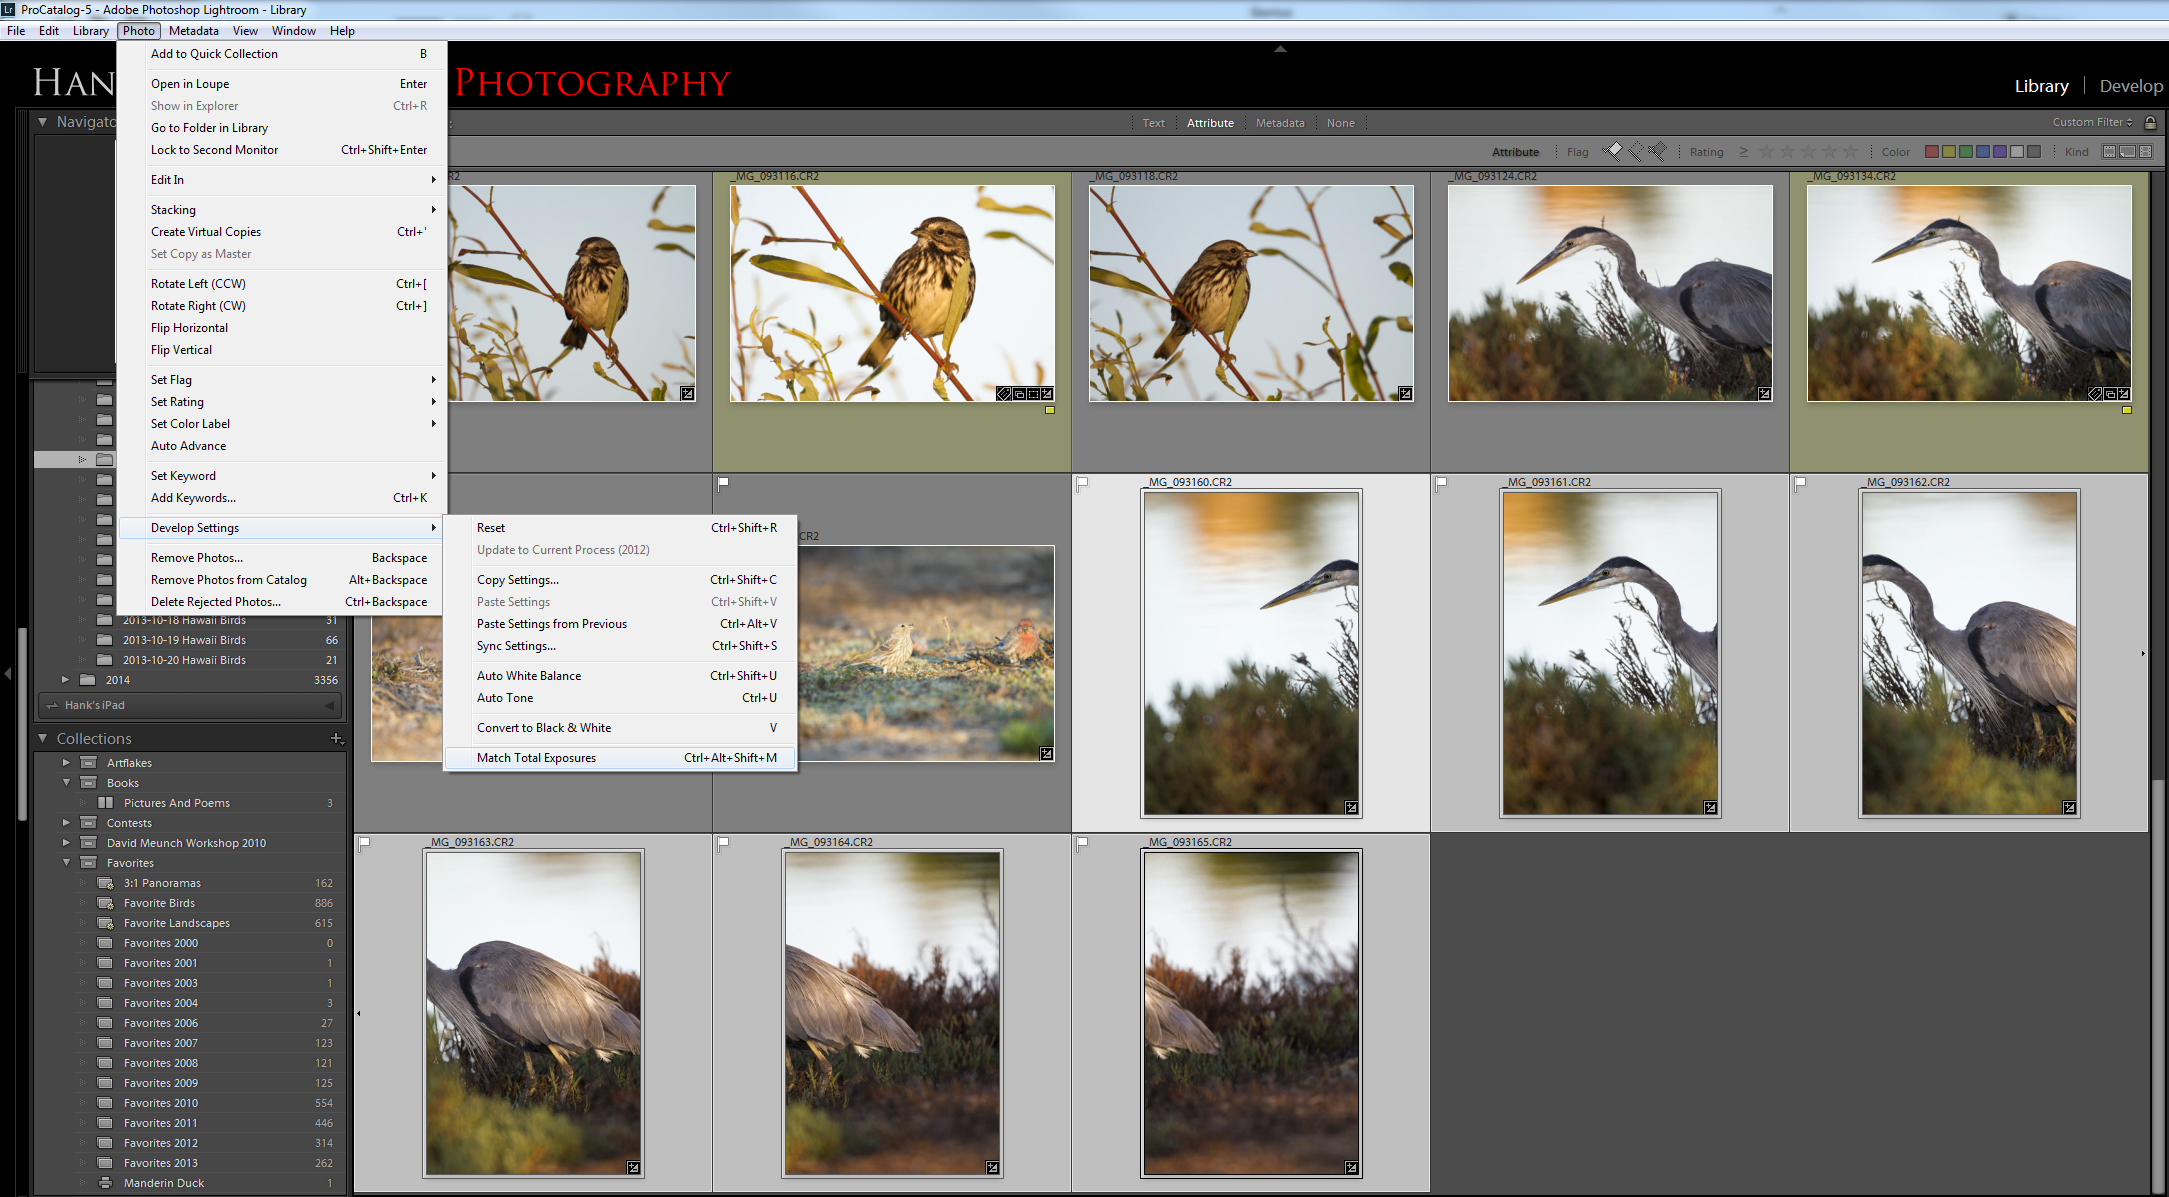
I pick one of the photos with which to optimize the exposure. Once I’ve adjusted the exposure slider to my liking, I select all the photos in the series and click the menu Photo->Develop Settings->Match Total Exposures. All of the other photos in the series will move their exposure sliders up or down so that the adjusted exposure is matched to the original. For example, let’s say we have three photos all shot at f/5.6, with the following shutter speeds: 1/500, 1/250, and 1/1000 (the exposures will typically be much closer, but I’m using easy math for illustrative purposes). If the first photo (1/500 seconds) is selected as the original to match, then the exposure slider for the second photo will move up one stop and the exposure slider for the third will move down by one stop. This is a quick and easy way to make sure the exposures for all photos in the series are similar so that they blend properly.
Once I’ve adjusted all the exposures, I keep them all selected and click Photo->Edit In->Merge to Panorama in Photoshop. This will result in a perfectly blended panorama.