A Counter-intuitive Tip To Tack Sharp Photos With A Long Lens

The hues of twilight cast offshore sea stacks in a blue glow as waves wash around them, Crescent City, CA

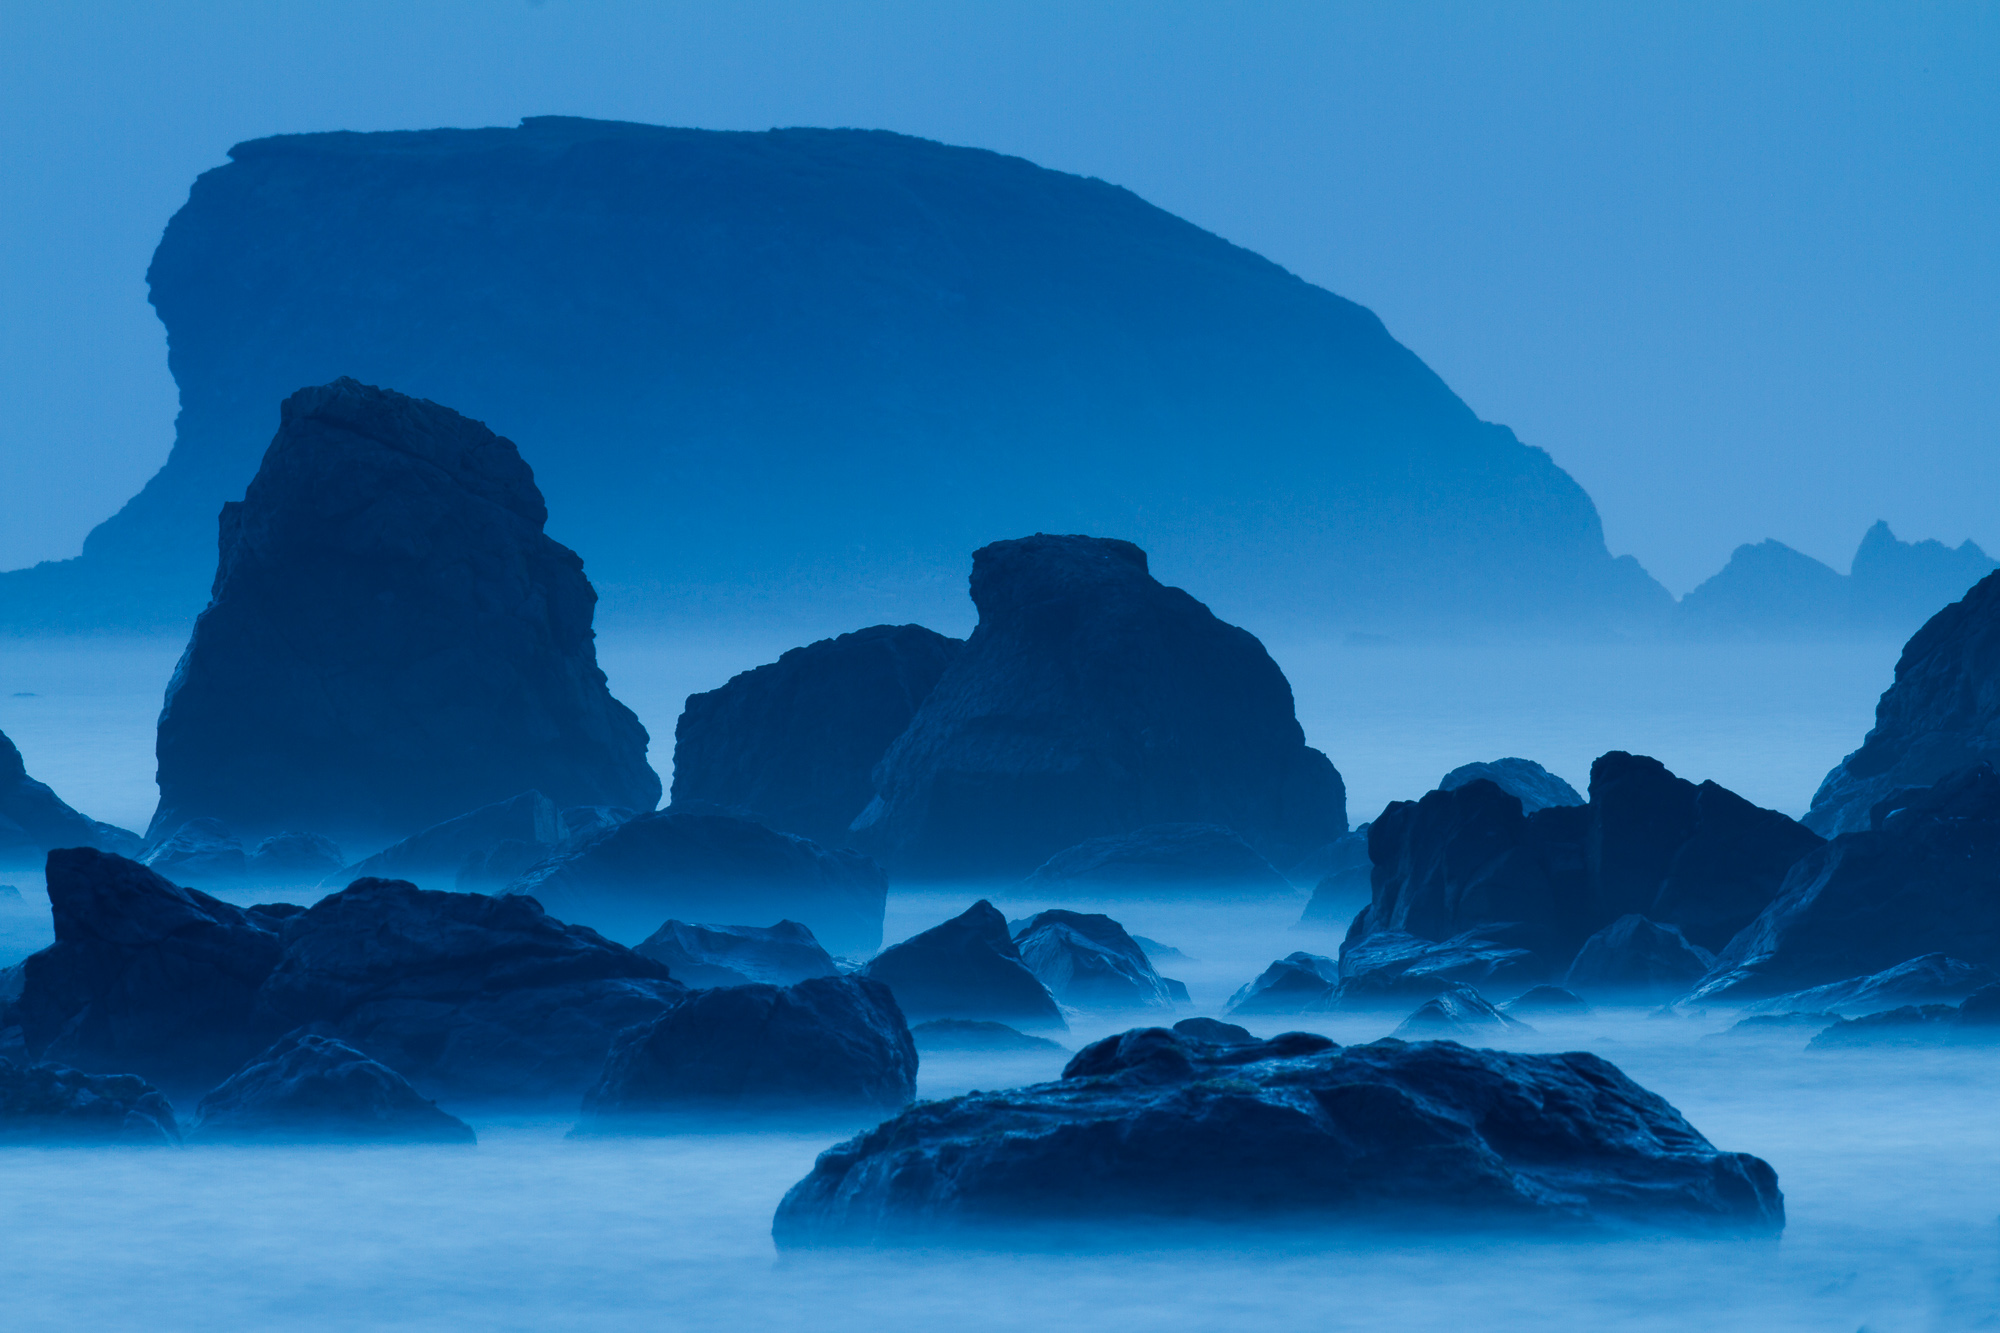
On my recent trip north up the California coast to photograph redwoods and rhododendrons, I also had an opportunity to shoot sea stacks just offshore in Crescent City, CA. After shooting a bit with my 70-200mm, I really wanted to go for a unique perspective of these rocks and stack them on top of one another. So I grabbed my go-to bird lens, the 800mm f/5.6. Using a Canon 7D with a cropped sensor gave me an equivalent focal length of 1280mm.

I waited until the sun set, giving me photos with the cool blue of dusk, and allowing me to slow my shutter speed to turn the crashing waves into a calming mist. This is the effect I was after – hard, sharp rocks shrouded in a blue fog of moving water. However, as soon as my shutter speed got longer than 1/100th of a second and started creeping toward the 1 and 2 second mark, the results on the back of my LCD were horribly blurry.

In normal shooting conditions with this lens, I never like to let the shutter speed drop below 1/250th of a second, and only if I have a stationary subject do I lock down the gimbal head on my tripod and go for something slower. But usually 1/100th of a second is my slowest usable shutter speed. What to do in this situation? Even by bumping the ISO very high I couldn’t achieve a fast enough shutter speed in these darkening conditions, and doing so would also counteract the effect of the moving water.

The solution seemed counter-intuitive at first. I found that by greatly lengthening my exposures, I was able to achieve much sharper results! The initial blurriness I was seeing was caused by the shutter vibration, amplified by the extremely long focal length (and yes, I was using mirror lockup). When I increased the exposure time, the percentage of time that the mirror shake impacted the overall exposure time was reduced, thus creating a sharper image. Using this principal, I found that by exposing for 30 seconds, I was able to achieve the sharpest results.

A couple things to keep in mind. First, this technique will only work if there is no wind. Even a slight breeze will blow a huge lens like that back and forth, ruining any chance of a long exposure. Second, make sure to check sharpness by zooming in to your resulting photo on the camera’s LCD. Never trust sharpness from a photo displayed 3 inches across – everything looks sharp when it is that small!

So next time you’re out with a giant lens trying to do landscape work (really not a very common combo!), remember to experiment with the slower shutter speeds. You might just find some sharpness in there.

Eastern Sierra, The Panoramas

On my recent trip to the Owens Valley, I tried to look for good panorama opportunities. These situations arise when there is an expansive vista that lends well to an image that is three to six times wider than it is high. As with any photograph, one thing to keep in mind is to make sure the entire contents of the frame supports the photograph. There should be no large empty areas, unless those areas purposefully support the image with negative space.

These images can be created with any regular digital camera. The images are stitched together in post processing to create large, wide angle views. All of the photos presented here are in the 40 to 100 megapixel range, which means they can be printed very large (at least 30×90 inches). For better appreciation for the detail captured in these photos, please be sure to click on the image to see a larger view.

The sun lights stormy clouds as sets behind the eastern Sierra range, north of Bishop
The sun lights stormy clouds as sets behind the eastern Sierra range, north of Bishop. Canon 70-200mm f/4L lens with the EOS-5D MkII. ISO 640. Evaluative metering 0 EV: 1/400 sec. at f/8. Composed of 7 stitched photos, handheld.
The sun rises over Hot Creek, as the Sierra Nevada looms in the distance
The sun rises over Hot Creek, as the Sierra Nevada looms in the distance. Canon 24-70mm f/2.8L lens with the EOS-5D MkII. ISO 100. Evaluative metering 0 EV: 3.2 sec. at f/16. Composed of 4 stitched photos.
The wall of the eastern Sierra rises over ten thousand feet above the Alabama Hills at dawn
The wall of the eastern Sierra rises over ten thousand feet above the Alabama Hills at dawn. Canon 70-200mm f/4L lens with the EOS-5D MkII. ISO 200. Evaluative metering 0 EV: 1/4 sec. at f/16. Composed of 7 vertical stitched photos.
An ancient bristlecone pine crouches on a snowy slope, greeting morning's first rays of light, Ancient Bristlecone Pine Forest
An ancient bristlecone pine crouches on a snowy slope, greeting morning's first rays of light, Ancient Bristlecone Pine Forest. Canon 70-200mm f/4L lens with the EOS-5D MkII. ISO 200. Evaluative metering 0 EV: 1/6 sec. at f/7.1. Composed of 7 stitched photos.

Hot Creek Sunrise

Moments before the sun rises, Hot Creek reflects the cool glow of snow covered peaks
Moments before the sun rises, Hot Creek reflects the cool glow of snow covered peaks. Canon 24-70mm f/2.8L lens with the EOS-5D MkII. ISO 200. Evaluative metering 0 EV: 30 sec. at f/16.

One of my first sunrise shoots on my recent trip to the eastern Sierra was at Hot Creek. I wanted to catch some snow from the recent snow storm before it melted out of the mountains, and I knew this spot would work well with longer lenses to help emphasize the mountains.

The first shot was taken a half hour before sunrise. The scene was just starting to light up, but still maintained some of the cooler hues of night. Although there were no clouds to work with, there was some slight haze above the mountains, which reflected some of the deep purple of pre-dawn.

One of my biggest challenges in these early morning shoots is staying warm as I patiently wait behind my tripod for the light to change. For this location, the main foreground attraction was really the flowing creek, so I didn’t move around a lot. If you had been there that morning, you would have seen what looked like a crazy person jumping up and down and blowing on his hands to keep warm (yes, I forgot my gloves that morning).

Grass adorns the banks of Hot Creek as sun touches the mountains to the east
Grass adorns the banks of Hot Creek as sun touches the mountains to the east. Canon 24-70mm f/2.8L lens with the EOS-5D MkII. ISO 100. Evaluative metering -1 EV: .3 sec. at f/16.

After the sun rose and I felt I captured that part of the creek in the best light of the morning, I explored with the camera a little trying out different foregrounds and lens lengths. I’m a sucker for near/far verticals, and that’s what my eye gravitated toward when I saw this long grass growing along the bank of the creek.

Soon enough the photo shoot was over, as the morning light faded and fishermen began to show up along the length of the creek.

Waterfalls of the Columbia River Gorge

Latourell Falls drops straight down from an overhanging basalt cliff, Columbia River Gorge, Oregon
Wild flowers adorn the creek that descends from the base of Latourell Falls, Columbia River Gorge, Oregon

Earlier this summer I spent a couple of mornings in the Columbia River Gorge, photographing just a few of the many waterfalls that line its cliffs. Luckily, I was blessed with Oregon’s trademark high overcast skies, which gave me the perfect diffused light with which to do forest photography. By cutting out all the scattered light beams filtering through the canopy, I was able to get even light across the entire scene, and reduce the dynamic range to something my camera could handle.

Latourell Falls drops straight down from an overhanging basalt cliff, Columbia River Gorge, Oregon

The two preceding images are of Latourell Falls, which seems to have endless foreground opportunities. While most of the falls in the Gorge cascade down rock faces, this waterfall plunges off an overhanging basalt cliff, allowing the water to fall straight down. Since there are never any true straight lines in nature, having a strong vertical line to work into the composition can be a lot of fun.

Ponytail Falls shoots outward from a cleft in a rock cliff, and cascades over large stones below, Columbia River Gorge, Oregon

Ponytail Falls sits upriver from Horsetail Falls, a much larger waterfall closer to the road. While Ponytail may be inferior to its companion in size, it makes up for it in beauty. This fall shoots out from a notch in the cliff, creating a pleasing arc of water. A hiking trail wraps around the base of the cliff behind the waterfall, giving hikers the added bonus of seeing the fall from a different perspective.

Shepperds Dell Falls empties into a narrow canyon overgrown with greenery, Columbia River Gorge, Oregon

Shepperd’s Dell Falls is absolutely covered with green. This is a nice tidy little waterfall that starts well below the trailhead, allowing views from high above looking down. Of course, shooting so much foliage makes using a polarizer a must. This will cut all reflections on the leaves, and really make the green color pop. This is an effect that cannot be replicated well in post processing.

The river below Wahkeena Falls cascades past a fern, Columbia River Gorge, Oregon

Just below Wakheena Falls is a beautiful cascade that runs past lush ferns and wild flowers. It is not as well visited, as it is tucked away below the road, and most visitors are drawn immediately to the waterfall.

Bridal Veil Falls empties into a small pool surrounded by dense forest, Columbia River Gorge, Oregon

The last waterfall I covered in this trip was Bridal Veil Falls. This is one of the more popular waterfalls along this stretch of road. Equally as popular is the Bridal Veil post office, which receives boxes of wedding invitations from all over the world, so that the invitations can be postmarked by the town of “Bridal Veil” and mailed out to potential wedding guests.

I have to admit, I had a little trouble with the aesthetics of this waterfall. The shot above is a straight-forward interpretation, shot from an (ahem) observation platform. Okay, let’s be honest – it is a vacation snapshot! I wasn’t very happy with this rendering, as I felt it lacked conveying the almost ethereal quality of the grotto that this waterfall plunged into. I worked the scene and settled on the more distant perspective below.

Bridal Veil Falls opens up into a creek that flows through dense forest, Columbia River Gorge, Oregon

The best part of this photo excursion is that I only scratched the surface of the multitude of waterfalls along the Gorge. With so much water flowing into the Columbia River, and so many overcast days (smile), this area really can be a photographer’s paradise.

Gear I used to create the photos in this post:
[amazon_link asins=’B007FGYZFI,B0076BNK30,B00009R6WO,B00IAYFDIC’ template=’ProductCarousel’ store=’hankchristens-20′ marketplace=’US’ link_id=’1e2a6983-927e-11e7-b829-e91a331daddd’]

Copyright 2017 Hank Christensen