Canon 5DSR For Bird Photography?

An anna's hummingbird perches on a thin branch, Belmont, CA

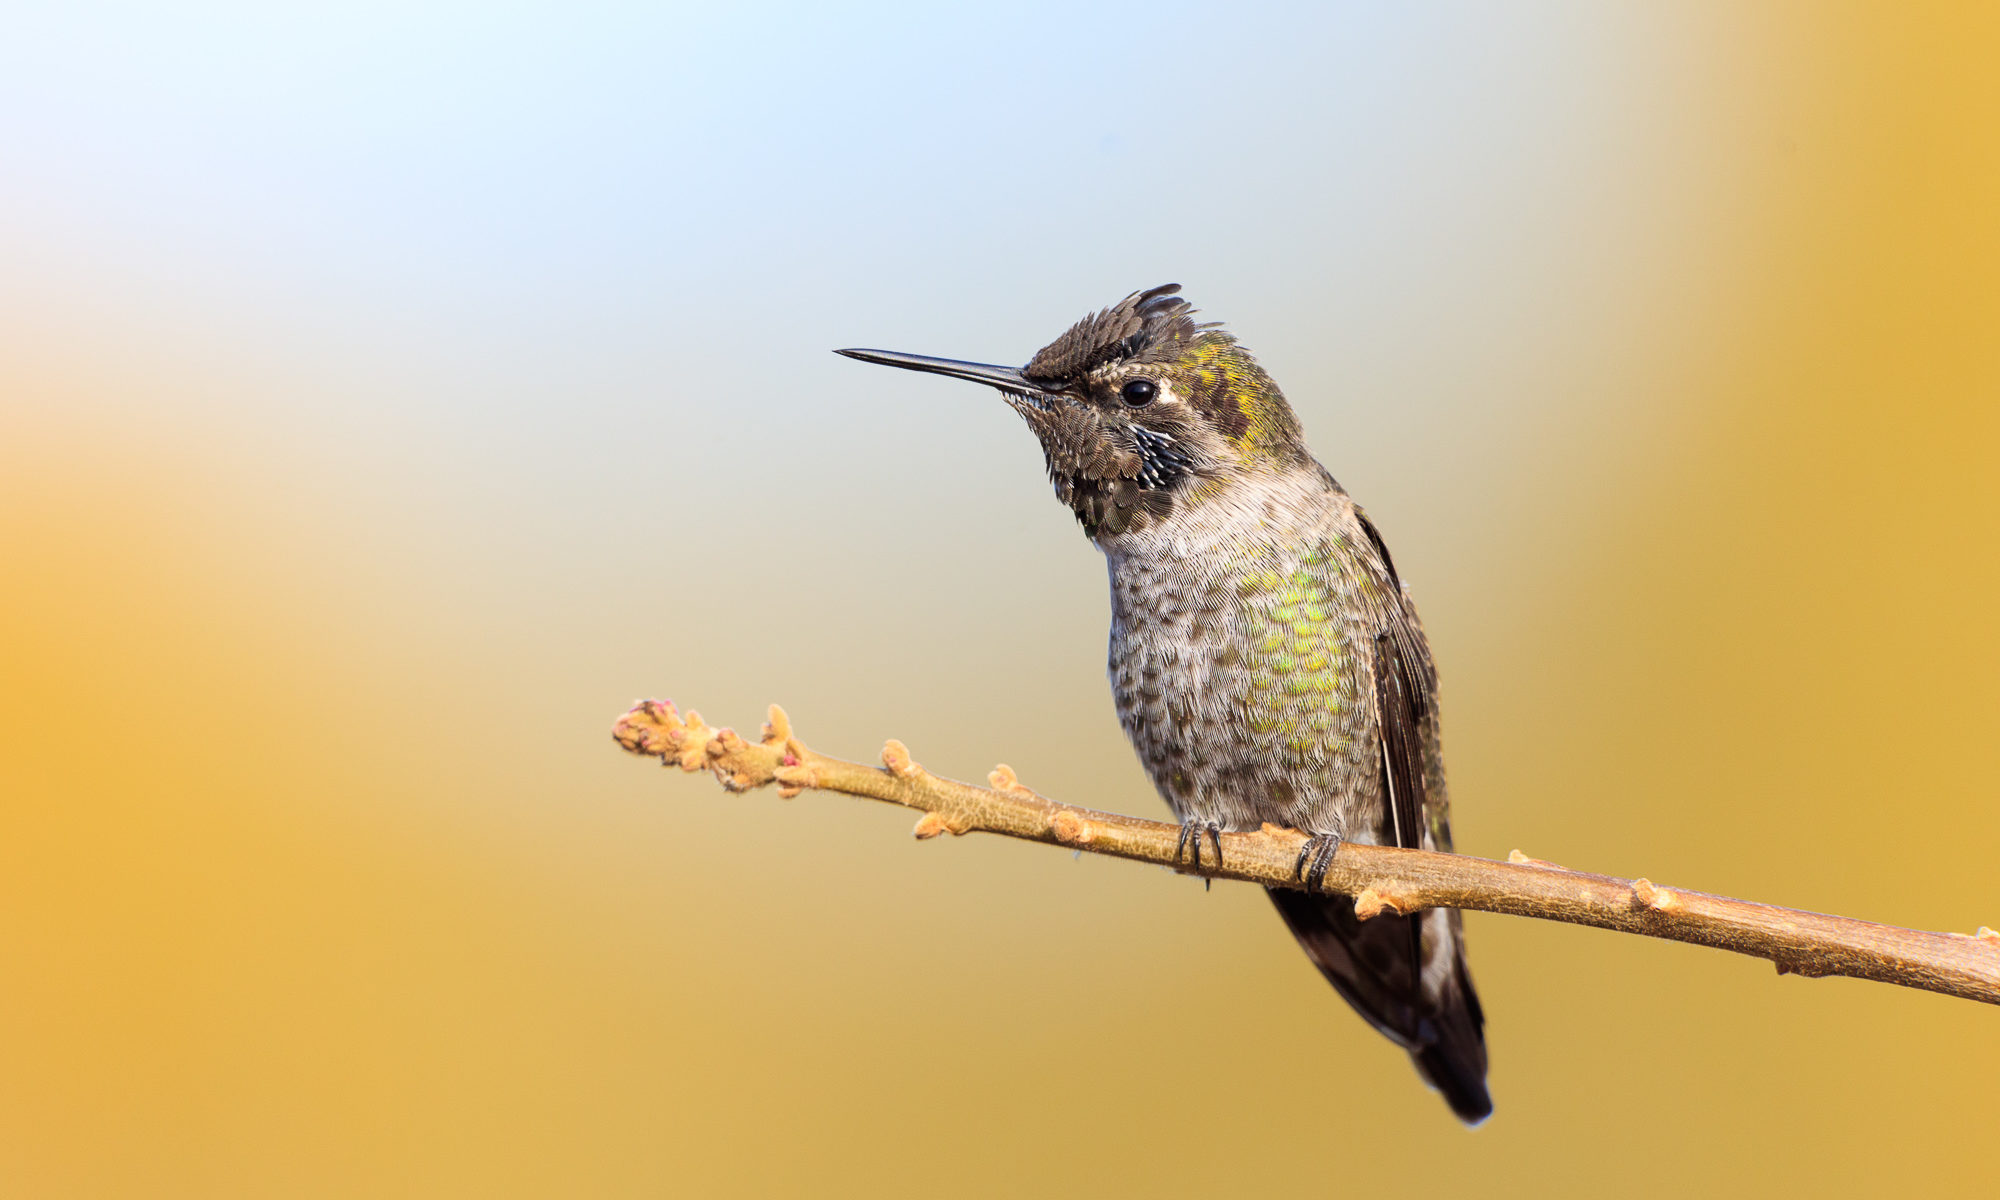
After fussing between either upgrading my next landscape camera to either a Sony A7RII or a Canon 5DSR (I’ll cover that saga in a future post), I finally pulled the trigger and received my new Canon this weekend. While I’ll primary use this 50 mega pixel monster for large resolution landscape images (wall sized prints, anyone?), I wanted to see if/how it would handle (albeit simple) bird photography. After spending a half hour with it in my front yard, chimping on the rear LCD, I was blown away.

An anna's hummingbird perches on a thin branch, Belmont, CA
An anna’s hummingbird perches on a thin branch, Belmont, CA

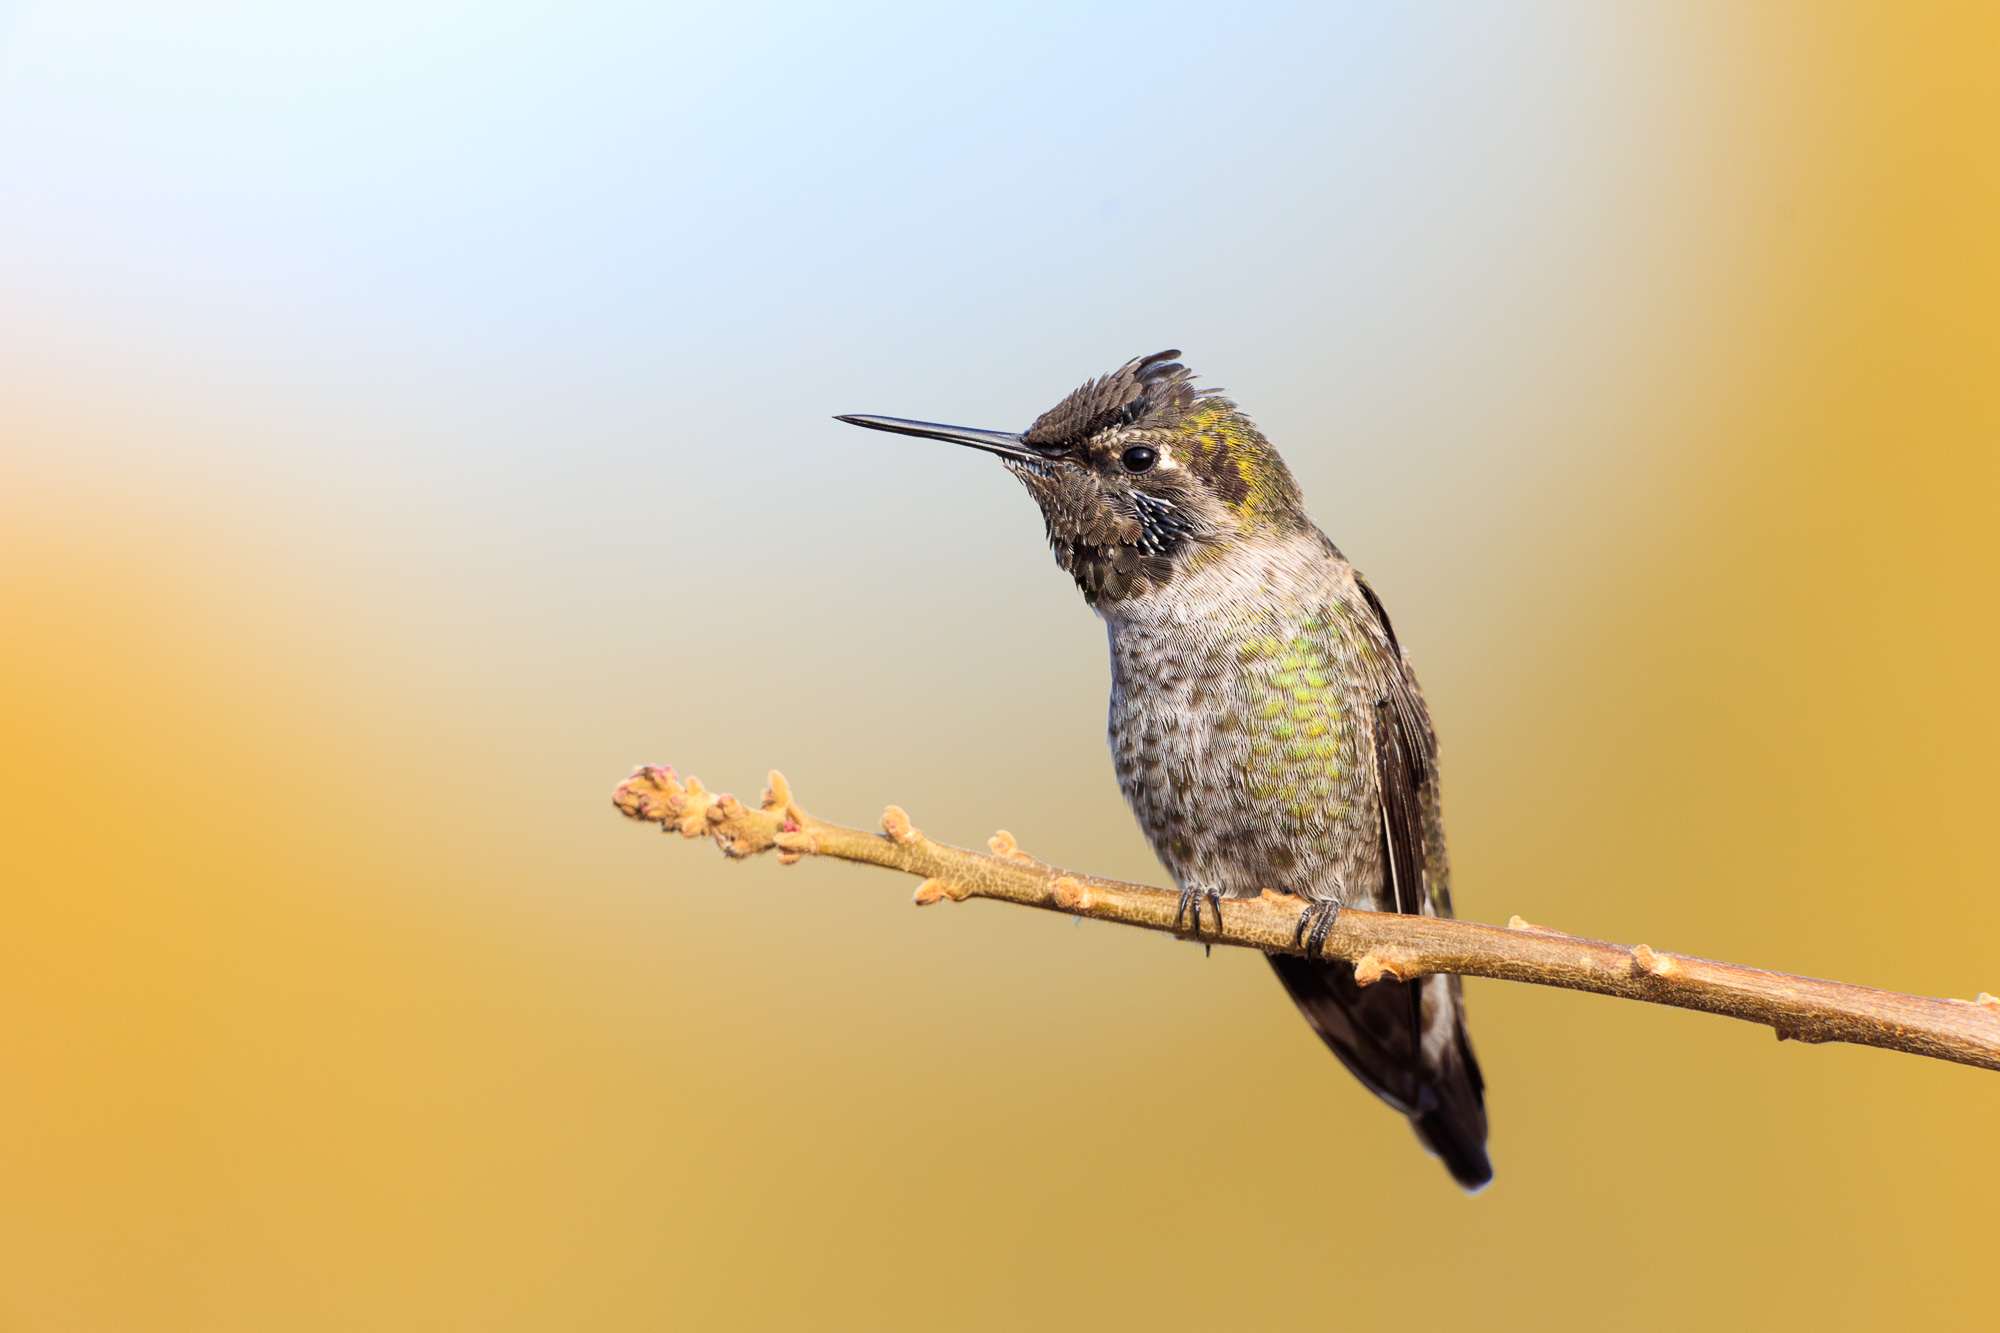
First of all, the auto-focus is fast and accurate – exactly what you’d expect from such an expensive camera. Maximum frame rate is low due to the huge image size, but that is not a concern with its intended use (my typical landscape frame rate is about 1 shot per minute!) The noise level looks better than my 7D Mk II, which is great given the pixel density of the sensor. All images in this post were shot at ISO 500 with no noise reduction – buttery smooth backgrounds.

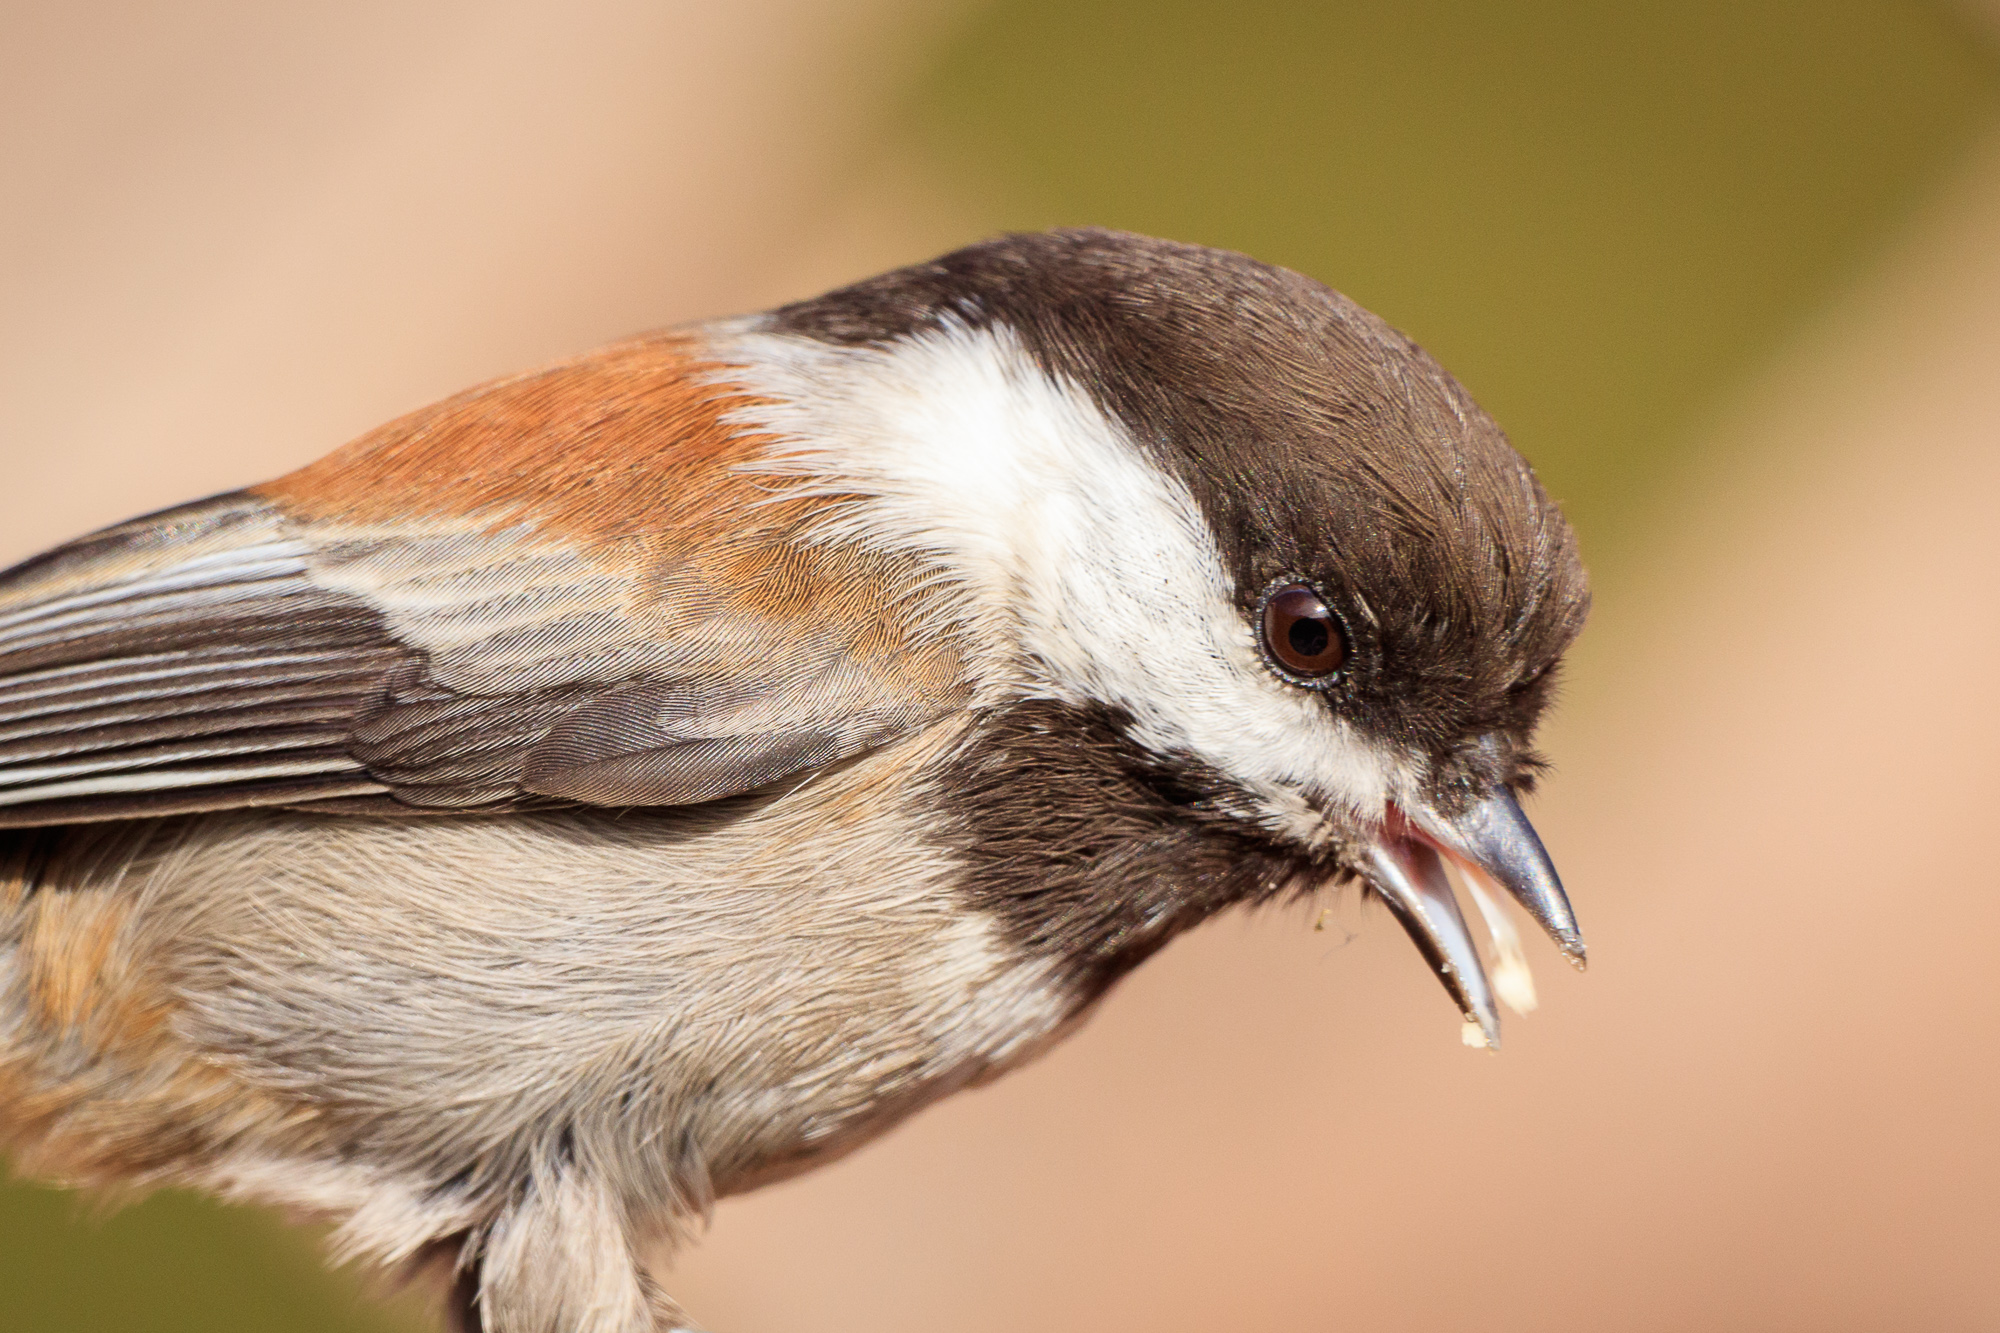
But where this camera really shines is its gigantic 50 MP sensor – this largest ever released for a 35mm DSLR. Even better than just packing in so many pixels however, is the fact that at 1:1 zoom, the details are tack sharp. Below is a 1:1 crop of the above image.

Headshot portrait of an anna's hummingbird, Belmont, CA
Headshot portrait of an anna’s hummingbird, Belmont, CA

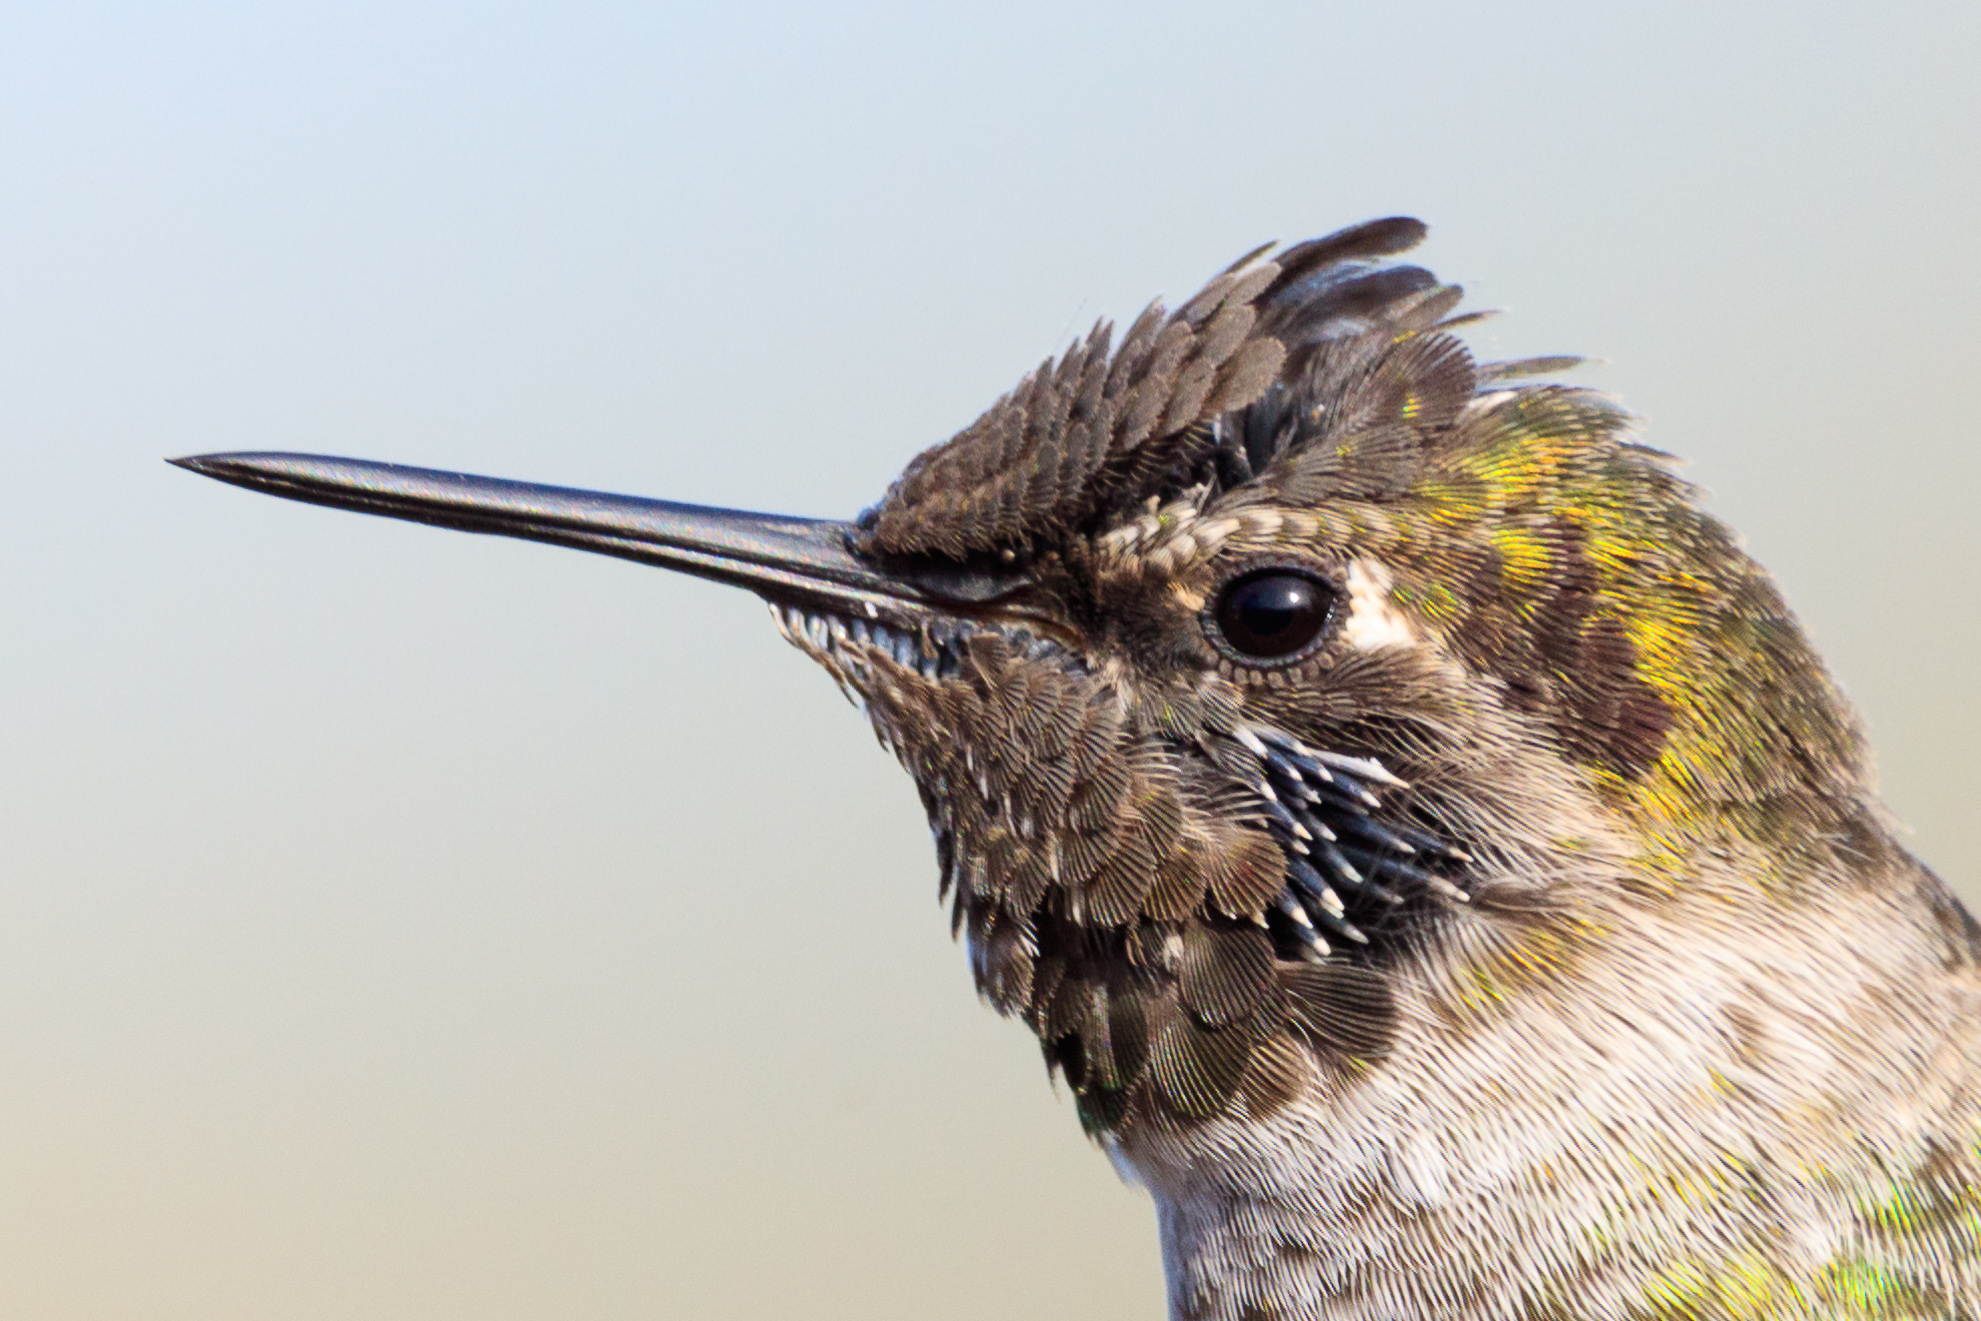
As you can see, the details are extremely sharp. I’ve seen other sensors that look sharp right out of the camera, but once you zoom in to 1:1, the details are a bit mushy.

Head and shoulders portrait of a house finch, Belmont, CA

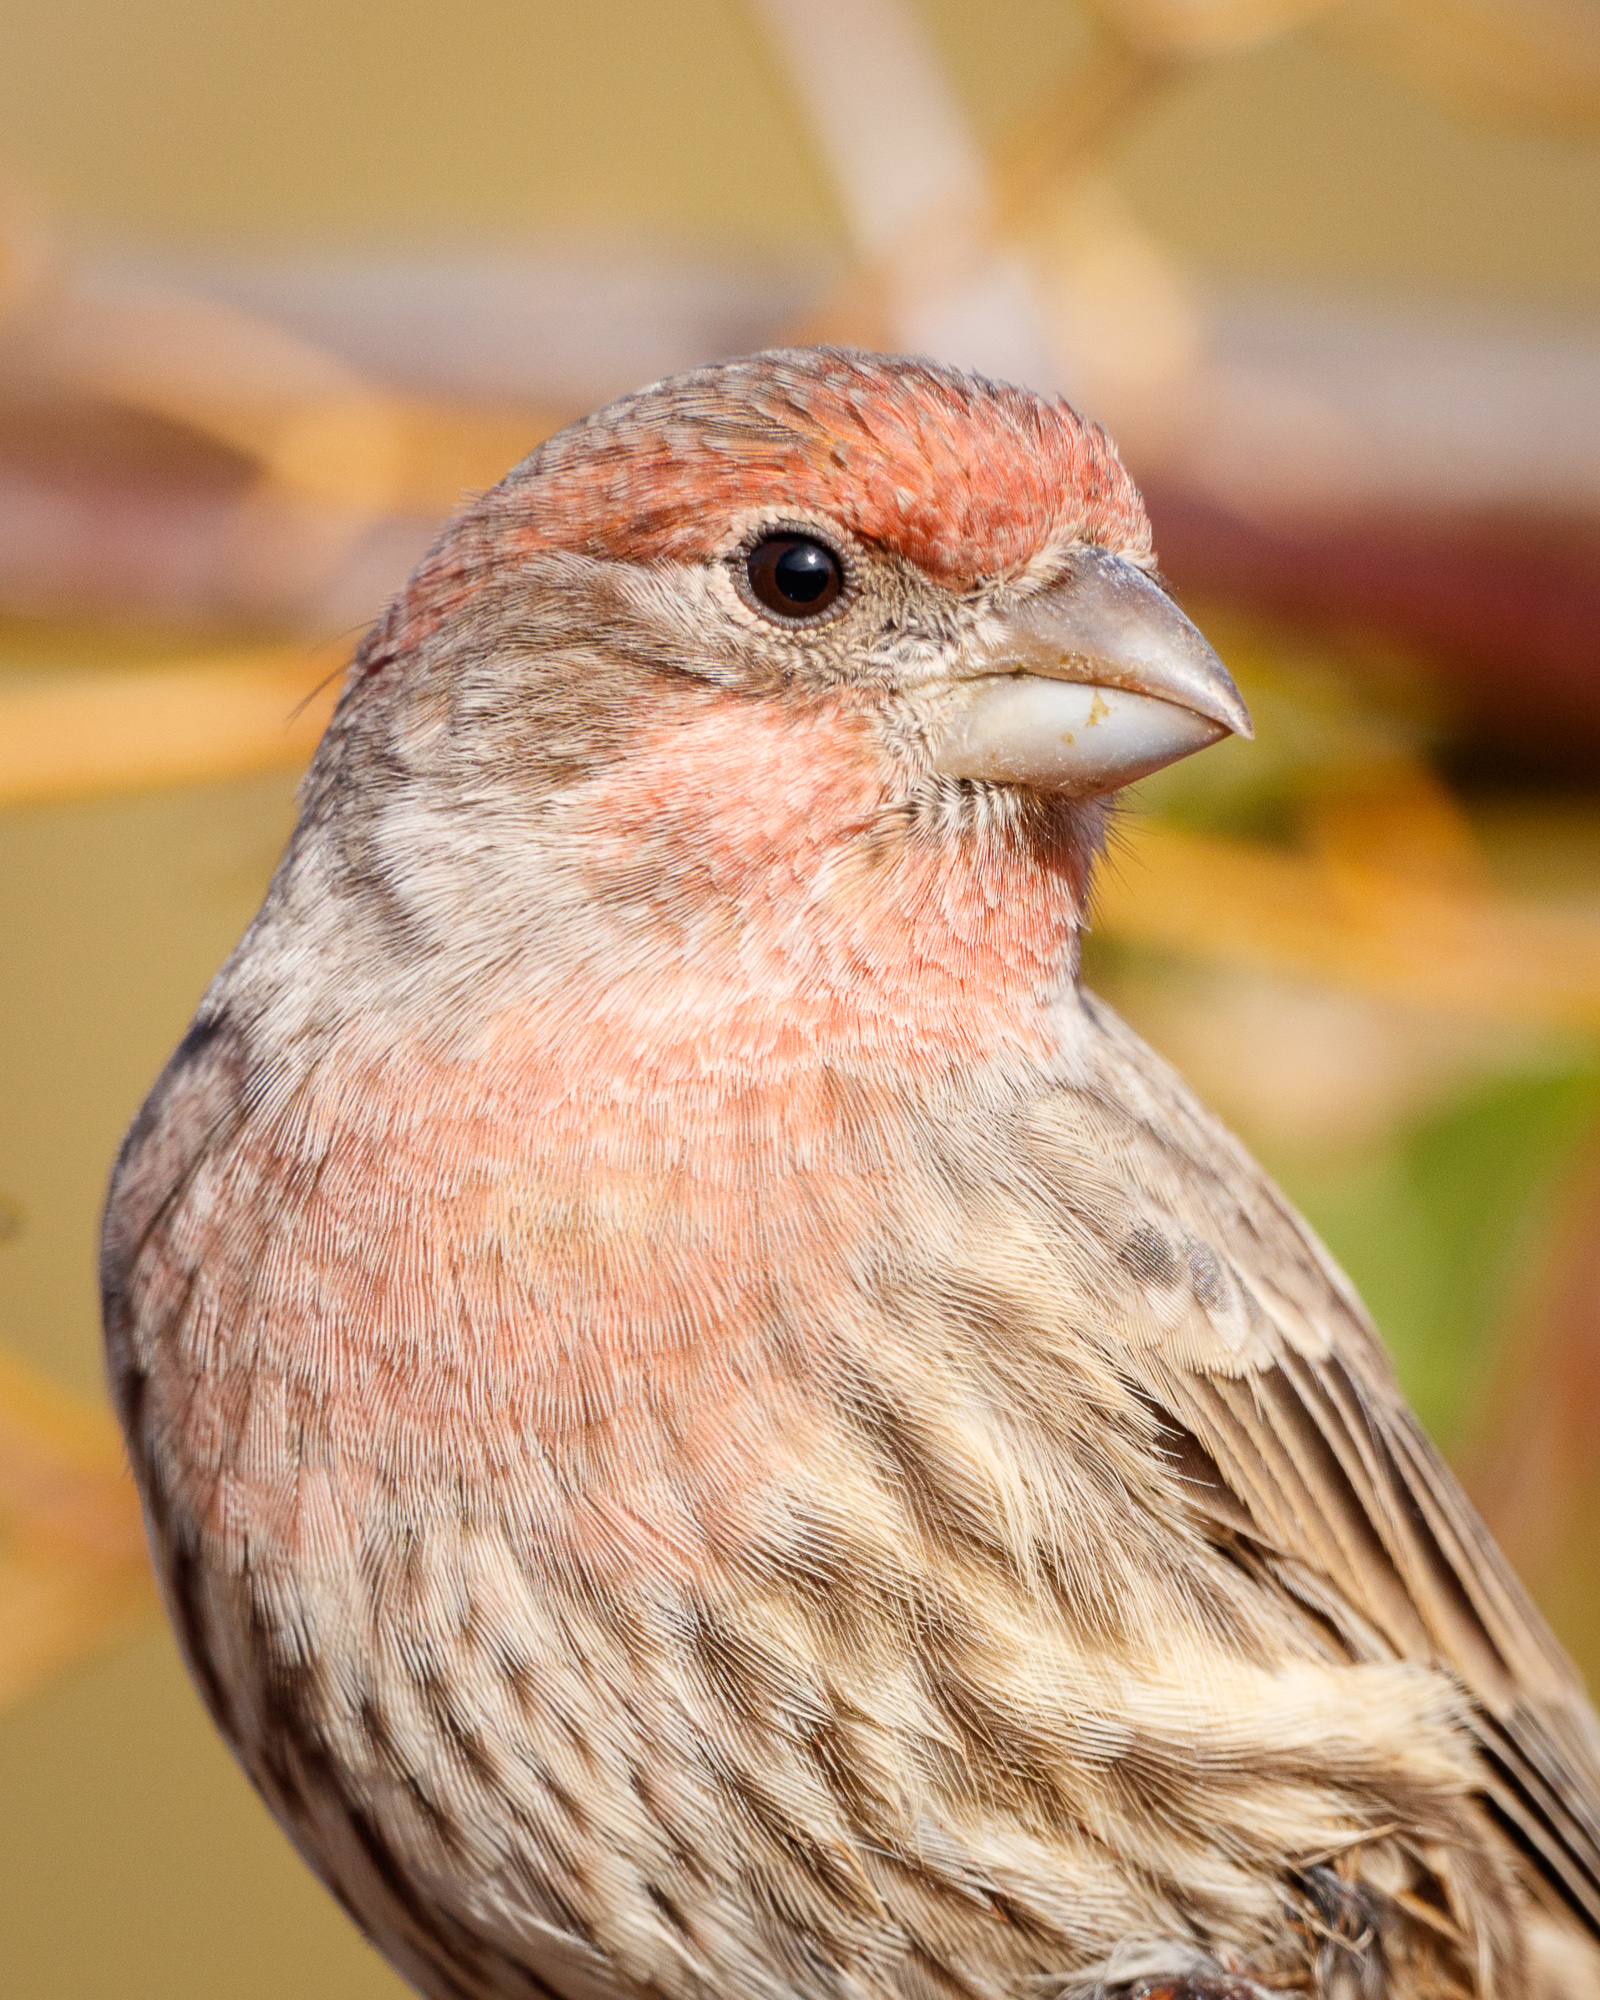
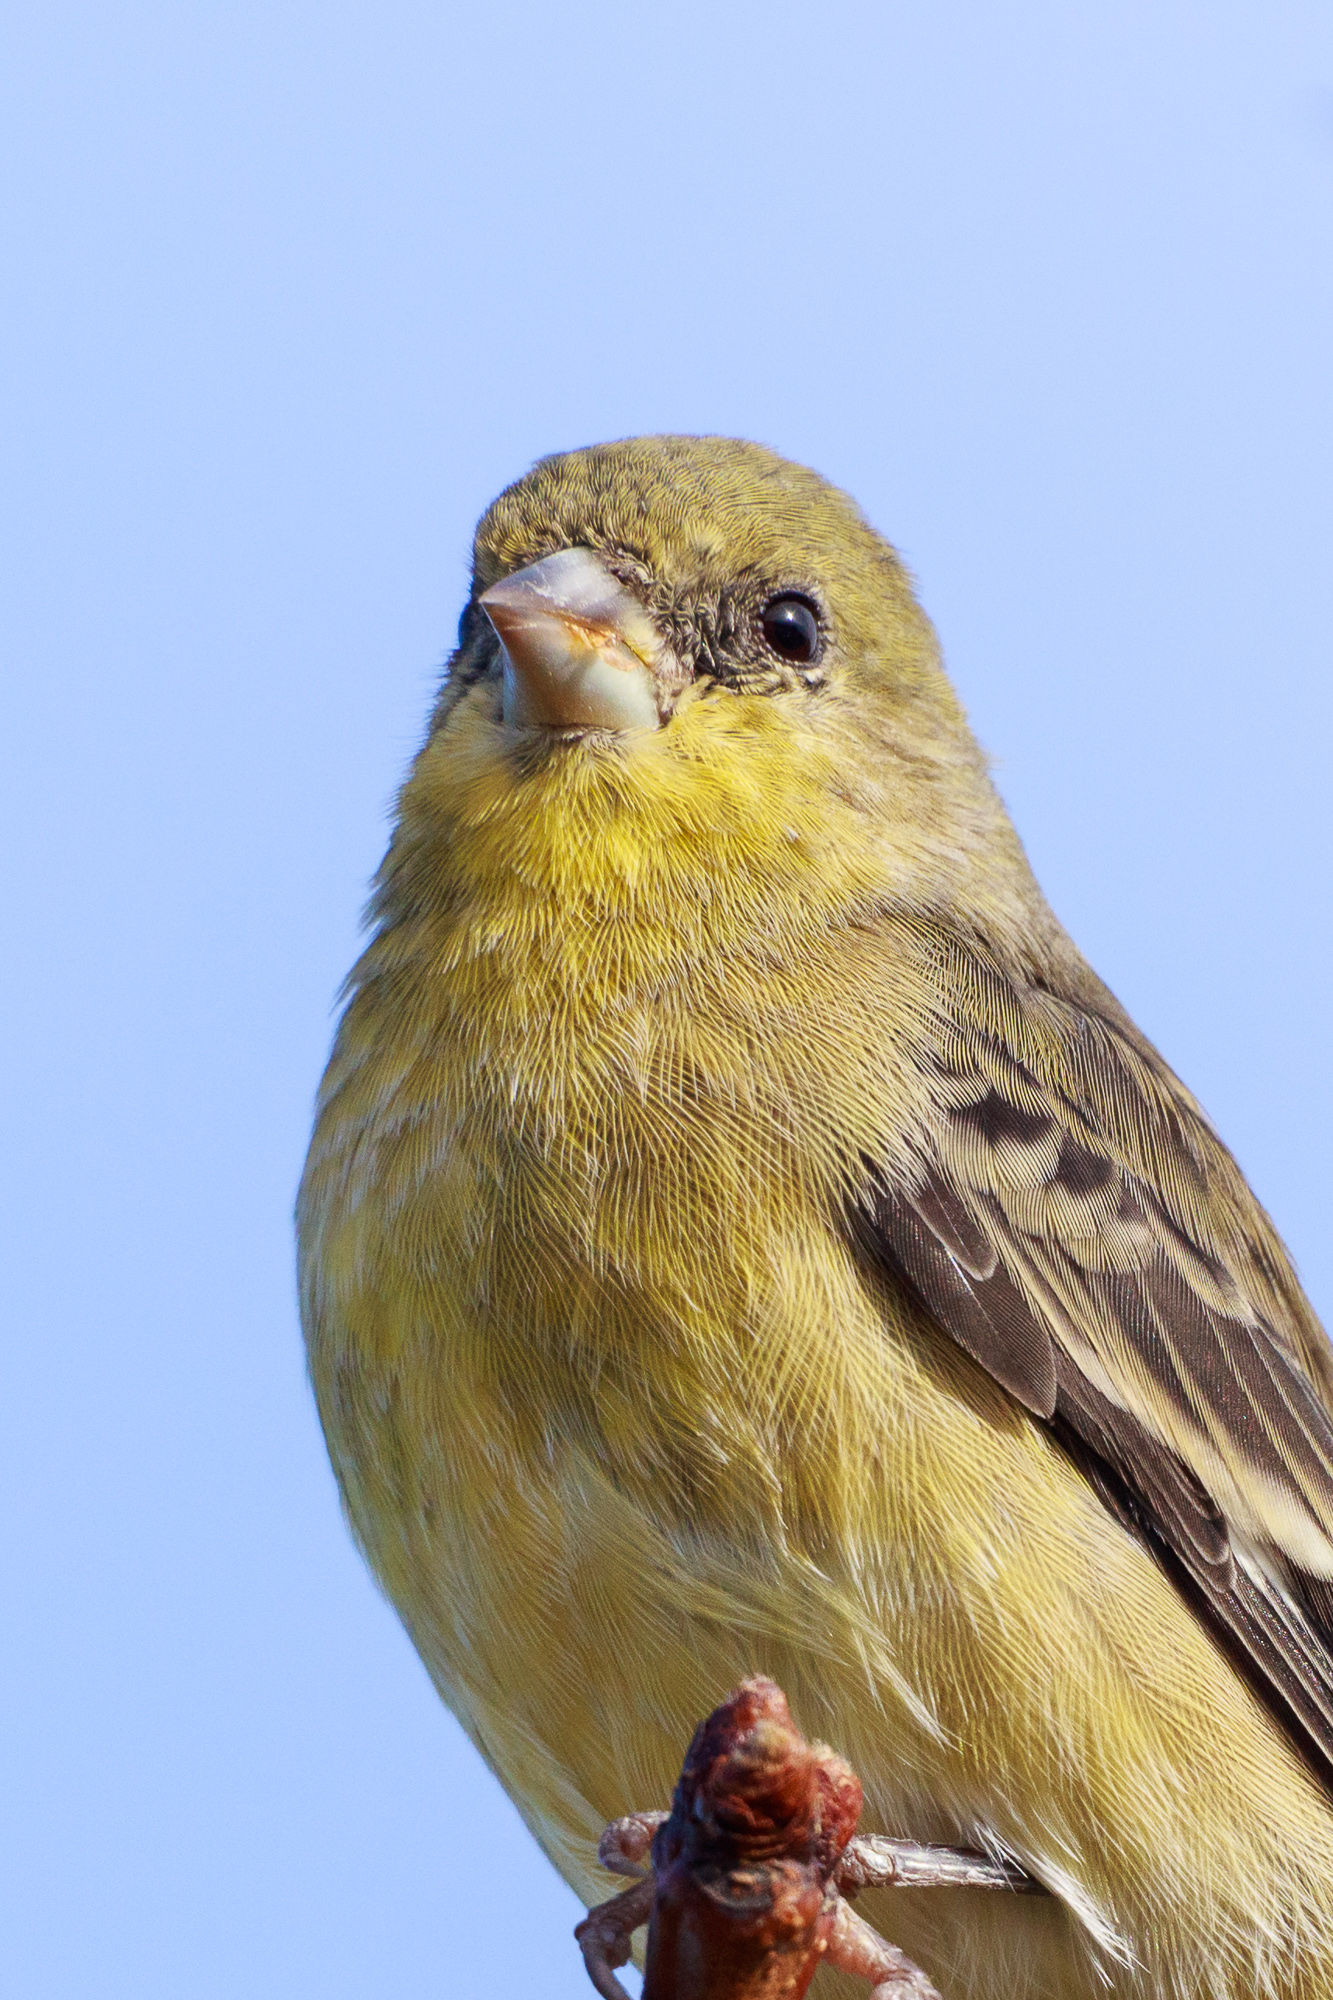
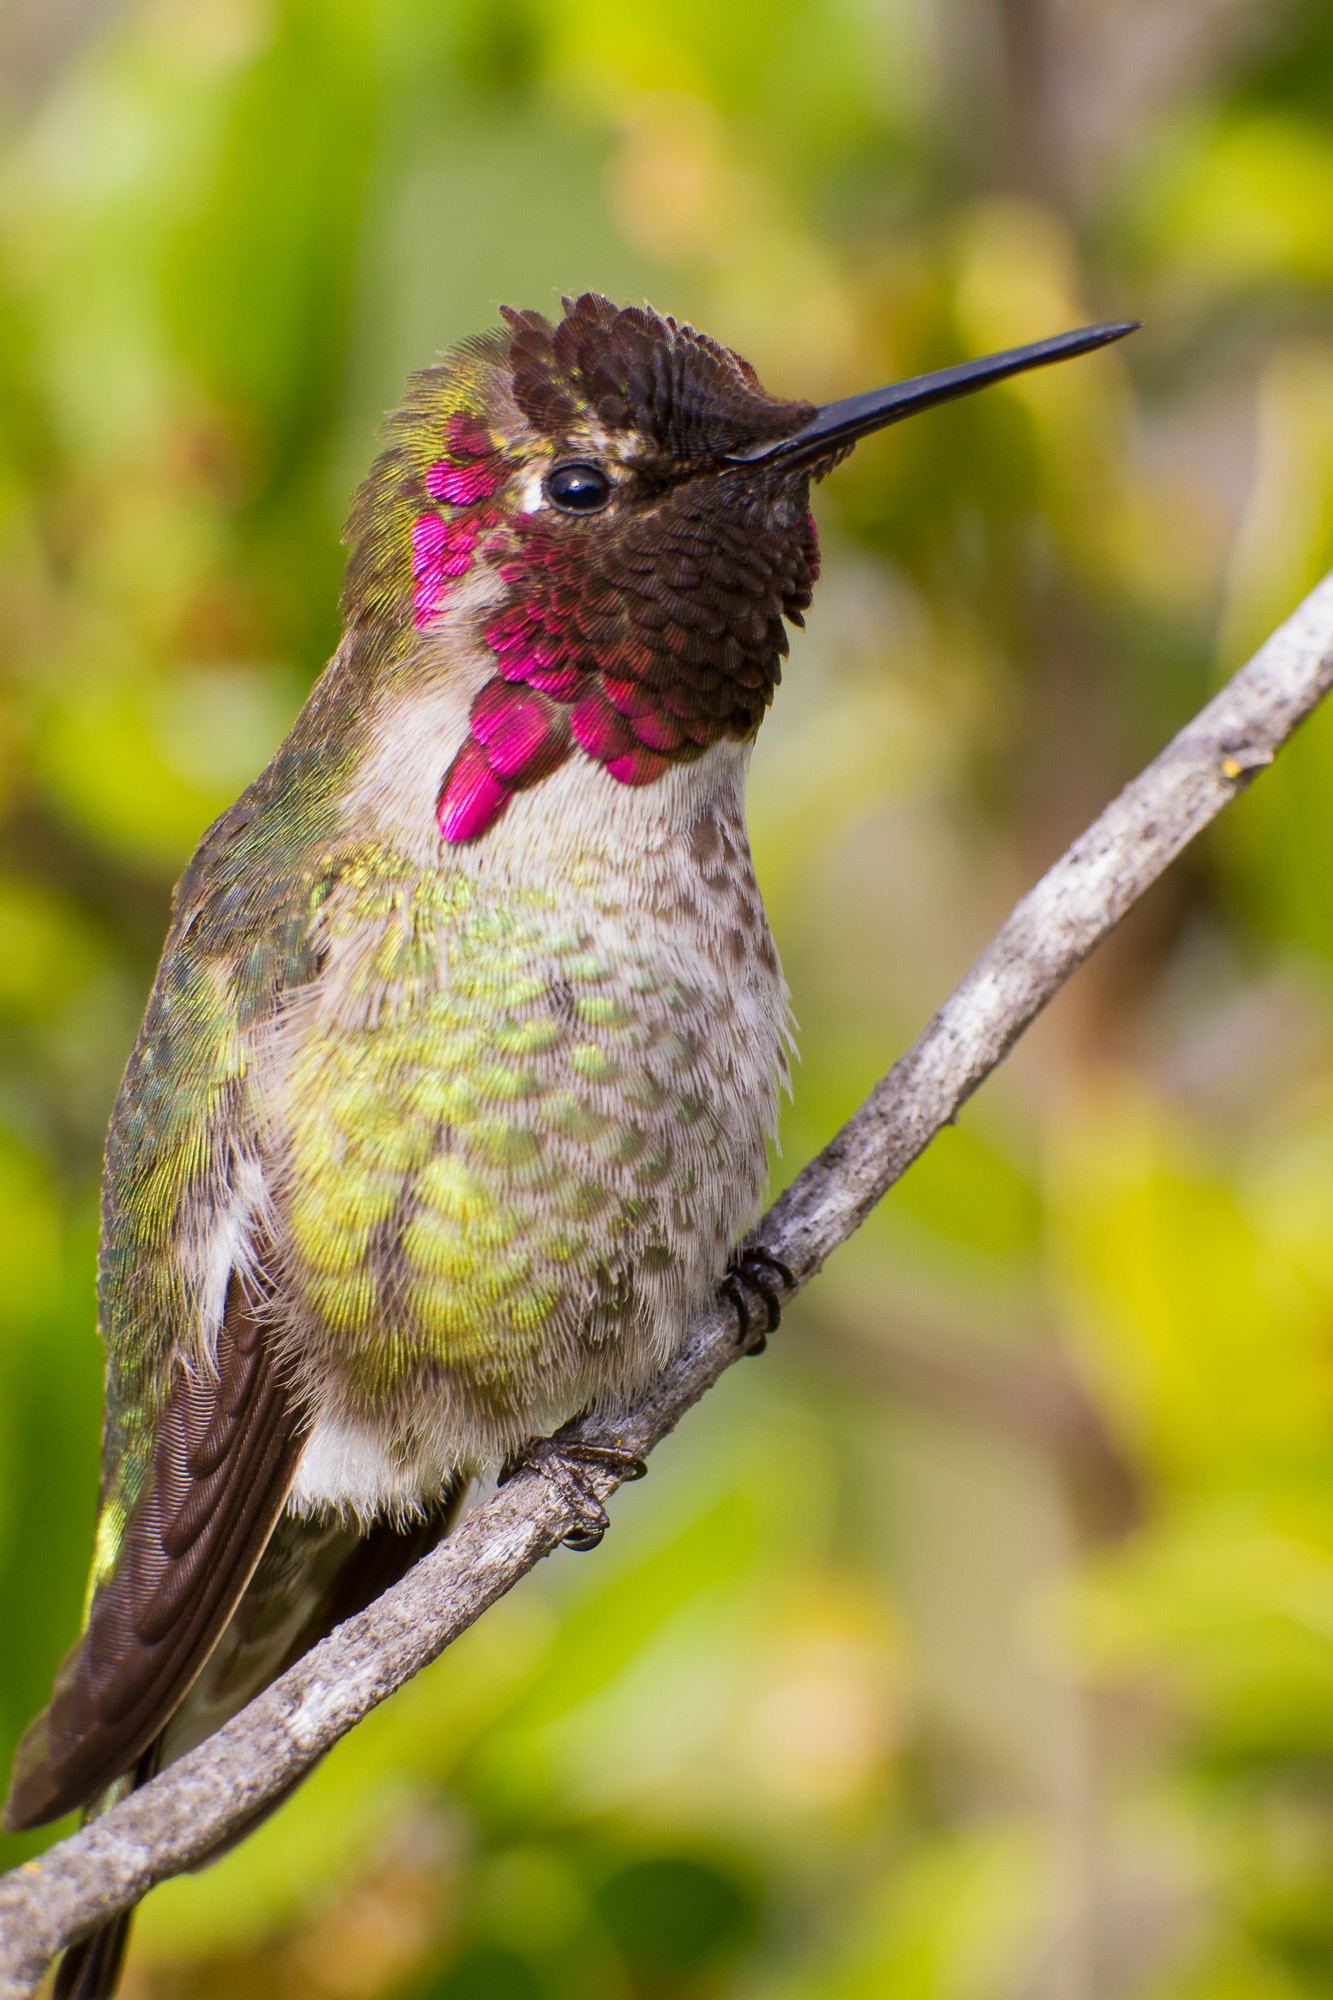
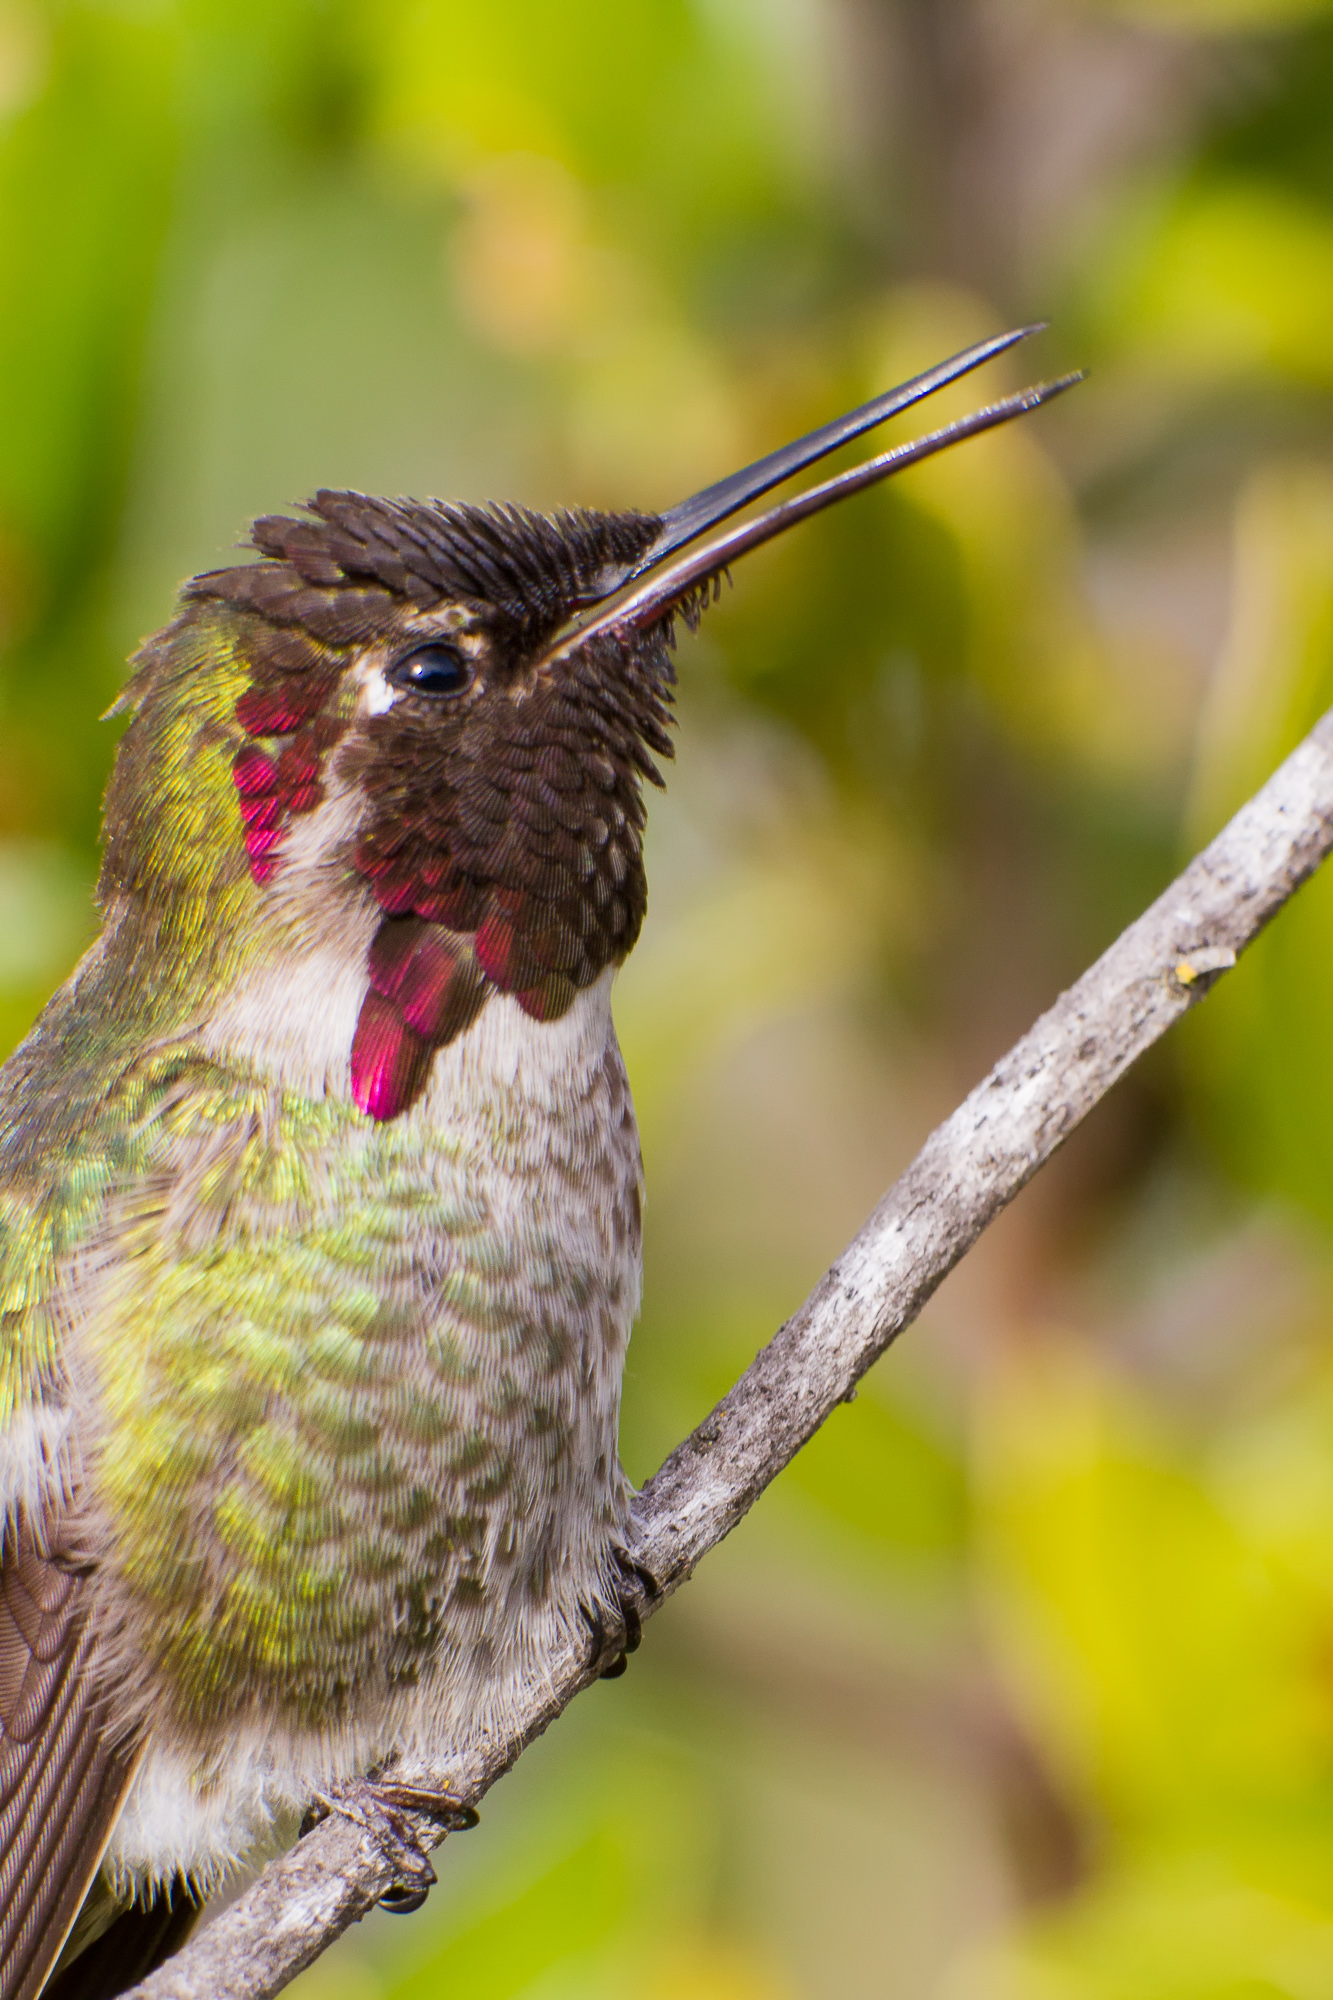
If I’m not concerned about printing wall size, the vast amount of resolution I have at my disposal opens up new cropping opportunities. Here I’ve included a few more yard birds I shot during my morning test. I’ve given each a massive crop to see what kinds of portraits I could create with these tiny birds, without having to shoot them with a macro lens (which would be nearly impossible with these fast movers).

A chestnut-backed chickadee finishes eating seed, Belmont, CA

The main areas that will limit this camera as a great bird photography setup is a low frame rate and full frame sensor. But with patience and careful technique, it could produce some amazing results. I’ll see what it can pull off for birds in flight in the future.

A lesser goldfinch perches on a narrow branch, Belmont, CA

Previously I’ve only been able to get head-and-shoulder portraits with much larger birds. But these tests tell me that I’ll likely be bringing this camera along on my next bird shoot. It won’t replace my primary body for now, but if I come across a docile bird that lets me get relatively close, I’m definitely going to pull out my 5DSR and capture some of those insane details this camera is able to resolve.

7D Mk II High ISO Performance

Last week I went out in the evening to run my new 7D Mk II through its paces with bird photography (most likely my primary use for this camera). Since my mind was in test mode, I decided to stay out after sunset (much later than normal for bird photography) to see how the camera performed in low light situations. I left the camera in auto-ISO mode to let it decide how high it needed to go. About a half hour after sunset, I was packing it in and heading back to the car, when I saw this blacktail jackrabbit eating from a patch of grass.

A blacktail jackrabbit ventures out into the grass just after sunset, Redwood Shores, CA.

I was a bit skeptical that anything would turn out given how dark it was. Not even sure if the auto focus would be able to work well in the darkness, I splayed out my tripod legs and got very low to the ground. Auto-focus seemed to be tracking well, so I started firing off bursts of shots, not really paying attention to the ISO. I knew it was high, but I wanted to see how high the ISO could go and still produce a usable image. This was highly dependent on the noise produced at high ISOs, and the amount of reasonable noise reduction I could perform in post processing.

The image above was shot at ISO 25,600! While I realized this produced far too much noise for a large print, it seems to be perfectly usable for web-sized images. You can also see here that the auto-focus was extremely accurate, even in low light.

So how does this translate into changes in the way I photograph? Nothing, really – a shot with this much noise is more of a curiosity than any hard data with which to change my workflow. However, let’s look at another example at a more reasonable ISO.

A hermit thrush pauses briefly on a branch in the last night of the day, Redwood Shores, CA.

I photographed this hermit thrush a little earlier in the evening than the jackrabbit. It was around sunset, but the sun had already set over the coastal mountains, so the light was certainly waning. Because of the extra light, the camera chose a more “reasonable” ISO of 5000 for this shot. But still, ISO 5000 is very high!

With my previous camera, ISO 1600 was really pushing the boundary of acceptability, with only about 50% of those images being able to hold up to the noise level. After running noise reduction on this image however, it became clear that images shot as high as 5000 ISO would be usable for many circumstances. This probably still wouldn’t hold up for a 16 x 20 inch wall print, but would most likely do fine for editorial use.

Finally, in order to show how smooth the images really are at ISO 800, I’ve included a shot of an anna’s hummingbird, followed by the 100% crop of its head.

An anna's hummingbird perches on a thin branch, surveying the landscape, Redwood Shores, CA.
An anna’s hummingbird perches on a thin branch, surveying the landscape, Redwood Shores, CA.
A 100% crop of an anna's hummingbird. At ISO 800, the Canon 7D Mk II performs with amazingly low noise.
A 100% crop of an anna’s hummingbird. At ISO 800, the Canon 7D Mk II performs with amazingly low noise.

With previous cameras, I’ve always used ISO 400 as my standard starting point, moving up and down the range as light would allow. But with the 7D Mk II, I will likely start shooting at ISO 800 most of the time. I’ve run a slight amount of NR on the hummingbird shot, but the noise is so low that I’d rather have an extra stop of light to play with and get faster shutter speeds than feel the need to drop down to a lower ISO.

Going Macro With A Big Lens

Don’t get me wrong – I love my big lens. My primary lens for bird photography is the Canon 800mm, which serves as a real workhorse. However, there are times while using that lens that I get frustrated. One of the lens’ limiting factors is its minimum focus distance. I can’t bring any subject closer than 16 feet into focus, which means that very small things (for example, hummingbirds) still appear fairly small in frame. What to do about this limitation? Enter the extension tube!

An anna's hummingbird pauses from its rapid flight to warm itself in the sun
An anna’s hummingbird pauses from its rapid flight to warm itself in the sun

Recently I took an out of town colleague to some of my favorite local bird sites. We found an area rife with anna’s hummingbirds, zipping this way and that, and generally causing a ruckus as they battled each other over territory. I took some shots, but couldn’t get close enough to these little creatures to fill the frame. I resolved to come back the following day, this time armed with my full array of extension tubes.

Luckily the hummingbirds were still there, sparring and resting, and this time in beautiful light. I wanted to get as close as possible, so I stacked three tubes together and placed them in between my camera body and lens. This allowed me to get as close as about 10-12 feet away from the birds, finally filling my frame. Creeping closer yet, I wanted to push my extension tubes to their limit, and was able to get the image below.

An anna's hummingbird perches on a small branch and opens its beak
An anna’s hummingbird perches on a small branch and opens its beak

Extension tubes have no optics in them, and can even be in the form of cardboard – no electronics required! My tubes happen to have small contacts that still allow me to use my lens’ autofocus system, albeit much slower than normal.

The principal of an extension tube is to move the rear focusing element of the lens further away from the focal point, which in today’s world means the camera’s digital sensor. The effect is that the lens’ minimum focus distance is reduced, allowing the entire rig to move closer to the subject while keeping it in focus. The downside is that with extension tubes attached, the lens will no longer be able to focus to infinity.

In comparison to most photography gear, extension tubes are relatively cheap. I have a set of Kenko tubes that stack together. If you ever want to dabble in macro photography, I recommend first getting a (cheap) set to tubes before spending bigger bucks on dedicated macro lens. Yes, the macro lens will give you better quality, but a set of extension tubes will allow you to bring your entire collection of lenses into the macro world.

Anna’s Hummingbird On Nest

An anna's hummingbird perches on the edge of its nest as it prepares to feed its chicks
An anna's hummingbird perches on the edge of its nest as it prepares to feed its chicks. Canon 800mm f/5.6L IS lens with the EOS-7D. ISO 800. Evaluative metering -2/3: 1/640 sec. at f/10.

Recently I was alerted to the location of an anna’s hummingbird nest near my house. After much searching, I found a nest the size of an espresso clinging to a narrow tree branch. No hummingbirds were visible, but I knew this nest contained several recently hatched chicks. I could hear them making faint sounds as they waited for their parent to show up with food. Finally, an adult approached and perched on the edge of the tiny nest.

An anna's hummingbird feeds hungry chicks while perching on the edge of its tiny nest
An anna's hummingbird feeds hungry chicks while perching on the edge of its tiny nest. Canon 800mm f/5.6L IS lens with the EOS-7D. ISO 800. Evaluative metering -2/3: 1/800 sec. at f/10.

The hummingbird proceeded to feed each chick one by one. Once it was finished feeding them, it settled down for a short rest on to of the nest, incubating the chicks.

An anna's hummingbird sits on top of its nest, incubating young chicks
An anna's hummingbird sits on top of its nest, incubating young chicks. Canon 800mm f/5.6L IS lens with the EOS-7D. ISO 800. Evaluative metering -2/3: 1/800 sec. at f/10.

I took these photos from 20 feet away, which is the minimum focusing distance of my lens. It is important to never approach any kind of nest too closely. Doing so will disturb the nest and stress the birds, potentially causing the death of the chicks.

In fact, after taking these photos, I saw a couple approach the nest, and start trying to pull away some of the pine needles you see in the above photos, so that they could get a better view. This is perhaps the most destructive thing they could do, short of picking up the nest and dumping the chicks on the ground. After asking them to back away from the nest, I explained that in pulling away cover, they were exposing the nest to predators, and leaving the nestlings vulnerable. That exact scenario had played out with a similar nest in the area only weeks before. Someone had broken away protective branches around the nest, and all the chicks were killed.

Hopefully these little ones made it.

Copyright 2017 Hank Christensen