Photo Fix Or Photo Fraud?

I was able to digitally remove the mud, restoring a close approximation of what the chicks' reflections looked like behind the mud.

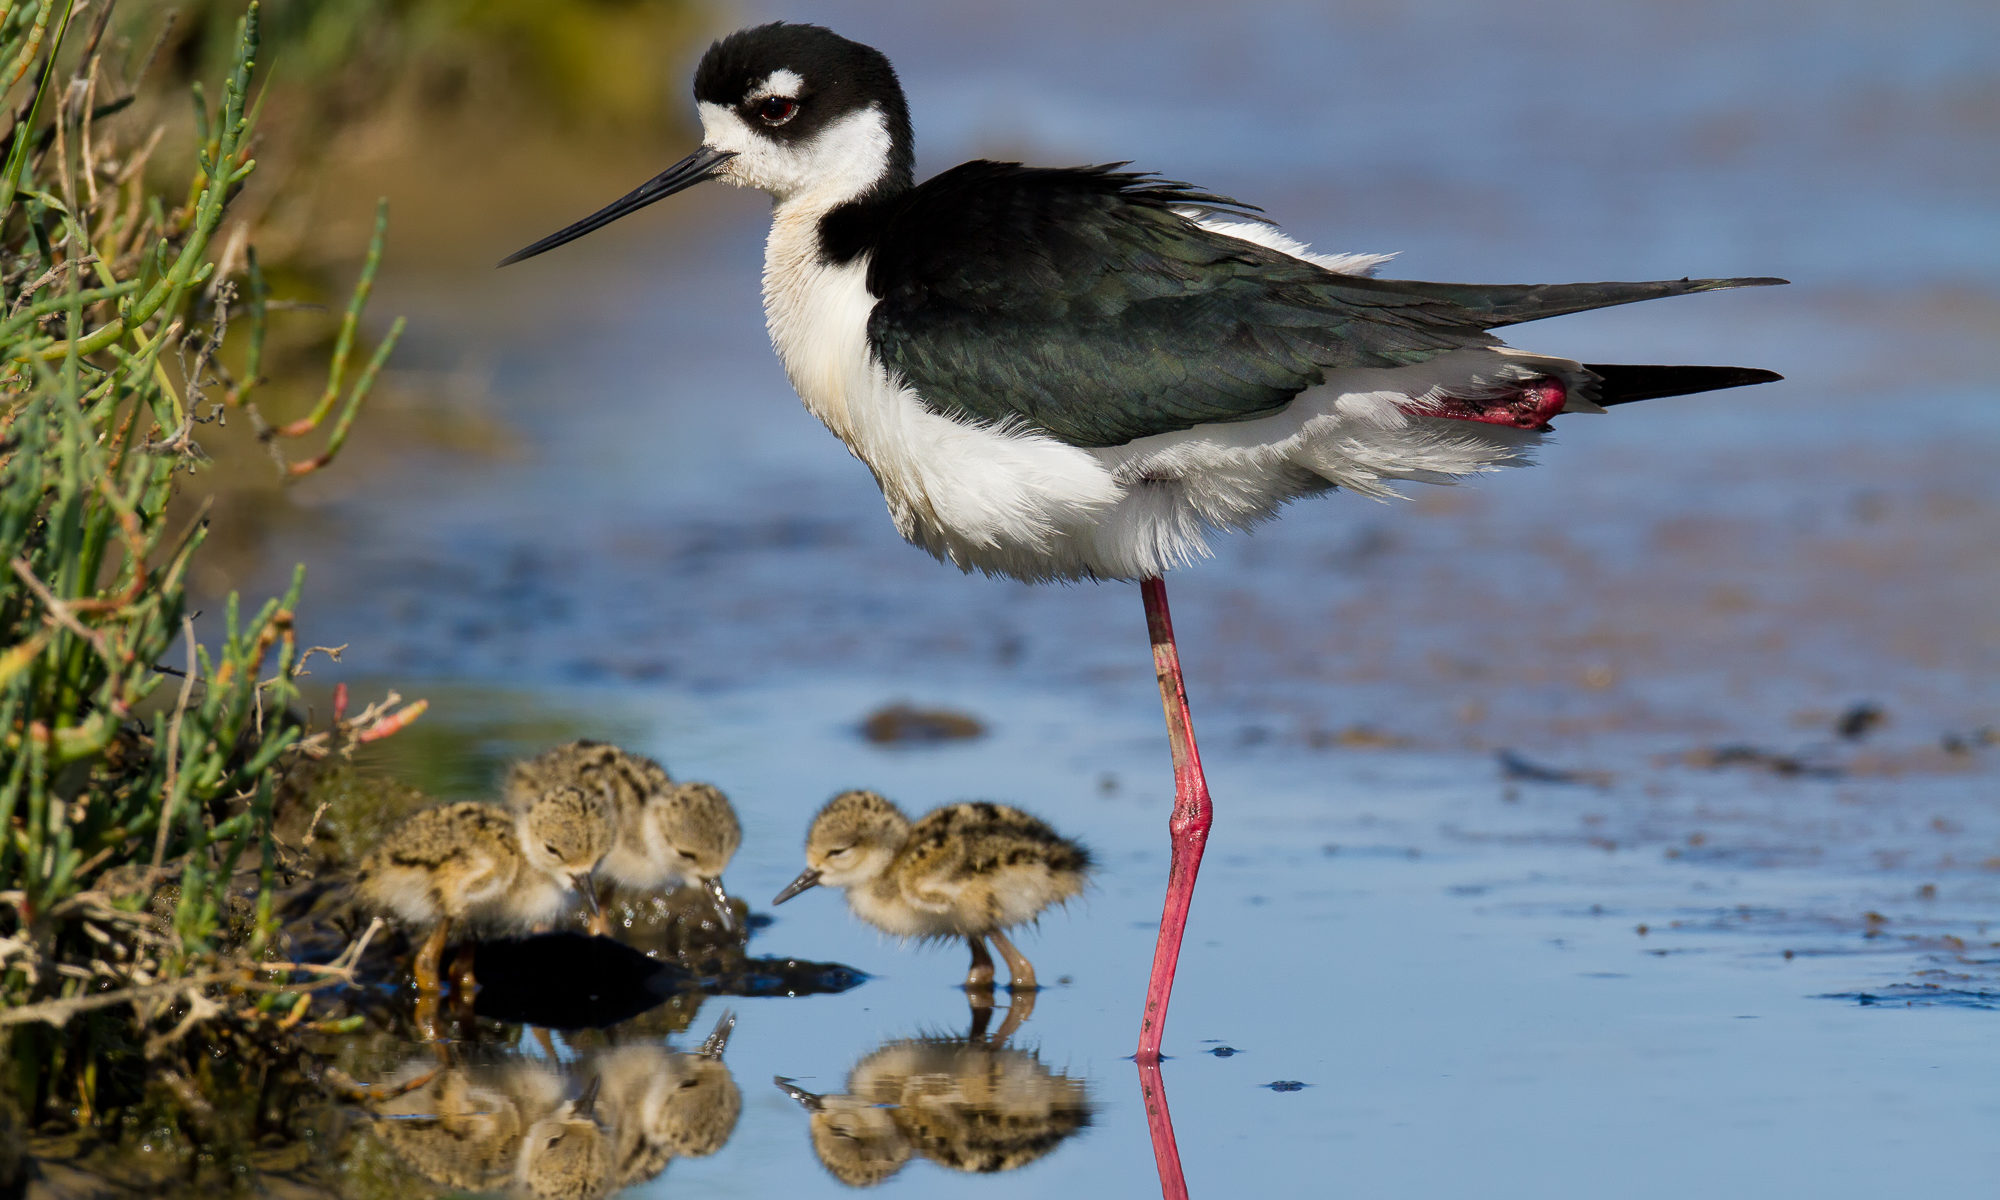
I took this photo last year of a black-necked stilt and her three young chicks. I had set up in my usual position, with my lens close to the water surface in order to achieve a more intimate eye-level perspective. I was happy with the shoot and this shot in particular, showing all three chicks together with the mother standing protectively over them.

The only thing that bothered me each time to looked at it was the out-of-focus mud bank just peaking up into the frame. It had not been a concern when I was shooting the mother by herself, but once the chicks were introduced to the scene, the mud cut off parts of their reflections and became a distracting element.

The original image included a distracting mud berm obstructing the reflections of the chicks.

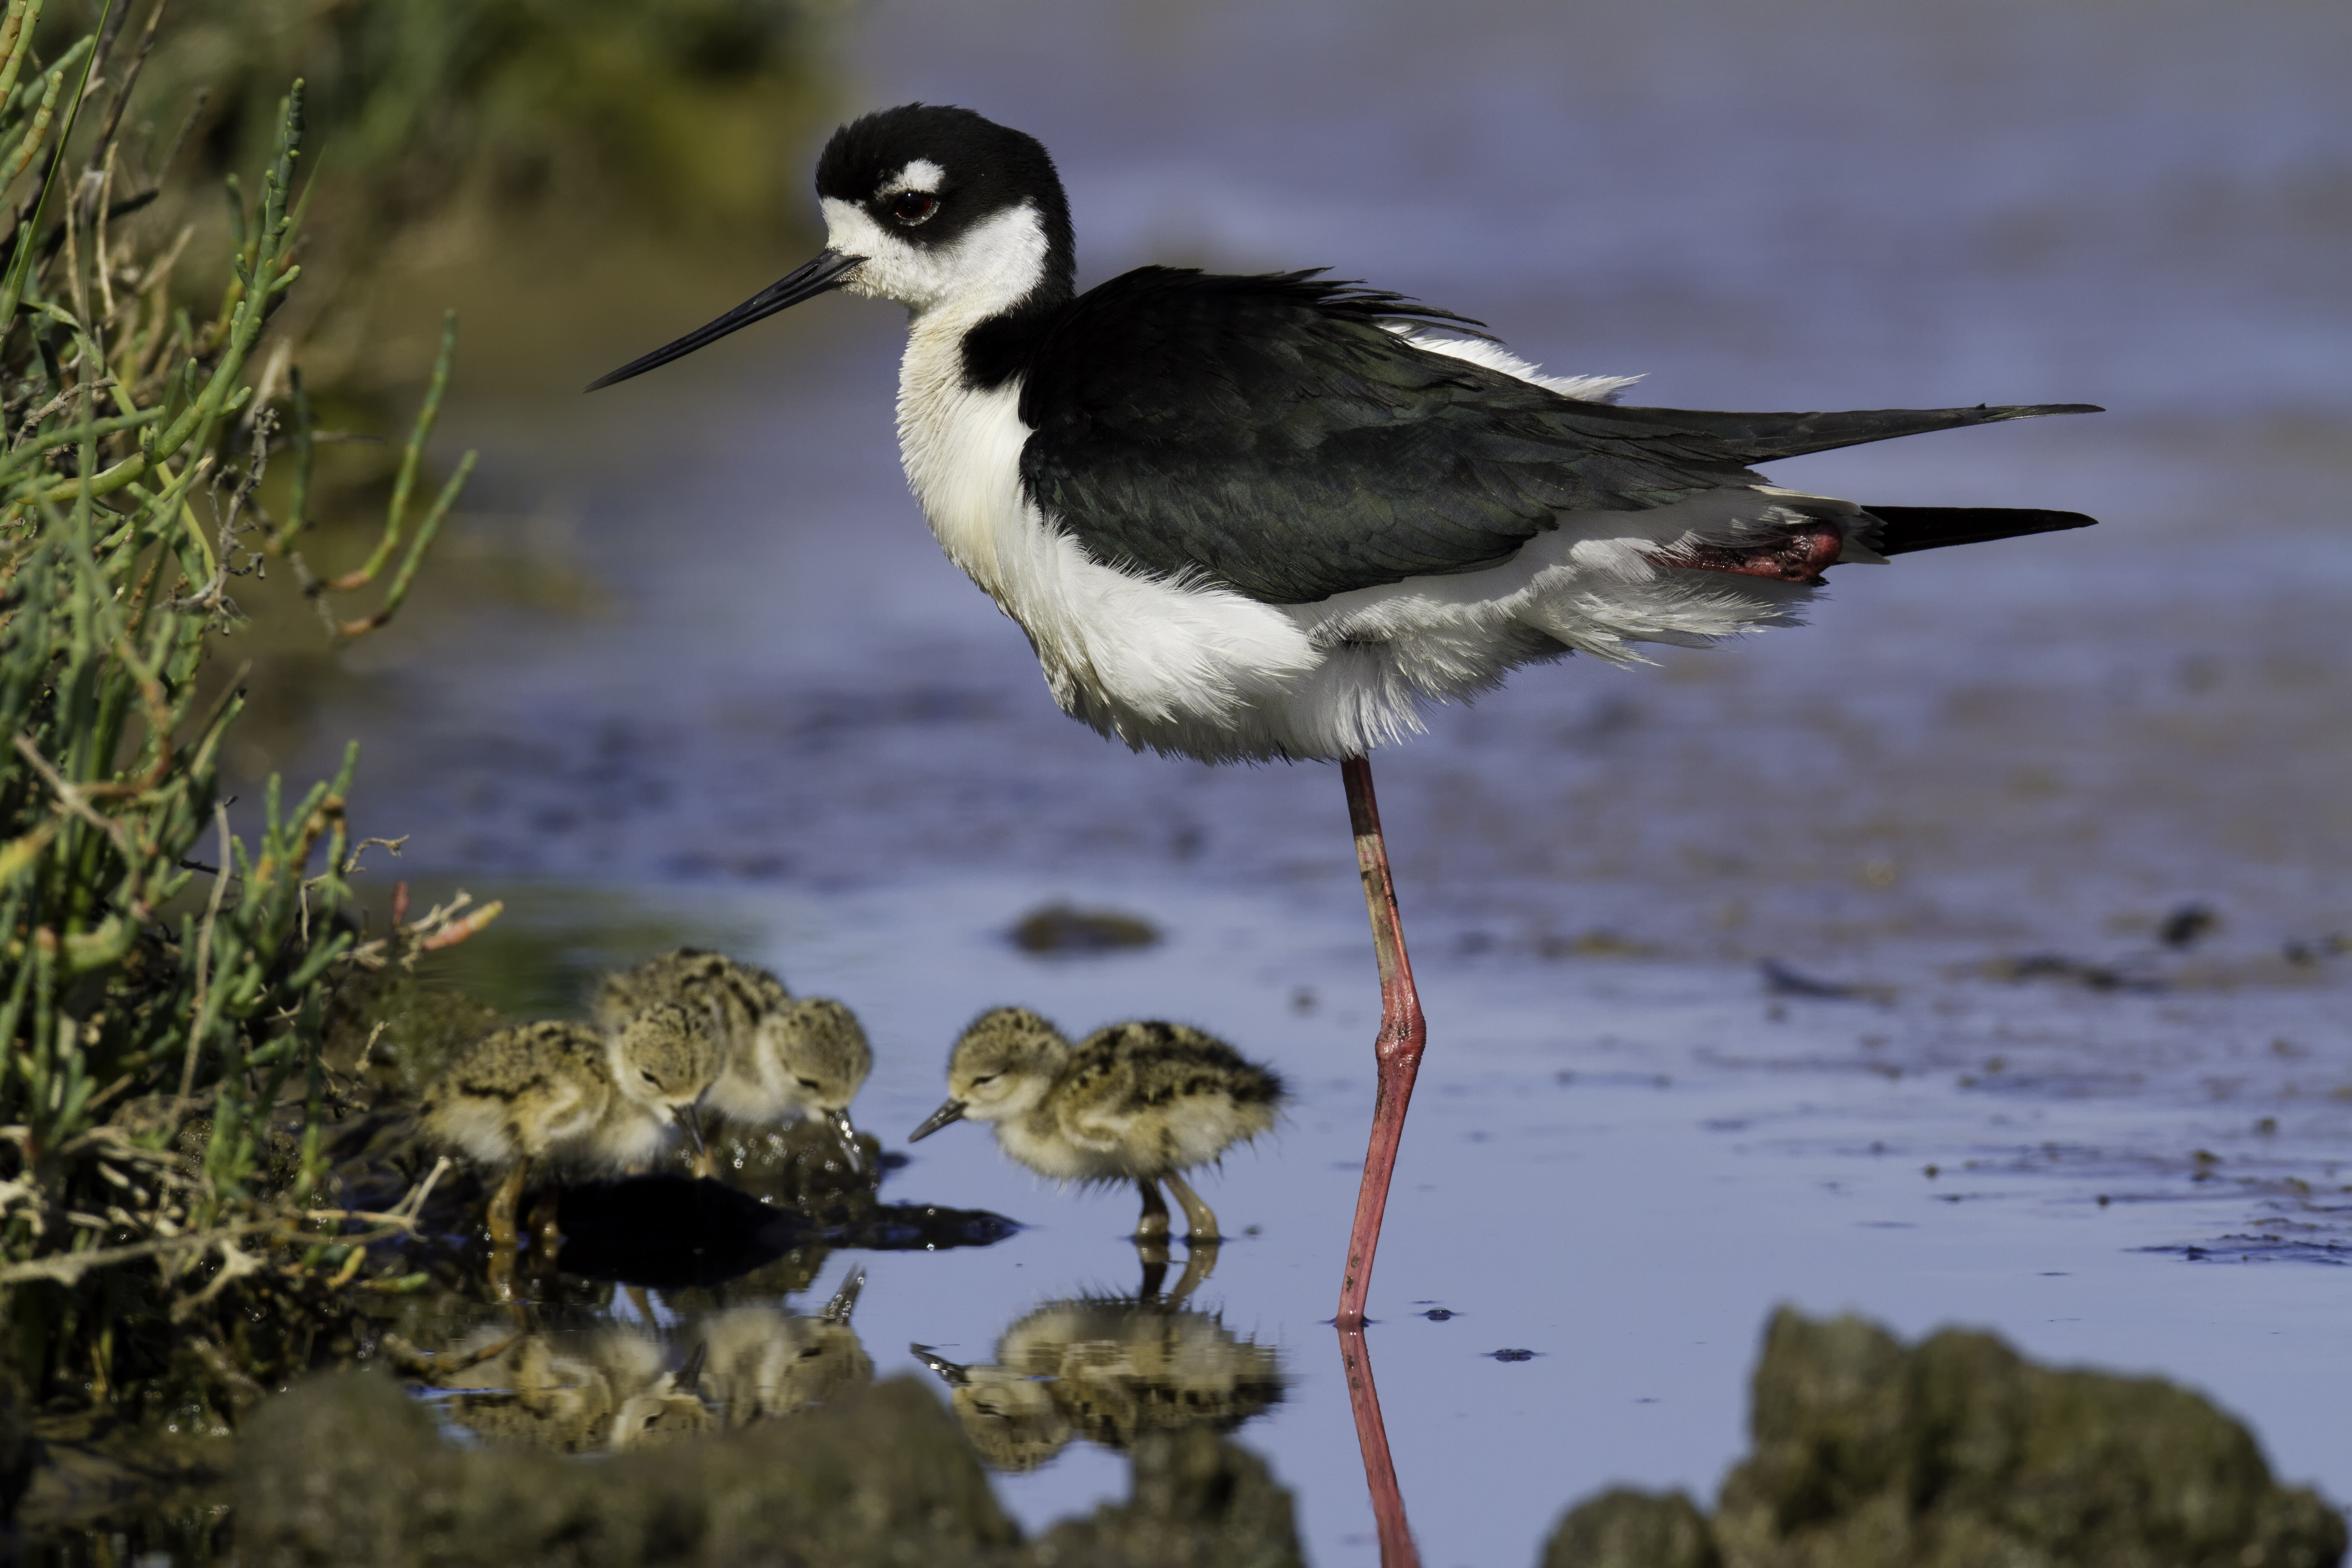
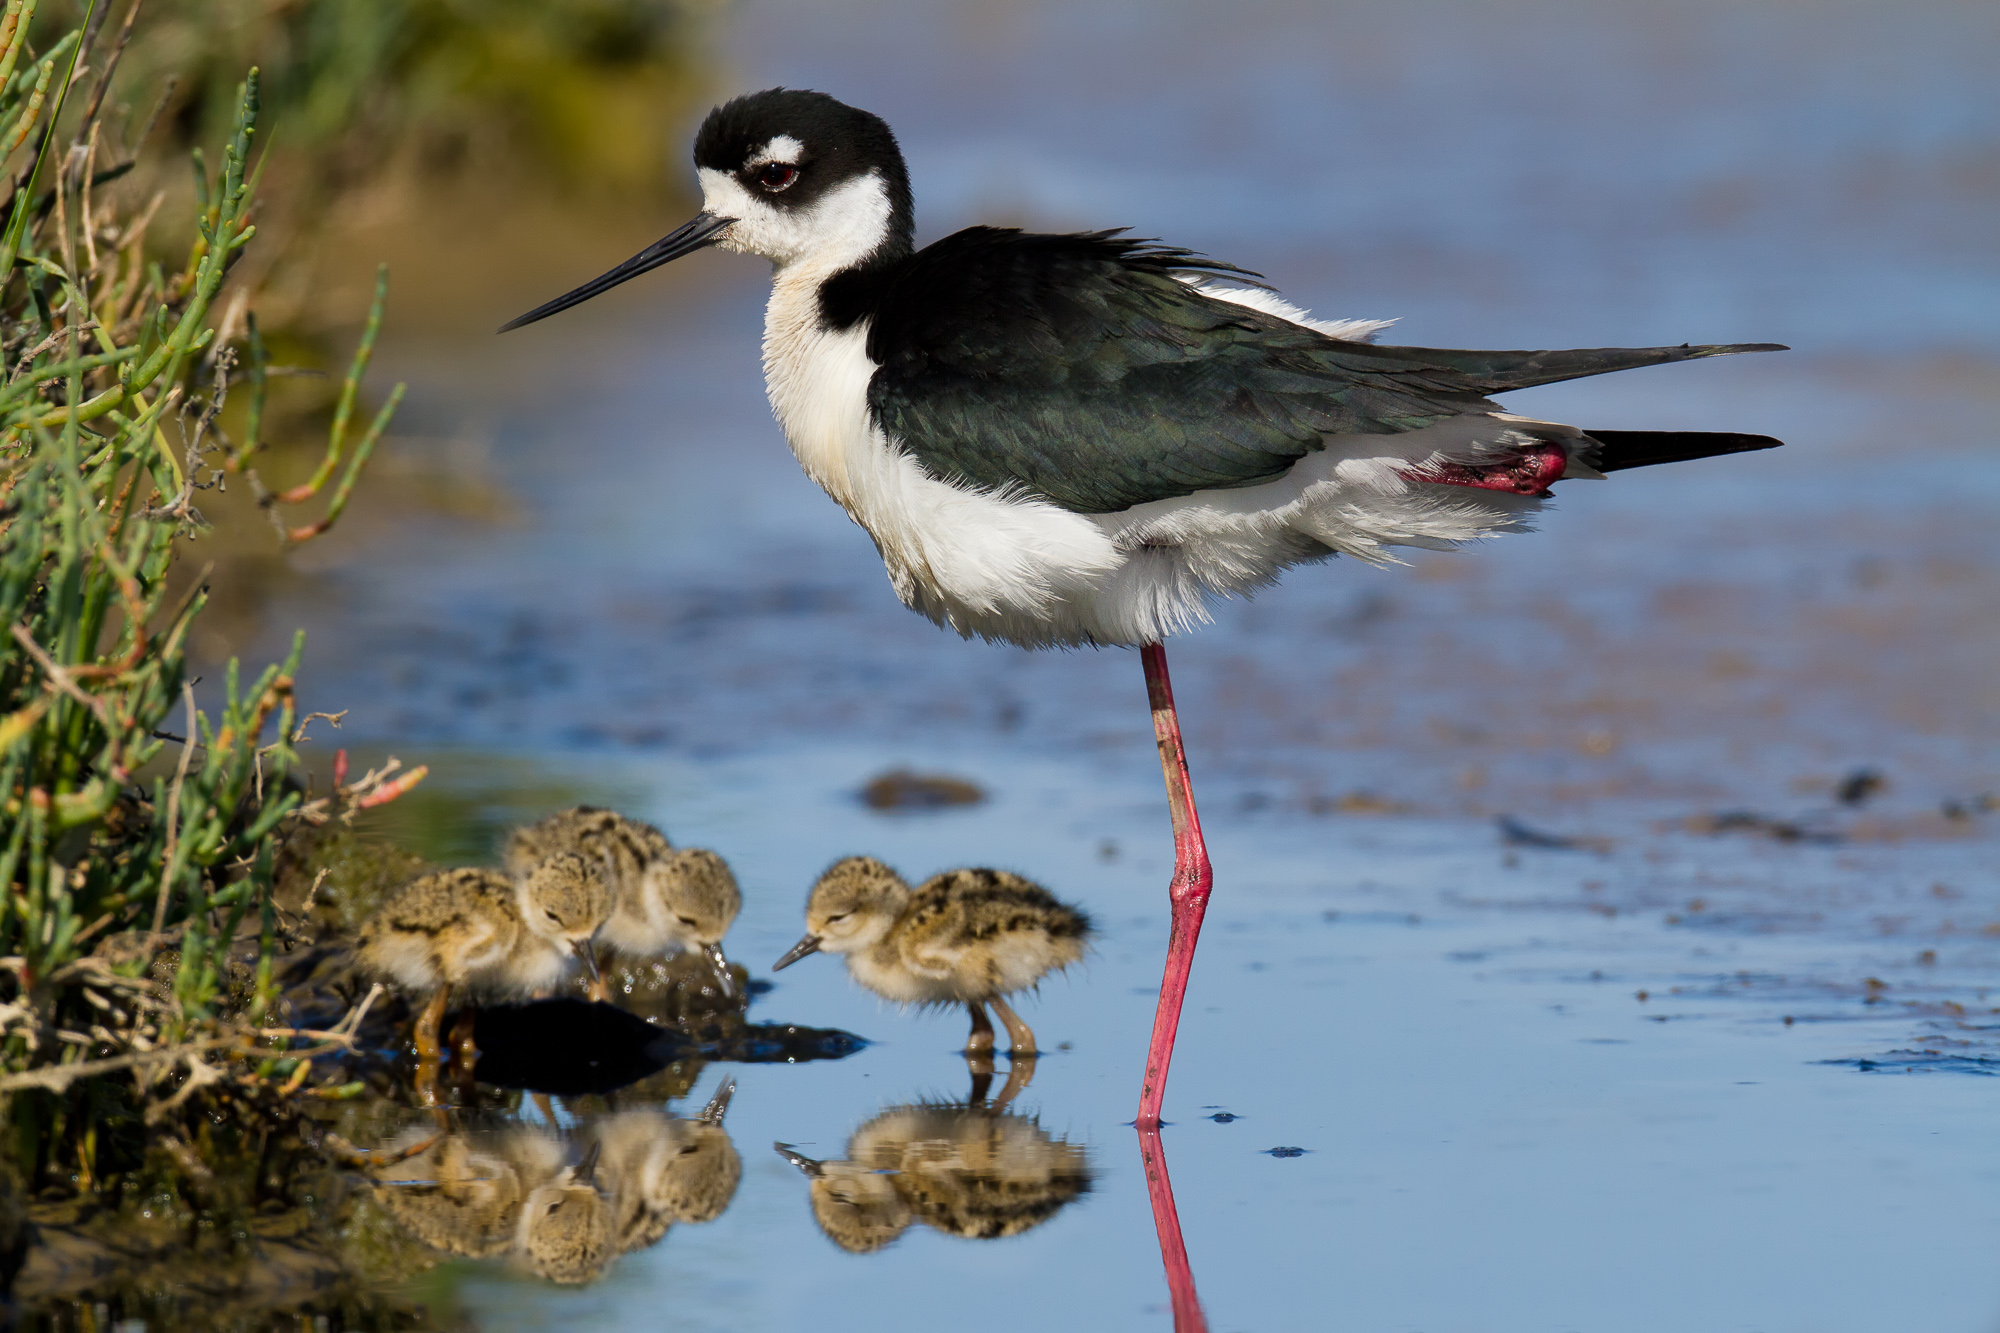
This week I took another look at the shot and realized I might be able to pull off digitally removing the mud feature, and finally fulfilling my original vision. The result is below.

I digitally removed the entire mud bank across the bottom of the photo, and restored portions of each chick’s reflections to rebuild what had been hidden behind the mud. While I was at it, I removed a distracting out-of-focus blade of grass from the left hand side of the photo.

I was able to digitally remove the mud, restoring a close approximation of what the chicks' reflections looked like behind the mud.
I was able to digitally remove the mud, restoring a close approximation of what the chicks’ reflections looked like behind the mud.

Was my change acceptable? Ethical perceptions of photography range wildly. Each photographer and photo critic sits somewhere on the spectrum from thinking that photography is merely a form of art so it is up to the artist’s vision, to thinking that any changes to what was captured by the camera is unethical and not acceptable.

In fact, ethics in photography cover topics other than just post-processing manipulation (which probably gets 80% of the attention). Even when a photograph represents accurately what a camera captures, it does not mean that the scene wasn’t artificially created by the photographer.

I think the judgment lies in how the photograph is presented to the audience. Is this presented as a work of art created in the mind of the photographer? Is it a natural history image, meant to accurately depict a natural scene or behavior? Do the digital edits in any way change the fundamental portrayal of that natural scene or behavior?

For example, in the digitally altered image presented in this article, if I had artificially inserted any of the chicks into the scene with the mother in order to create more emotional impact, that would go beyond what I consider an ethical representation of my work. It would be depicting a behavior in a species that never actually took place. However, the edits I have made fall inside what I consider ethical. I have not changed the position or behavior of any of the subjects of the photo. I have only removed an aesthetically distracting element in order to create a more pleasing photo.

What do you think? I’d love to hear your opinions on the matter.

Teaching A Middle Aged Dog New Tricks For Old Photos

Painted cliffs descend to a mixture of fir and pine along East Eagle Creek, Eagle Cap Wilderness, Oregon

For me, learning happens in spurts. Call it a growth spurt of the mind. Over the last few weeks I have been spending many hours learning advanced Photoshop techniques to help me process my photos. This gives me better tools to recreate exactly what I saw, and the mood I felt when I took the photograph.

Now, I’m no slouch when it comes to Photoshop, but that application is so deep and allows for so much creativity, there is always more to learn. Once you’ve become expert in all the individual tools Photoshop has to offer, combining them to work for you becomes a life-long practice.

Needing to try out some of the new techniques I was exploring (detailed selections, channel masking, blending modes, etc), I decided to reprocess the photo above, which I took two years ago in Eagle Cap Wilderness. I always loved the photo, but never felt that I achieved that sense of awe that I experienced hiking down East Eagle Creek canyon. My latest reworking of the photo is above – here is the result of my original processing two years ago:

Painted cliffs descend to a mixture of fir and pine along East Eagle Creek, Eagle Cap Wilderness, Oregon

One of the things that I love about digital is that as time goes on, the experience I gain not only impacts my photographs going forward, but can have a positive impact on old photos as well. It can also be seen as a curse – that feeling that you’re never really finished working on a photograph. But I’d rather see my work (even old work) improve over time, and I’m more than willing to put in the time to make that happen.

Masking: the portrait photographer’s best friend

Ever take several photos of a group, but none of the shots show everybody looking at the camera, eyes open, with a smile on their face? The more people you add to the shot, the more likely this is to occur. Recently I shot a wedding, and although most of the shots came out well, one of the critical portraits (the wedding couple with the bride’s parents) did not turn out. There wasn’t a single frame with everybody looking their best.

The photo on the left was the best shot, but the mother of the bride was looking away from the camera. Because I knew I liked the picture except for this one problem, I hunted through the rest of the similar shots and found the photo on the right. Ordinarily, it would be a throw-away, particularly because the bride is blinking. But the mother of the bride’s expression is perfect.

Good shot, but mother of the bride is looking away from the camera
Mother of the bride is smiling at the camera, but bride's eyes are closed

So now that I have both pictures that I want to combine, how do I do it? First, I open both images in Photoshop (for this example, I will be referring to CS4, but the same technique can be used in CS3). Using the Move tool, I drag one image on top of the other image. This will create a second layer, giving the second image two layers, one with each original image.

Or, if you are using Lightroom, all of the above can be skipped by selecting both photos, and clicking the menu item Photo->Edit In->Open as Layers in Photoshop…

Now that both images are stacked as separate layers, I select both layers in Photoshop and click the menu item Edit->Auto-Align Layers. This is a crucial step in making sure everything blends nicely between both layers when I merge them later. Next, I make sure that the image I want to keep (the left image above) is the top layer, and I add a layer mask (by clicking on the rectangle with the small circle icon at the bottom of the Layers palette). I make sure that black is selected as the foreground color.

With the top layer selected, I use the paint brush tool to paint the photo in the places that I want the bottom layer to show through. In this case, I painted in the mother-of-the-bride’s head. The head from the bottom layer appeared in the top layer, creating the fixed photo below:

Fixed portrait with everyone looking great

If the two photos you are merging have only small differences, the above method can be a great and more natural looking alternative the more traditional approach of selecting from one image and pasting into another.

To HDR or not to HDR

Sometimes capturing a scene that has very bright and very dark areas with a camera can be impossible, because both film and the digital sensor can resolve fewer stops of light than the human eye. Traditionally, this limitation was overcome by using a graduated neutral density filter, which darkened the bright portions of the scene to allow the film to expose the entire scene correctly. With the advent of digital technology, there has been a trend to move instead to post processing and digital manipulation to achieve similar results.

HDR (or High Dynamic Range for the uninitiated) has been sweeping the digital photography world for the past couple of years, mostly thanks to some new software that makes creating these images easy. The goal is simple: use several shots of the same scene at varying exposures to create a single image with a greater dynamic range (the range between pure white and pure black) than your camera can capture. Unfortunately, this goal is usually not achieved with results that look correct to the human eye. The final images appear flat and with low contrast, and the colors tend look almost cartoonish. This can be overcome to some degree by increasing the black level and overall contrast – however correcting the color issue is difficult.

The solution is to go back to digital basics. Instead of letting software automatically combine 3 or more shots at different exposures, combine 2 or more images yourself in an application such as Adobe Photoshop using stacked layers and various blending techniques. Photographer Glenn Randall covers some of these techniques and the principals behind them in his recent article for Outdoor Photographer magazine. The images below demonstrate using image blending verses an HDR software approach.

High Dynamic Range photo of Zion National Park
High Dynamic Range photo of Zion National Park, combining three images shot at different exposures

The above image was created by blending three photographs of different exposures together using software. Once this was done, the contrast was increased significantly. However, as you can see, the colors still look unnatural, with too much yellow in the rock. In addition the two rock faces in the background are washed out.

The image below combines two the the images used to create the previous image. The foreground and mountain were exposed with no evaluative metering compensation. The sky was exposed in a second shot at -1 stop, and blended into the foreground using a graduated mask. The result is more natural looking.

Dramatic cliffs rise above a snowy riverbed with foreground trees, Zion National Park
Two images of Zion National Park blended together using a gradient mask

Some people like the aesthetic of HDR images, and that is great. It brings a new artistic flair to the world of digital photography. But since I am usually trying to create a final photograph that accurately portrays what I see in nature, using the blended approach often works better for me.

Copyright 2017 Hank Christensen