
I first heard about Adobe’s astonishing anti-shake feature In October 2011 when they demoed it at their user conference. The tool works on photos that were focused correctly but had a slow enough shutter speed to introduce camera shake (usually from hand-holding the camera), resulting in a blurry photo. To put it simply, the tool will analyze these photos, attempt to derive the directional path that the camera was moving along at the time the photo was taken, and correct that blur path. If it worked, this would be the holy grail of photo correction, finally disproving photography teacher’s mantra – “You can’t fix a blurry photo.”
At the time it was touted as a feature “in development,” which in software speak means it is something we’re tinkering with, but might actually never be released. Therefore, I was very surprised when it was announced as a headline feature of Photoshop CC. Now that this was out, I was excited to put it to the test with some real world examples from my catalog. Would this be a handy tool in the digital photographer’s toolbox, or just useless demo ware – a good idea with poor execution?
To start with, I needed to find a couple of test photos. I did a metadata search in Lightroom through my entire archive for photos taken with my Canon 800mm lens at a shutter speed of less than 1/200 of a second. Even when mounted on a tripod with the image stabilizer turned on, such a slow shutter speed usually introduces camera shake. This results in blur, even when the subject is correctly focused. Most photos taken at this speed with that lens are mistakes, usually due to a rapid change in light or background. And almost all of them become throwaways, never seeing the light of day on my web site.
I quickly found two candidate photos, one of a female ring-necked pheasant at 1/180 seconds which was almost sharp, and a much blurrier shot of a swimming common gallinule at 1/100 seconds.
I first worked on the pheasant and brought it into Photoshop. I duplicated the background to create a working layer and opened the anti-shake filter. The first thing the tool does is to pick a portion of the photo and analyze the edges to make a judgement about the motion of the camera at the time of capture. It automatically selected a portion of the face, probably because it has the sharpest edges in the photo. I slightly adjusted the detection square so that it just included the most important parts of the bird’s face. This is the area I wanted maximum sharpness. Other than that, I left all settings default. I had no experience with custom settings here, and in those cases, it is usually best to leave things alone to see how the tool performs.
There is a large preview in the tool, but I found it didn’t really help me determine if the shake was corrected or not. I hit OK to see the following results:

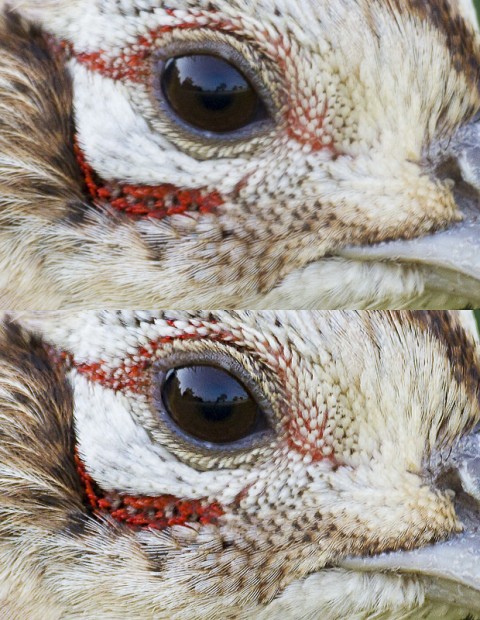
Compare the corrected photo above with the original below.

As I said, the original was almost sharp but not quite. But I was blown away with how sharp the corrected photo was! This definitely turned a throwaway into a keeper. (Thanks Adobe!) Here is a closer crop comparison to help see the improvement in sharpness.
Very satisfied with the results of the ring-necked pheasant, it was time to really put the anti-shake tool to the test. I opened the common gallinule photo and followed the same steps above. This photo is much blurrier than the ring-necked pheasant, but I was fairly sure the subject was in focus, just blurry due to camera shake. This time I again chose a target rectangle around the bird’s head, as this was the area of critical focus (especially the eye). The results are below:

The photo above is corrected, and the photo below is the original.

In this case, the sharpness improved quite a bit, but the results were not as stellar as the first photo. The resulting photo almost looked a little too crunchy, with small halo artifacts here and there. That said, this photo now became usable at smaller sizes. It will find a new life in web use and for smaller prints. Here is a crop to do a detailed comparison.

So what do these two real world tests tell us about the tool? First and foremost, this is not a panacea for blurry photos. This is no reason to go sell your expensive tripod on eBay. However, it can rescue some photos that are right on the verge of sharpness, but suffer from some amount of camera shake. And for those photos, it really does a fantastic job.
I’ll definitely spend some time scouring some of my older photos that I rejected because of camera shake. I’m very impressed with how well Adobe was able to pull this off – it is definitely a worthwhile and very usable feature.
")
")
")
")


