It’s long been said that the eyes are the windows to the soul. That has never been more true than with wildlife photography. Capturing the subject’s eye helps the viewer connect with the animal, and brings a kind of depth to the photograph. Books such as Frans Lanting’s fantastic Eye To Eye are dedicated to this connection between the viewer and the subject. Achieving this kind of connection with your subject is something to keep in mind when out in the field photographing.
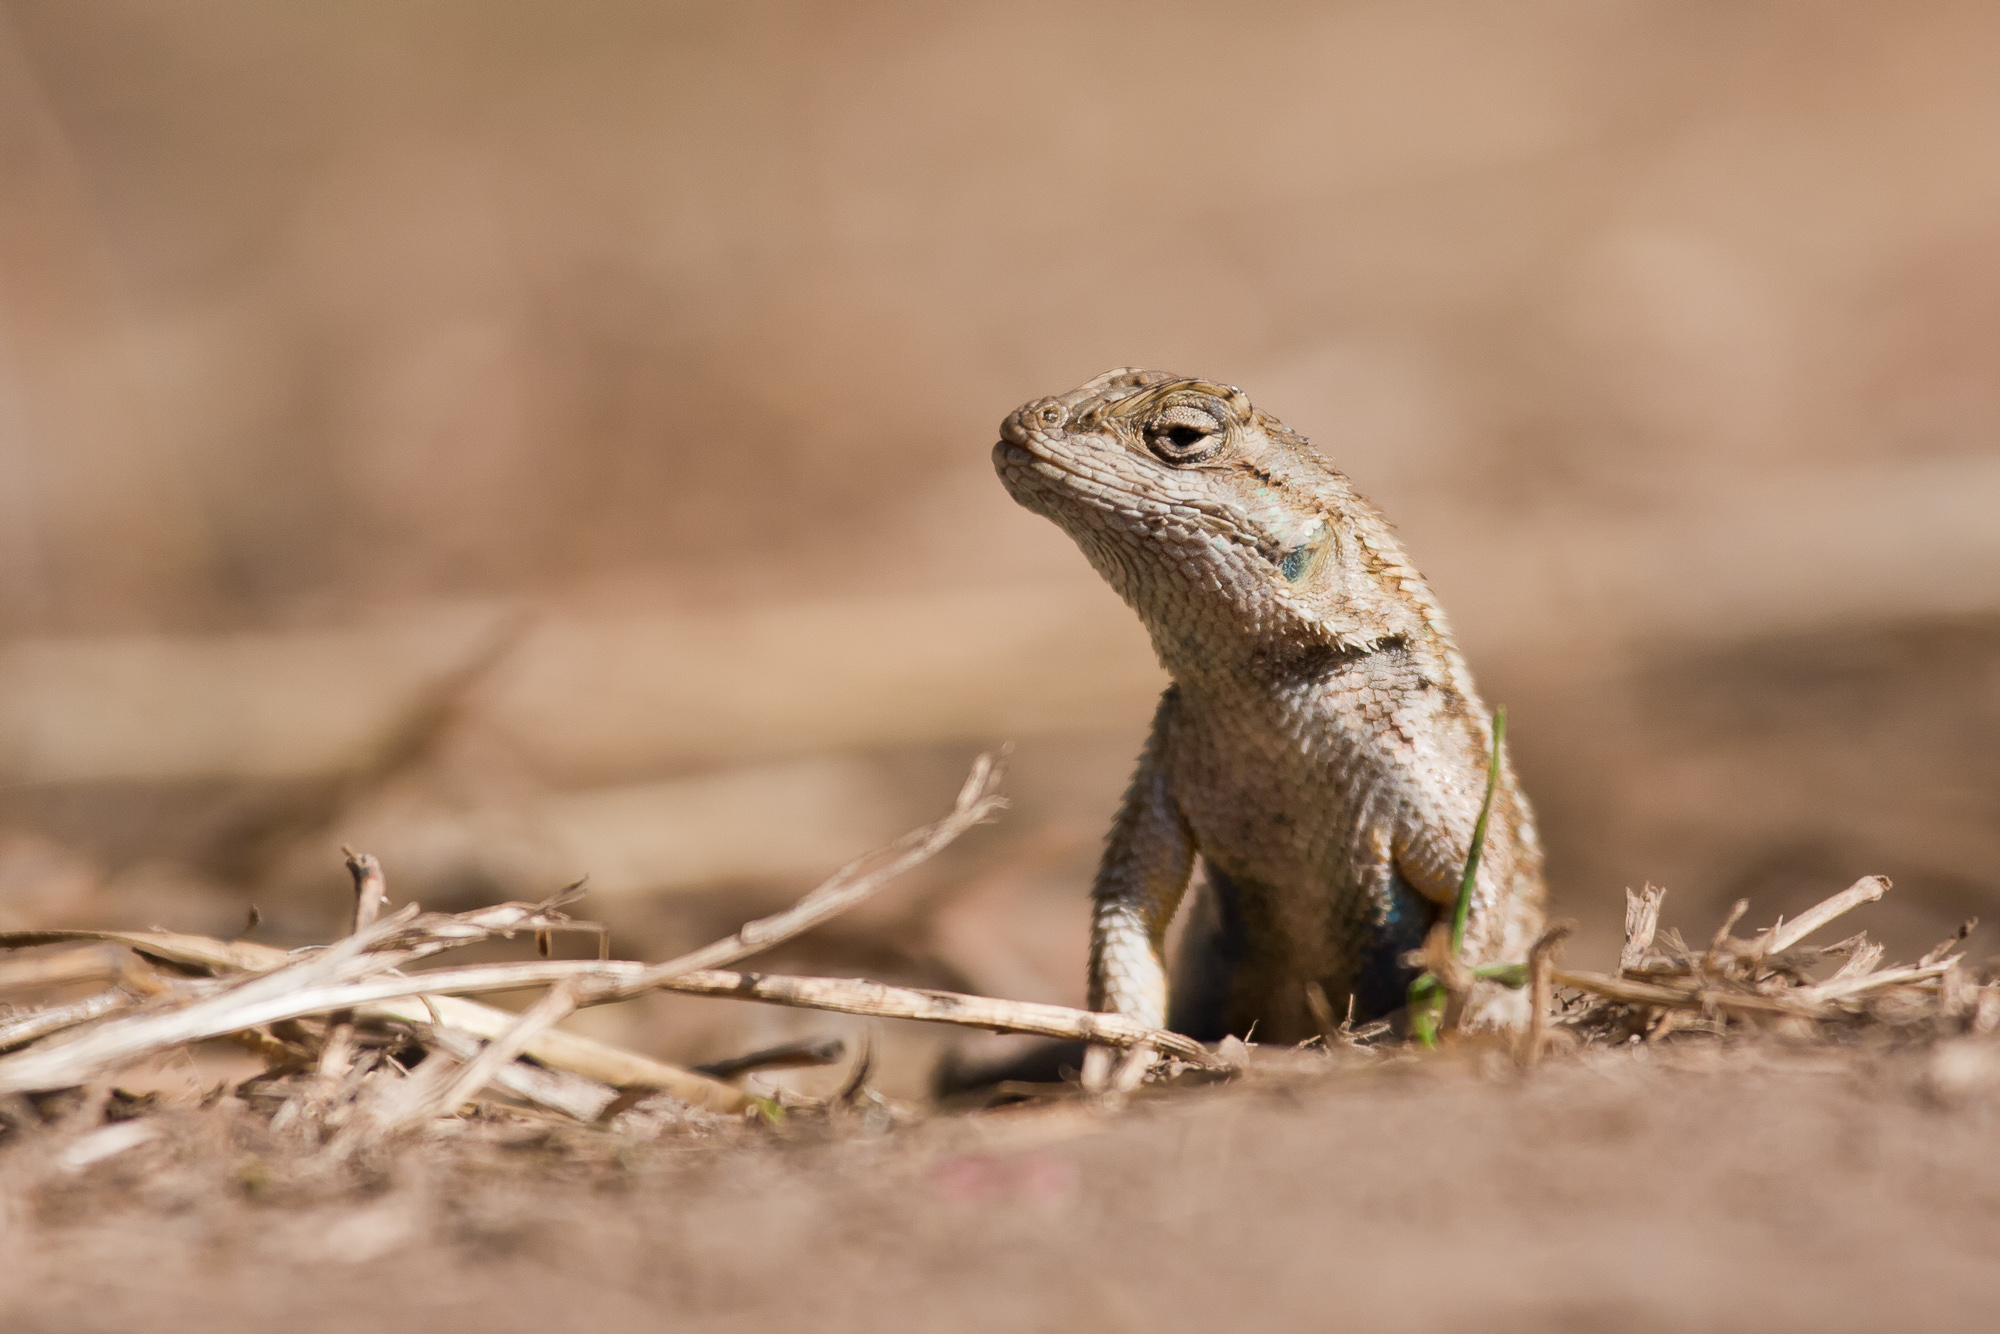
The photo above features a western fence lizard – very common in local open space preserves and urban green space. Recently I was out walking with my wife, and I was carrying (as I often do) my 100 – 400mm zoom lens. We came across this lizard, and given that the birds were not very active this time of day, I wanted to capture at least something fun with my camera. The lizard was only about 5 inches long, tip to tail. I’ve seen about a million straight shots of lizards from above, and knew I could easily fire off a few of my own – boring! That angle shows me nothing about the lizard – it might as well be a rubber toy. I wanted to get a sense for what the lizard might be thinking as he sat out in the hot sun. In order to do that, I had to get down to eye level.
Although the ground was covered in thick dust, I proceeded to get down on my belly, feet behind me (sometimes one has to sacrifice for one’s art!). I put my camera right onto the ground, to get as low as possible. Starting out at a distance with which the lizard seemed comfortable, I slowly crawled forward, taking pictures along the way. Once I got closer than the lens’s minimum focusing distance, I knew that was as large as I could make the lizard in the frame. I usually carry a set of Kenko extension tubes with me, but this time I didn’t have them, so that was as close as I was getting. The lizard kept me in his view the entire time, turning his head back and forth. After shooting for a while, I realized this lizard wasn’t planning on going anywhere soon. So I slowly backed away so as not to disturb him, and went on my way.
By getting eye level to a creature we don’t normally see that way, I was able to create a photo that does more than just document. There is a subtle connection made between the subject and the audience, which when achieved, can go a long way toward the success of a photograph.
Ever get tired of all the ads that tell you that to take better photos, all you need is this new camera or that new lens? If so, this article is for you. Almost everyone has a camera of some kind these days – point and shoot, SLR, cell phone. The tips below will work with any kind of camera out there, and will improve the photos that come out of them without requiring the purchase of a single new item.
A typical snapshot - overall, pretty bad
A better shot, using some of the tips below
I took the photos of my brother above with my iphone. This camera has no flash, a crappy lens, and no controls of any kind other than taking the photo. Using some of the techniques discussed in this article, I was able to add interest and improve the quality of the photo.
1. Stabilize, stabilize, stabilize!
This is perhaps the most important tip here – do anything you can to keep the camera still while taking photos. This usually means using a tripod (and I’d definitely recommend that whenever possible – it’ll change the way you do photography!) But if you don’t have the funds (or the patience) to use one, there are many other ways to keep the camera stable. Get an old grocery bag and fill it with dry beans. Place this make-shift beanbag on anything you can find – rocks, tree stumps, table tops. This will give you a malleable surface from which to position your camera. If that isn’t available, lean up against a tree or wall and hold the camera tight against your face, bracing your elbows against your torso. Hold your breath and shoot.
2. Shed some light on the subject
The darker the subject, the longer the shutter speed required to get the proper exposure. Getting some natural light on your subject will improve the photograph dramatically. Indoor photography (even in the middle of the day), usually has less light than desired. Open some windows to bring in natural light from outdoors, or if possible, bring your subject next to a window. Strong directional light against a dark background can have dramatic effects.
Shooting outdoors with a harsh mid-day overhead sun? Try shooting your subjects in the shade to even out the light. Get a large piece of cardboard and some aluminum foil and build a homemade reflector. With a reflector you can bounce that harsh noon sunlight onto your shaded subject, giving you plenty of light to work with.
3. Find a new angle
Shooting your subject from a lower or higher vantage point can differentiate your shots from the rest of the pack. Think creatively about new ways to capture a subject you’ve seen over and over again.
By moving above my nephew with him looking up at me, I added interest to the photo
I took the photo of my nephew above for his family’s Christmas card. I found a fence to climb, and had him stand below me on some bright green moss. This new angle added interest to what would otherwise have been a mundane straight-forward portrait with a background of trees.
4. Don’t center your subject
Anyone who’s been around photography a while will immediately recognize the rule of thirds. But it’s important, so I’ll repeat it here. Using two imaginary vertical lines, divide your photo area into three equal sections. Now do the same horizontally. There should be four places in your photo area where the imaginary lines intersect. The rule of thirds says that the main subject of the photo should appear in one of these four spots. Unless your photo is specifically illustrating some form of symmetry, avoid placing your main subject in the middle of the frame.
The example below demonstrates applying the rule of thirds. Which photo looks better?
Here the mallard is centered in the frame
By moving the subject to the right, in keeping with the rule of thirds, the photo looks better
5. Edit ruthlessly
This tip doesn’t technically concern the “taking” of photos, but rather what to do with them afterward. Everyone takes crap photos. The pros just take fewer of them, and know enough to get rid of them when they do. Next time you’re reviewing photos from your last vacation or outing, don’t be afraid to delete the misses. In my early years of photography, I was as guilty of this as anybody. I kept EVERYTHING. And yes, with today’s storage, you can technically keep everything that ever comes out of your camera forever. But really ask yourself, do you ever want to actually go back and look at all the bad shots you took?
A friend of mine (I won’t name any names) once took a two week trip to Europe. When he came back, he asked if I wanted to see his vacation photos. “Sure,” I said, “how many do you have?”
“Oh, about 5,000.”
“What?!” We waded through shot after shot of the same subjects, taken as he tried to get the photo he wanted. Needless to say, we never got through them all. And the unfortunate part was that I missed all the gems that I’m sure were in there. So, throw away the crap, or at the very least, pick your winners and copy them to a separate location. When asking your audience to view your photos, having an edited collection will change their response from “Oh, do we have to?” to “Yes, please!” And I’ll bet you never look at your garbage folder again.
As the saying goes, all rules are meant to be broken. Such is true with each tip above. For each tip, there are situations in which they may not be the best choice for one reason or another. But by in large, keeping these in mind when I pick up my camera helps me focus beyond all the bells and whistles of the camera. It pays to occasionally get back to basics and remember the simple things we can do next time we’re out trying to capture that perfect shot.
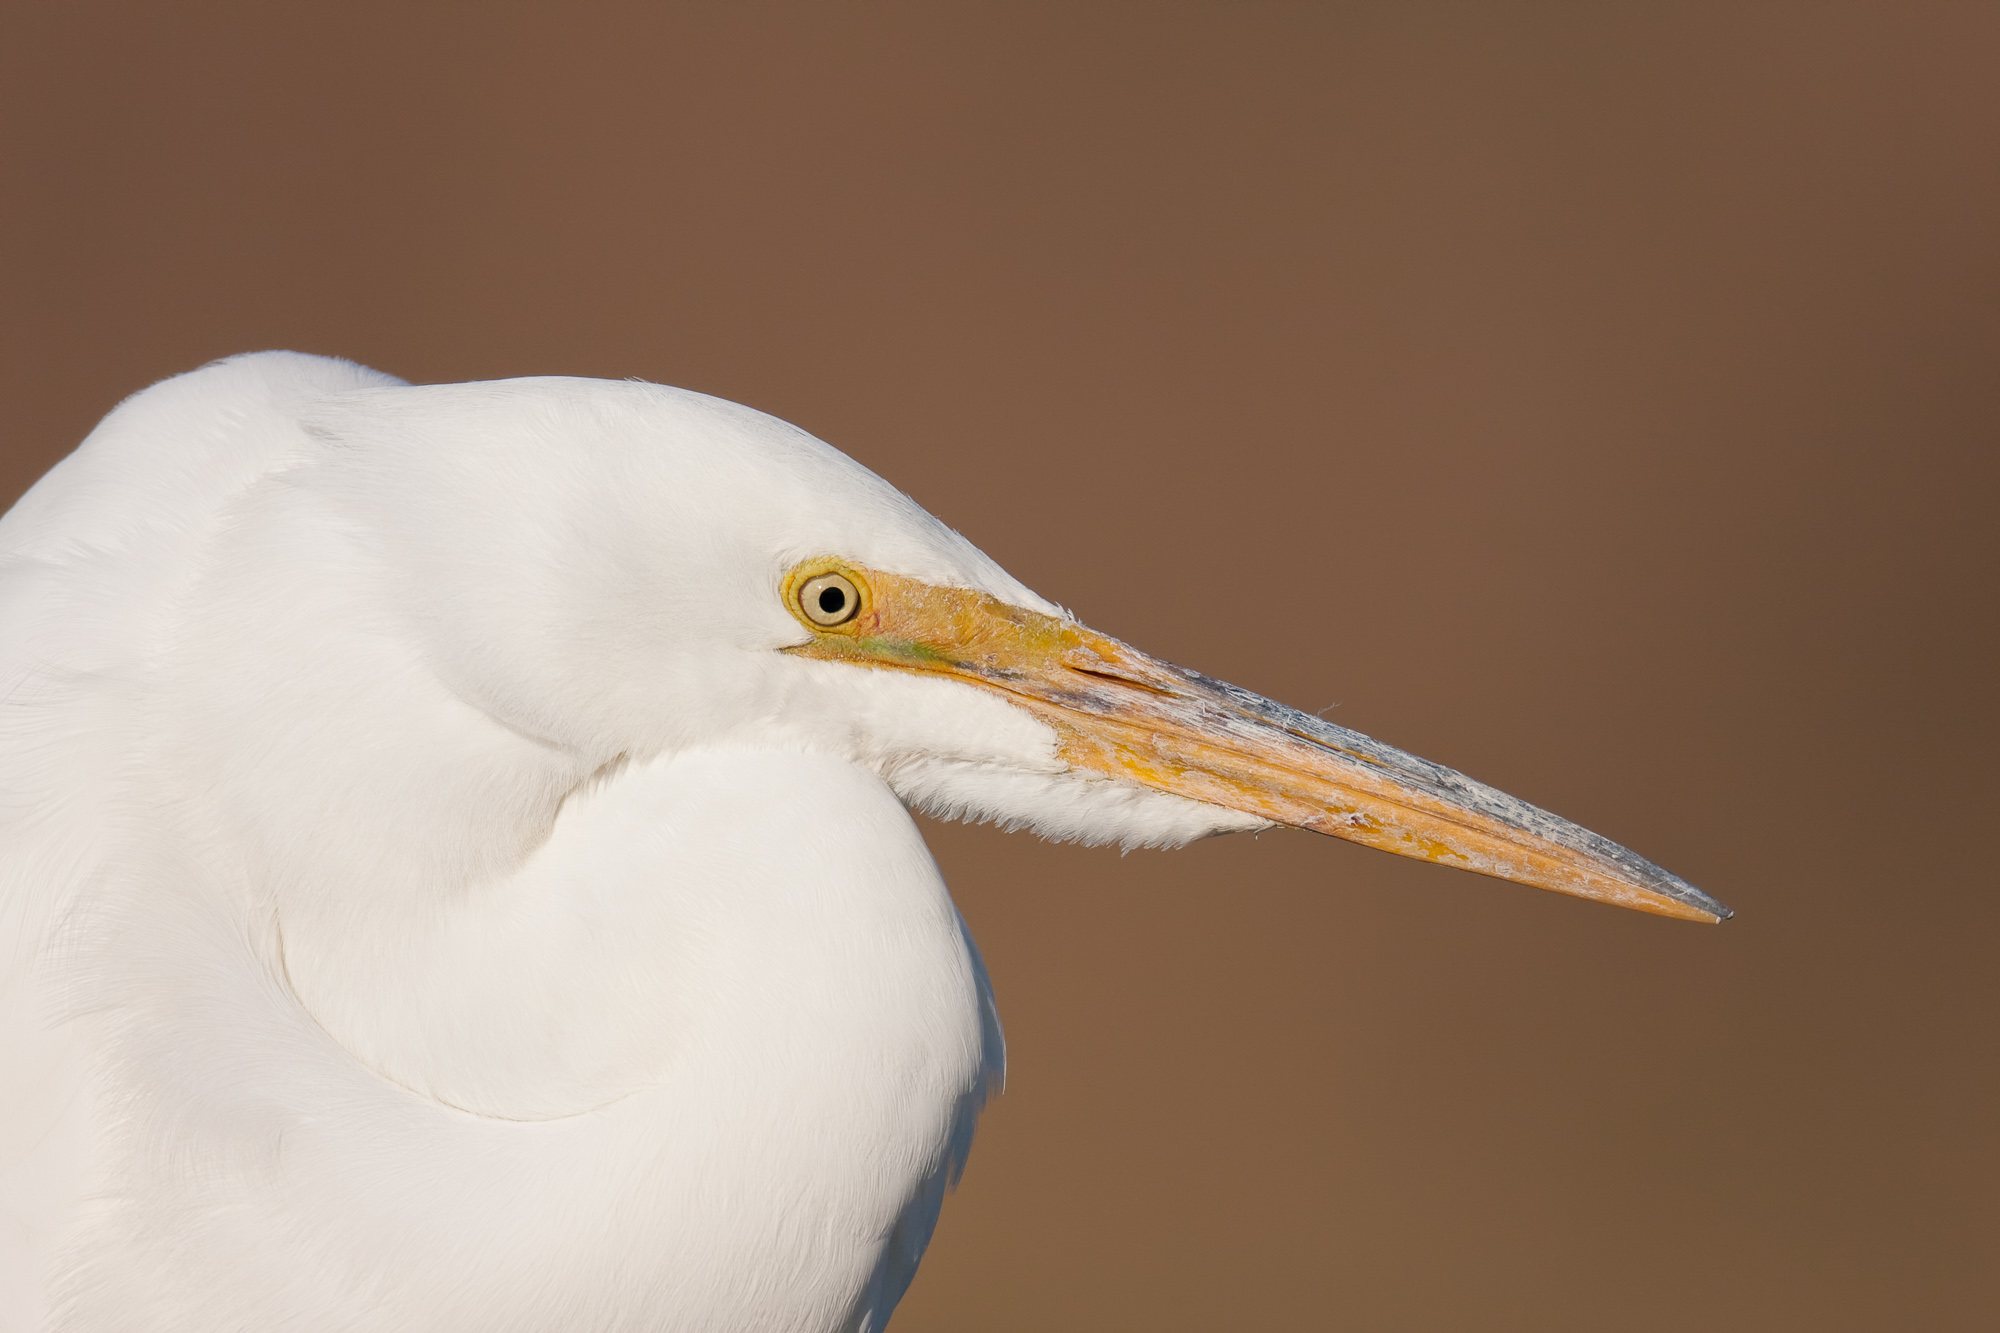
In a post a couple of weeks ago, I mentioned making corrections to your background while still in the field. Another trick you can sometimes employ is to get a different look by changing the background completely. This works best when using long telephoto lenses (400 mm and up).
A great egret poses in soft evening light, preparing to fish for dinner
The great egret in the photo above was perched on a short fence, and eying the water below. He seemed to be looking for the best place to fish for dinner. I was directly in line with the angle of the sun, so as to reduce any side lighting on the egret. The foliage of a berm far behind him created a solid, even color.
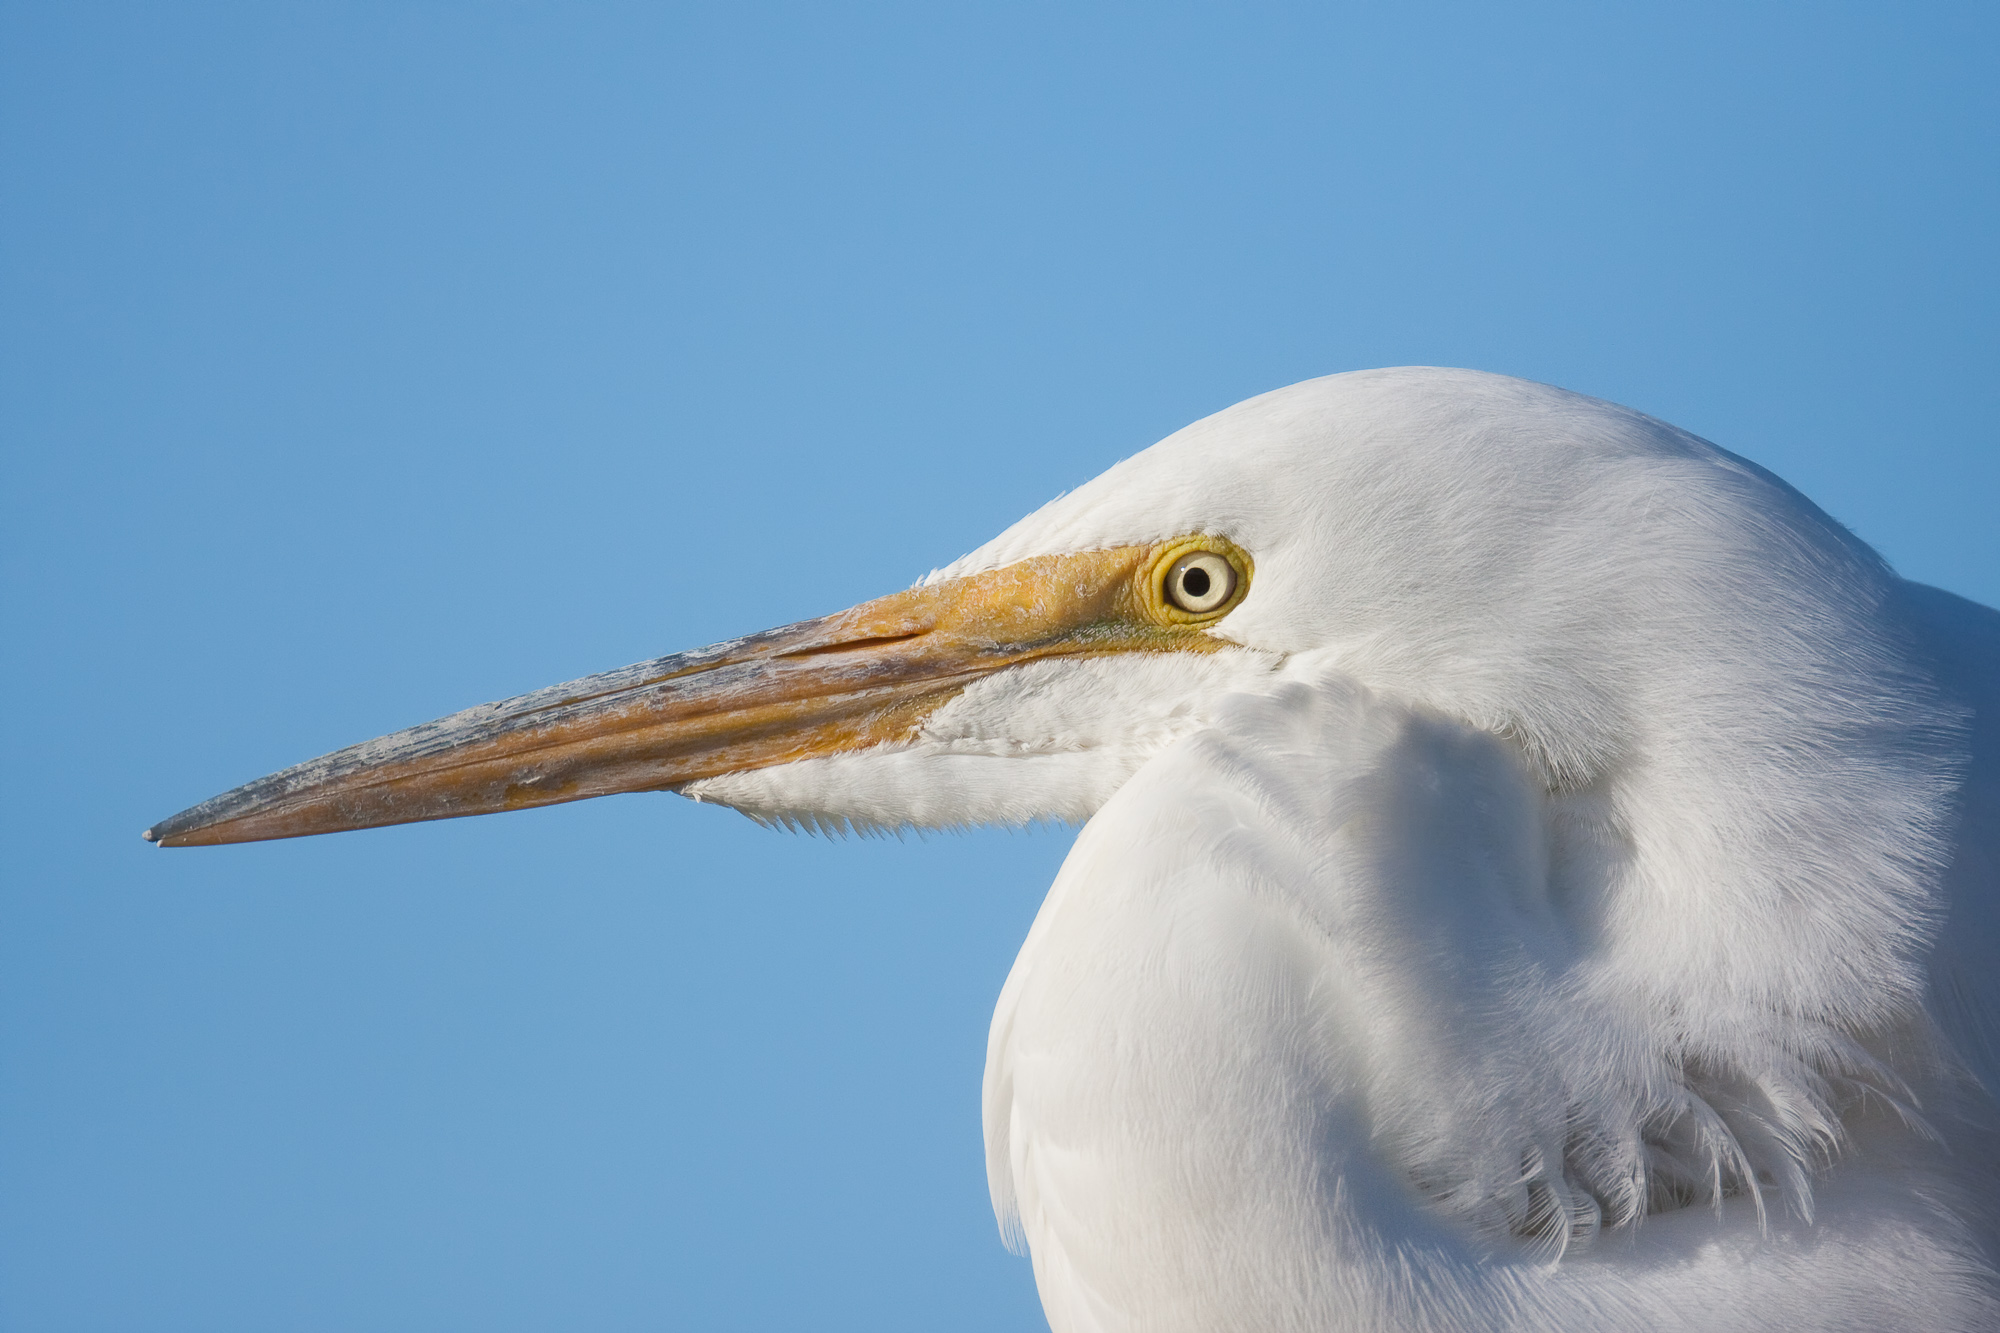
I got several head poses that I liked, but since my subject was being so patient, I wanted to see if I could get a completely different background. The berm was not very high, and the evening sky above it was a nice light blue. I moved to the right and lowered my camera until I was close to the ground. This removed the berm from my background completely, and gave me the photo below with a background of sky.
A great egret poses in soft evening light, preparing to fish for dinner
Because my lens was a long telephoto, I didn’t have to move far to change my background. This is great when my subject is wildlife, and they can decide to end the photo session at any moment. However, I use the same idea even when photographing friends with shorter lenses. Taking the time to look around for different background options can give you different variations on the same subject and can lead to new, interesting photos.
Have you ever taken a great photograph, been really excited about it, only to get it onto the computer and see that some distracting background element ruined it? I have learned this lesson too many times. Yes, you can spend time in photoshop and mask and clone and clean and and and…. It takes a lot of time (and photoshop skill).
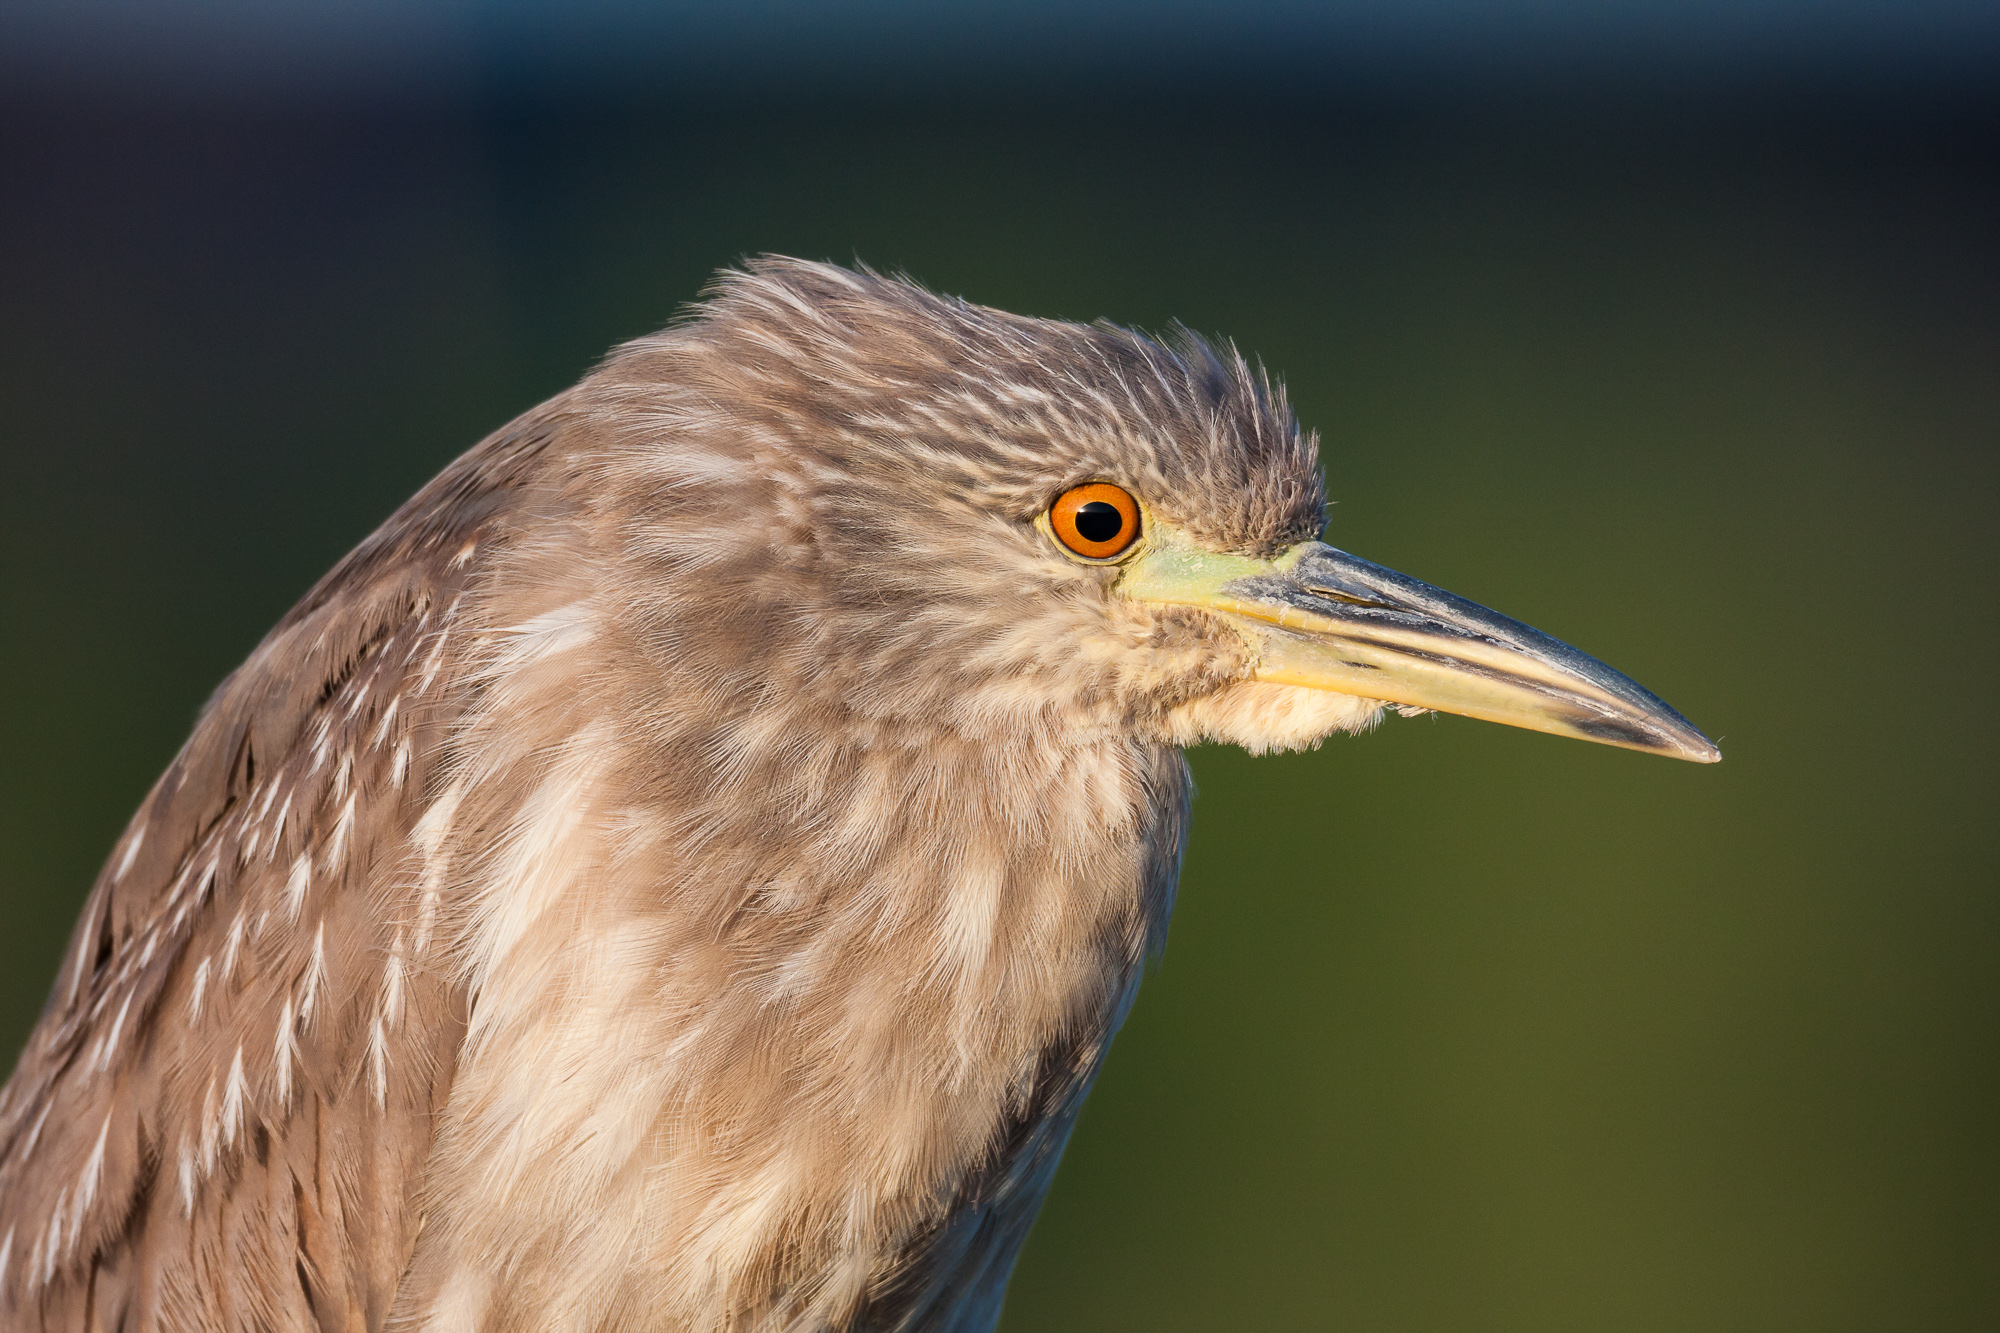
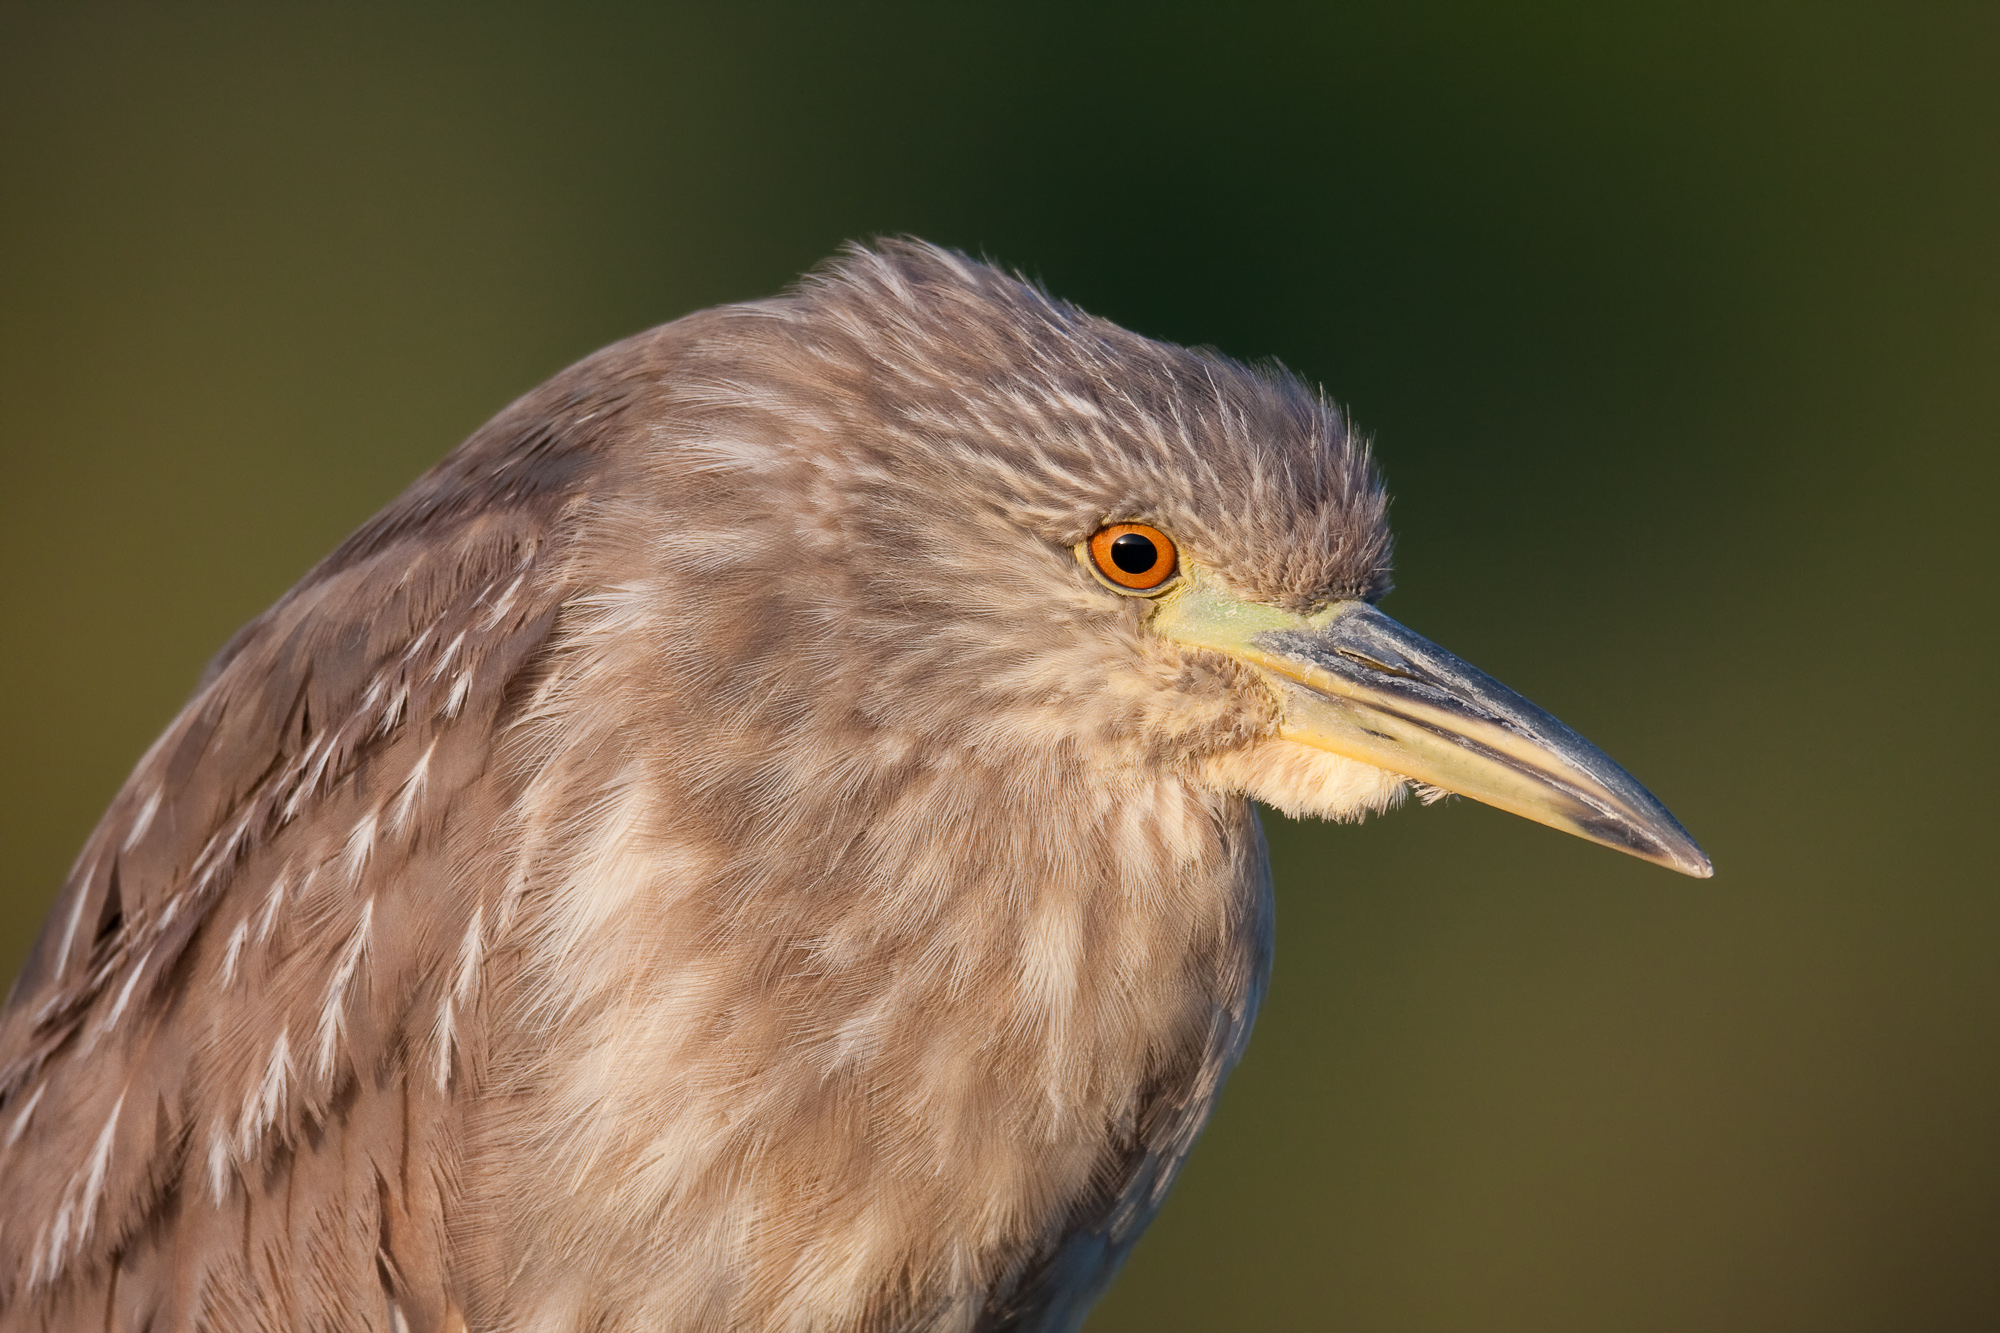
A couple of weeks ago, I got the chance to actually modify my behavior based on this lesson. I was photographing snowy egrets by the water, and had my tripod legs low and splayed out, so as to get my camera close to the ground. I saw a juvenile black-crowned night heron perched atop a short fence, and took the following picture.
Juvenile Black-crowned Night Heron. A small strip of sky is visible at the top of the frame.
I was really focused on its head angle and exposure, and was pretty happy with the result, when I scanned the entire frame and noticed the background. The shallow depth of field gave me a nice solid green, except for a sliver of blue at the top of the frame. While the photo was still good, the sky at the top detracted from the even background. No problem – luckily I had noticed this issue while I was still behind the camera. A quick adjustment to my tripod legs raised my rig to eye-level with the bird, eliminating the sliver of sky, and improving my photo. The resulting image is below.
By moving the camera up, I was able to eliminate the sky, and create a solid smooth green background.
No matter what type of photography you are doing, it always pays to stay attentive to everything in your frame. Usually by simply moving up, down, left or right, you can improve the shot and save yourself a ton of work on the computer.