Isolating nature

A western bluebird perches in front of a red barn

Living in an urban environment, I am often viewing wild things against a backdrop of non-wild habitats. This is especially true of birds, as they perch on anything convenient – fences, lamp posts, roof tops. A constant challenge is to showcase these wild birds without exposing the urban landscape in which they’re found.

A juvenile red-tailed hawk perches on the top of a metal lamp post

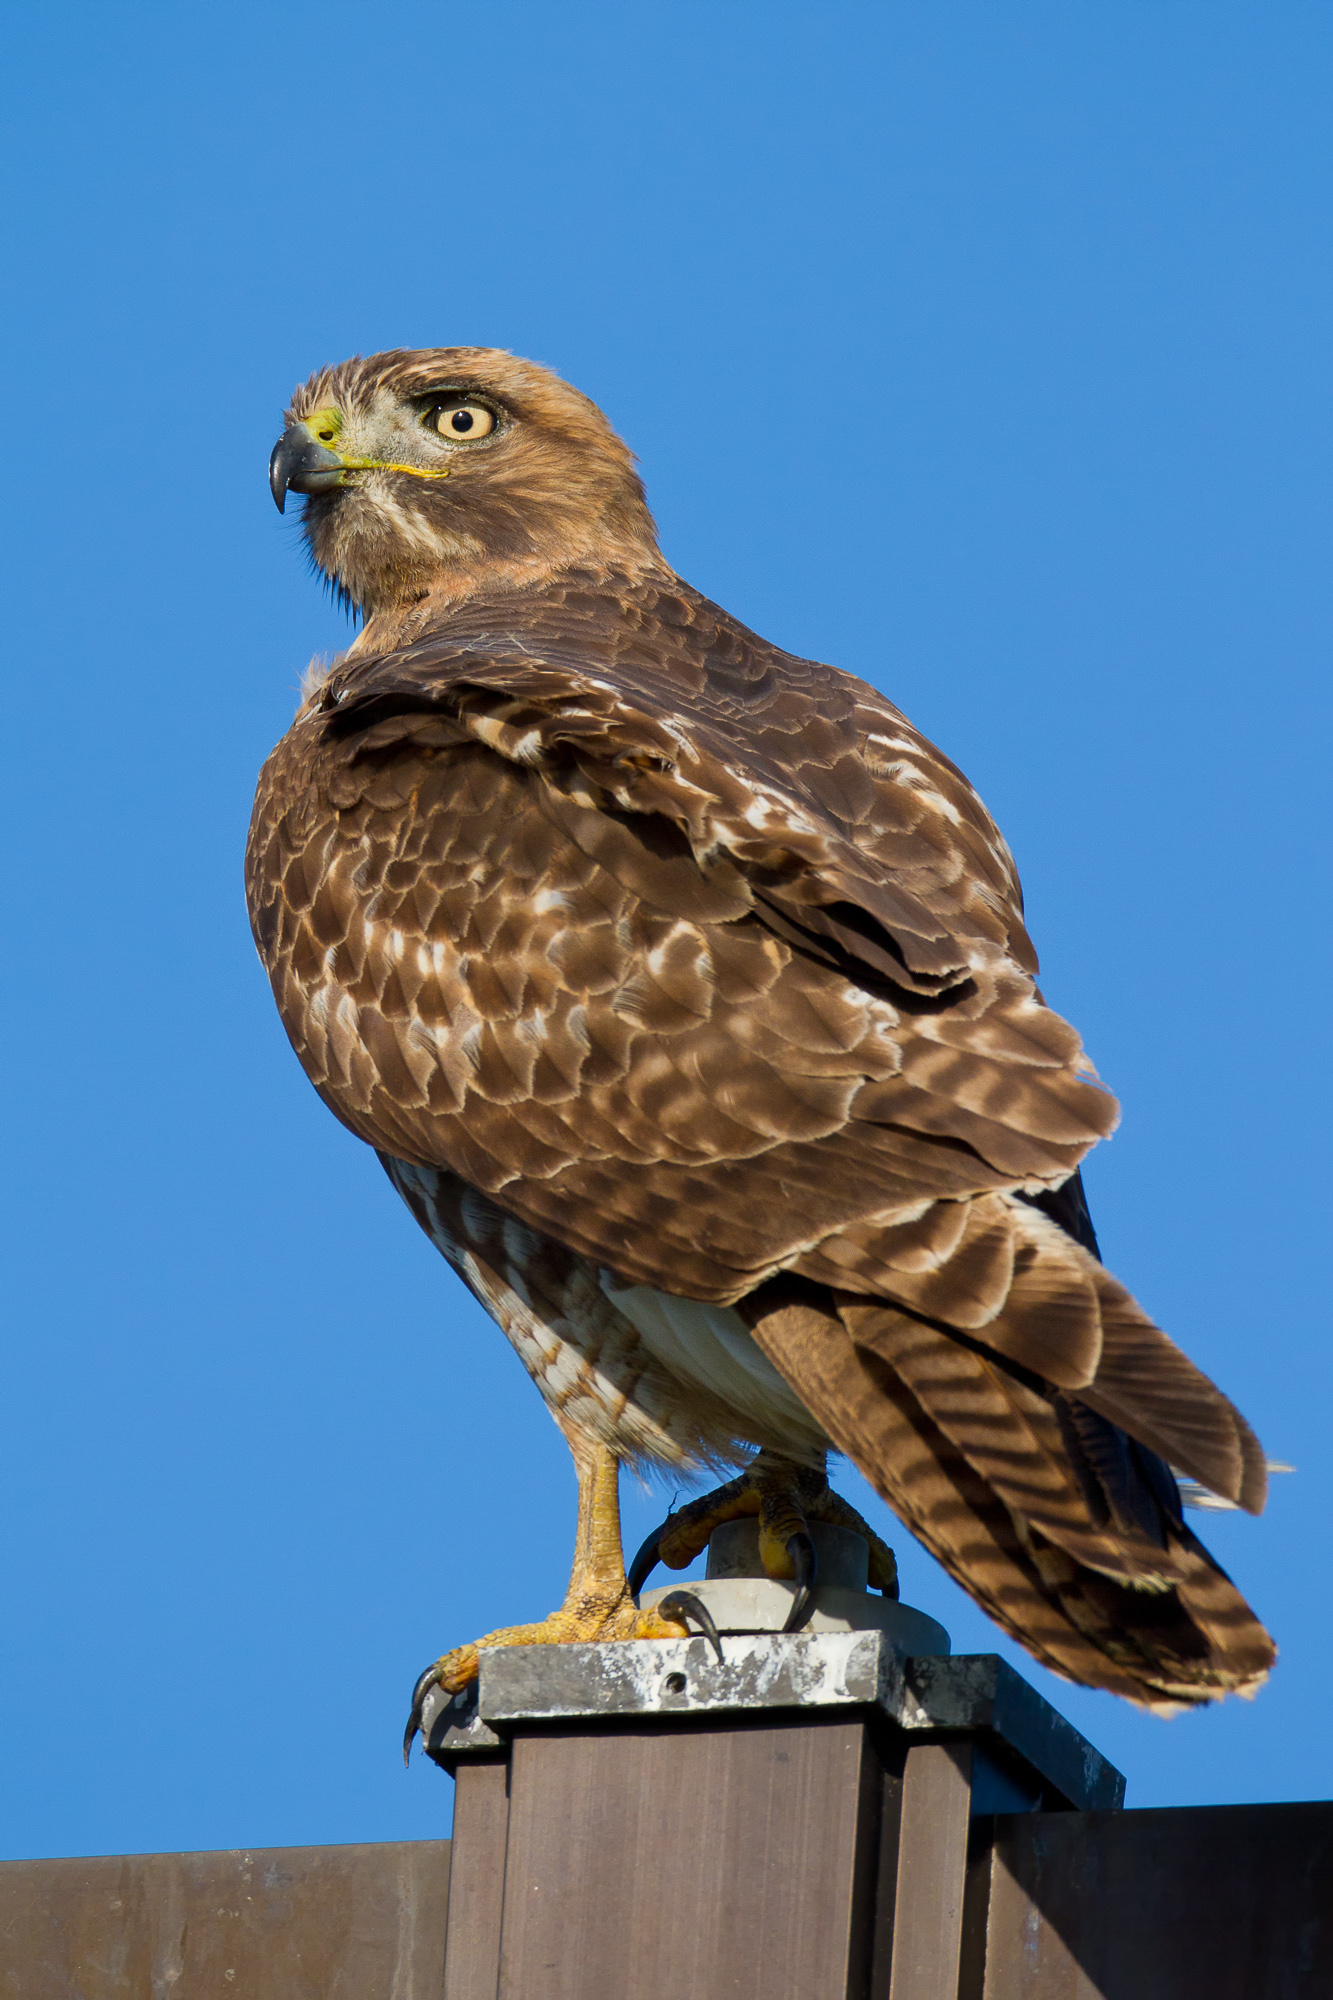
I found this juvenile red-tailed hawk perched at the top of a lamp post, surveying the surrounding grasses for potential prey. He seemed fairly bold (as many juveniles tend to be), and allowed me to approach closely. Several poses later, I wasn’t happy with including this man-made element in my “nature” shot. He’d look much better perched on a scraggly branch of a long-dead tree. But, you must work with what you have. So I tried to move in even closer to eliminate this unnatural element, and create a pleasing head shot of this great bird.

An immature red-tailed hawk looks back over its shoulder

Although this hawk showed no indication of leaving based on my original approach, I still was very slow and methodical about getting closer. The reasoning behind this are twofold. First, I reduce my chances of the hawk getting spooked and leaving. And second (and more important), I don’t stress out the bird, even if he was to remain in place. When approaching any wild animal, always make sure they are comfortable with your presence. If they show signs of stress (with birds, usually a wing flap or calling out), back away!

Eventually, I got close enough to fill the frame with a head and shoulders portrait of the hawk. Composed against blue sky, I’ve successfully removed all man-made elements. The following image shows another technique to eliminate obvious hand-of-man elements, while also using the head shot approach.

A western bluebird perches in front of a red barn

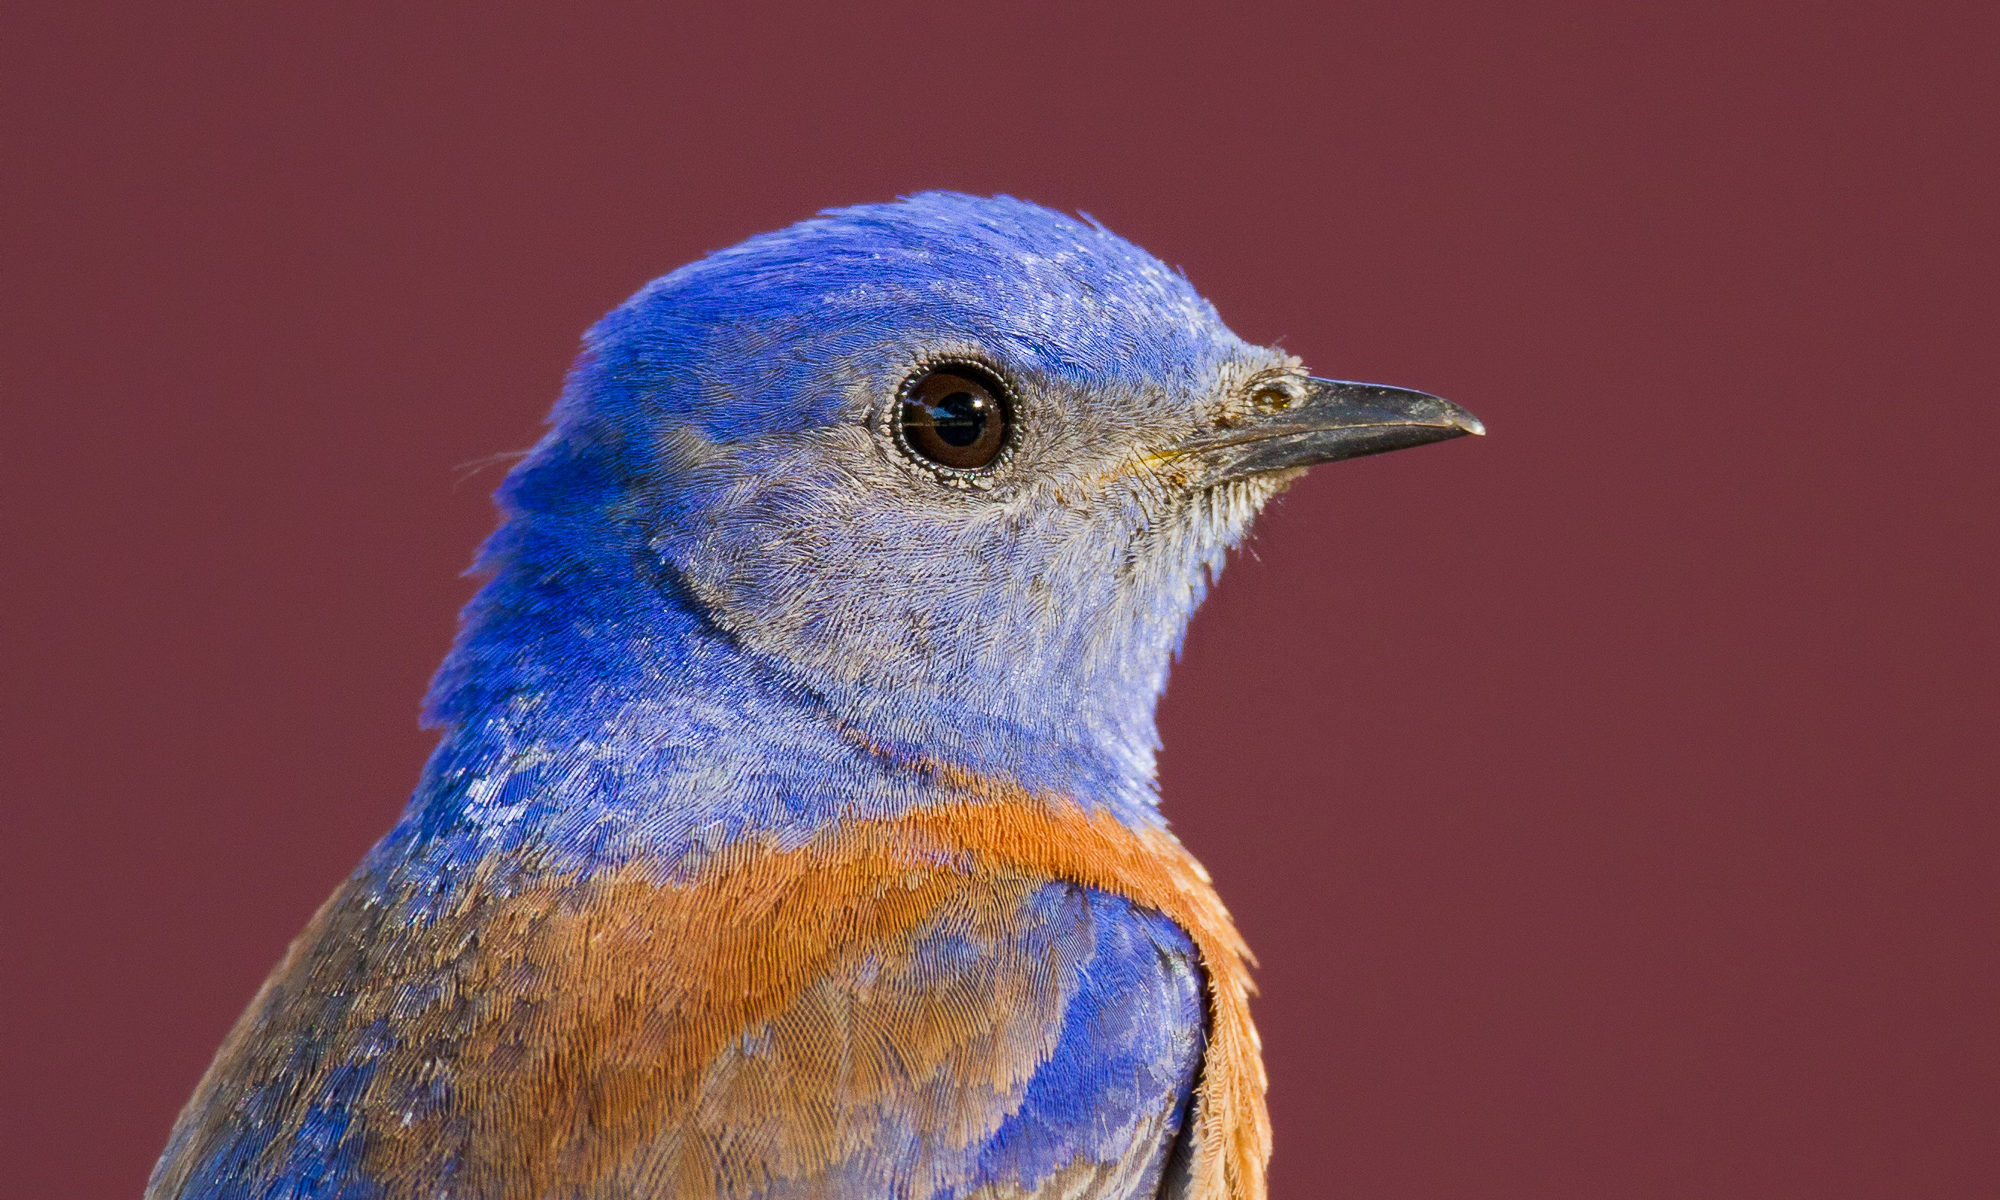
In this instance, a western bluebird was perching on an ugly fence (covered in bird poop) in front of a red barn. The sun angle required I be facing the barn, thus not being able to avoid including it in my background. Once I had framed the bird however, I used an aperture that reduced the barn to a solid red background. Though not exactly natural, I thought it was quite pleasing.

I moved in close to isolate the bird’s head, and removing the fence. This time the target bird was much smaller than the hawk, and I knew that in order to fill the frame with the bird’s head, I needed to be closer than the minimum focusing distance of my lens. I added an extension tube between the lens and my camera, reducing the minimum focusing distance. Luckily this bird was quite used to people (and was probably expecting to be fed!), allowing me to get close enough.

California Quail

A California quail stands next to a flowering bush, Arastradero Preserve, Palo Alto, CA
A California quail stands next to a flowering bush, Arastradero Preserve, Palo Alto, CA. Canon 800mm f/5.6L IS lens with the EOS-7D. ISO 1600. Evaluative metering +1 2/3 EV: 1/160 sec. at f/5.6

The California quail is a very common bird, but one that is difficult to photograph. I usually only see them scampering from underneath one bush to the next, or flushing from a bush with a great commotion (and giving me a heart attack!) if I approach too closely. If there are other people around making any kind of noise, you can forget about any kind of photo. The only shots I have gotten in the past are of a quail streaking off into the forest.

A couple of weeks ago, I lucked upon one poking around for food on the ground out in the open. It was after sunset, and getting dark quickly. I was alone and trying to move quietly, hoping to see some wildlife before they saw me. When I rounded the corner and saw the quail, my heart skipped a beat and I silently lowered my tripod and prepared my camera.

It is then that I made a classic photographer mistake: I failed to recheck all of my camera settings from my previous shots. I had just been shooting a small song bird on a branch, surrounded by bright white sky. This required an exposure compensation of + 1 2/3 stops, in order to prevent the bird from being rendered as a dark silhouette. As soon as I saw the quail, I readjusted all the other important settings (shutter speed, aperture, ISO) but failed to realize I was over exposing. Luckily the magic of shooting in RAW format saved me, and I was able to recover any blown highlights. However, if I had exposed using a lower compensation (probably +1/3 or +2/3 would have worked here), I could have shot faster than the very slow 1/160 seconds that I used here. Thankfully I had locked down the gimbal head and the quail granted me with a brief over-the-shoulder glance, and I was able to come away with a decent shot.

This shot reaffirmed an old lesson – always know your settings. Sometimes if one setting is off, your images may be ruined, and it is not always immediately apparent from the camera’s LCD. I know wildlife photographers who always reset their cameras to a basic setup whenever they are finished photographing a particular subject. This is especially important in situations with varying light conditions. I know I’ll be following that lesson in the future!

Turn a head shot into a portrait

A western scrub jay perches in early morning light
A western scrub jay perches in early morning light. Canon 800mm f/5.6L IS lens with the EOS-7D. ISO 640. Evaluative metering 0 EV: 1/250 sec. at f/6.3

Recently I was out photographing birds when a western scrub jay landed fairly close to me on a wooden post. Even though this was not a species I was targeting that day, I took advantage of this opportunity, and slowly and quietly swung my lens around to point at the bird. He was so close that his head filled my frame.

I took several tight head shots, and decided I also wanted to capture the entire bird, as I had a great background to work with, and wanted to get as many different types of shots as possible. I used the techniques I described in my thinking digitally post, and took several horizontal slices of the bird, knowing that I could stitch them later.

A western scrub jay perches in early morning light
A western scrub jay perches in early morning light. Canon 800mm f/5.6L IS lens with the EOS-7D. ISO 640. Evaluative metering 0 EV: 1/200 sec. at f/6.3

Of course I could have backed up in order to fit the jay’s entire body in the frame, but I didn’t for several reasons. First, I didn’t want to spook the bird by picking up my tripod and walking backward. In this case, the bird came to me, so I hadn’t had to stalk it. Second, being able to stitch multiple frames yields a much larger file size than a single shot, allowing for bigger prints. Finally, being so close to this bird allowed me to capture fine detail in the feathers. If I backed further away, my lens wouldn’t be able to resolve this amount of detail.

Thinking digitally

A juvenile black-crowned night heron perches among reeds along the edge of a pond
A juvenile black-crowned night heron perches among reeds along the edge of a pond. Canon 800mm f/5.6L IS lens with the EOS-7D. ISO 800. Evaluative metering 0 EV: 1/320 sec. at f/8

I little while ago I found myself in a situation in which I could not have gotten the shot I wanted had I been using film. After being tipped off by a friend, I found this nice looking juvenile black-crowned night heron in some reeds next to a pond. The shoreline was such that in order to get the proper frontal lighting on the heron, with a small angle of inclination between the lens view and the ground, I had to be right up close to him. Luckily, he seemed in no hurry to move, nor did he seem to care about my presence. While this distance was great for making tight head shots like the photo above, there was no way I could “back up” and capture any habitat around the bird.

Then I started thinking digitally. I knew that if I was careful in my photographing, I could take multiple photos and stitch them together later, creating the illusion of a wider angle. An added benefit would be a huge image file, which I could later print at very large sizes if I wanted to.

The process of taking the photos was very similar to the process I use for creating stitched panoramas – set the camera to manual exposure, fix the focus so that it is constant for all images, and fire away. The difference was that instead of moving left to right in a single line, my goal was for an aspect ratio close to a normal 35 mm photograph (2:3). In this case, I created two columns of three photos. I didn’t worry about lining up the overlap perfectly – I just eyeballed it.

Note that this only worked because my subject was completely stationary. If the heron was moving at all, the photos would not have lined up well and the stitched image wouldn’t have been successful. It probably took between five to ten seconds to capture all six shots, which I then stitched in Photoshop, creating the 50 megapixel image below.

A juvenile black-crowned night heron perches among reeds along the edge of a pond
Composed of six separate images (two columns of three shots), this stitched photo is 50 megapixels. Canon 800mm f/5.6L IS lens with the EOS-7D. ISO 800. Evaluative metering 0 EV: 1/250 sec. at f/8

Even though I found myself in a position where I was “too close” (don’t worry, I’m not complaining – its a GREAT problem to have!), I was able to think digitally to solve my problem. By combining multiple shots, I was able to virtually “back up” and capture a wider shot of the heron.

Copyright 2017 Hank Christensen